- SQL拆分字段内容(含分隔符)
- 云计算基础、Issa、Pssa、Saas区别
- -bash: hadoop: 未找到命令
- 初始SpringBoot:详解特性和结构
- 【解读Kubernetes架构】全面指南,带你掌握Kubernetes
- idea 2023版本创建maven管理的Scala项目教程
- SQL Server数据库日志查看若已满需要清理的三种解决方案
- YOLOv7保姆级教程!(个人踩坑无数)----环境配置
- 【项目实战经验】DataKit迁移MySQL到openGauss(下)
- GmSSL-3.1.1编译
- MySQL中的SET数据类型详解
- 数据库的基本知识(mysql)
- 使用Navicat导出导出 MySQL 数据库表结构、表数据到Exce
- 虚幻引擎架构自动化及蓝图编辑器高级开发进修班
- IDEA搭建spring boot时报错Error: Request
- Mac清理软件cleanmymac x4.14.4破解版,2024年有
- Windows中网络适配器里的VMnet1和VMnet8出现感叹号怎么
- IntelliJ IDEA 2023.3 的 AI Assistant
- 前端(四)——vue.js、vue、vue2、vue3
- 如何借助Idea创建多模块的SpringBoot项目
- Spring AOP(1)
- MySQL中的SQL高级语句[一](上篇)
- SQL Server2022版+SSMS安装(保姆级)
- 搭建第一个Web服务器(在eclipse或idea上部署Tomcat服
- 【数据结构】链表面试题
- 关于postgresql 报错there is no unique o
- springboot 实现登录注册
- Java项目:基于Springboot框架实现的校园求职招聘系统(sp
- Spring Boot学习随笔- 集成MyBatis-Plus(二)条
- 高级Java开发工程师手把手教你用AI人工智能帮你写JAVA代码实际案
摘要: 本文将介绍如何创建一个自定义的 Spring Boot Starter,让您可以封装常用功能和配置,并在多个 Spring Boot 项目中共享和重用。
1. 简介
Spring Boot Starter 是 Spring Boot 框架中的一种特殊的依赖项,它用于快速启动和配置特定功能的应用程序。Starter 实际上是一个 Maven 或 Gradle 项目,它包含了一组预配置的依赖项、默认的配置信息和自动配置类,以帮助开发者快速集成和使用某项功能。
Spring Boot Starter 通常命名为 spring-boot-starter-*,例如 spring-boot-starter-web 用于启动基本的Web应用程序,spring-boot-starter-data-jpa 用于启动使用JPA的数据访问应用程序。
2.背景
在企业微服务开发中,每个微服务模块可能会有不同的异常处理和错误信息输出方式,这样会导致系统的一致性和可维护性下降。为了解决这个问题,您希望创建一个自定义的 Spring Boot Starter,用于统一处理异常和错误信息,并提供一致的错误响应格式。
3.需求
-
统一的异常处理:对于常见的异常类型(如 404、500),提供统一的异常处理方式,并返回一致的错误响应。
-
统一的错误响应格式:定义一致的错误响应格式,包括错误代码、错误消息、错误详情等信息。
-
可定制化:允许开发人员根据实际情况定制异常处理和错误响应的方式,以满足不同的业务需求。
4.实现
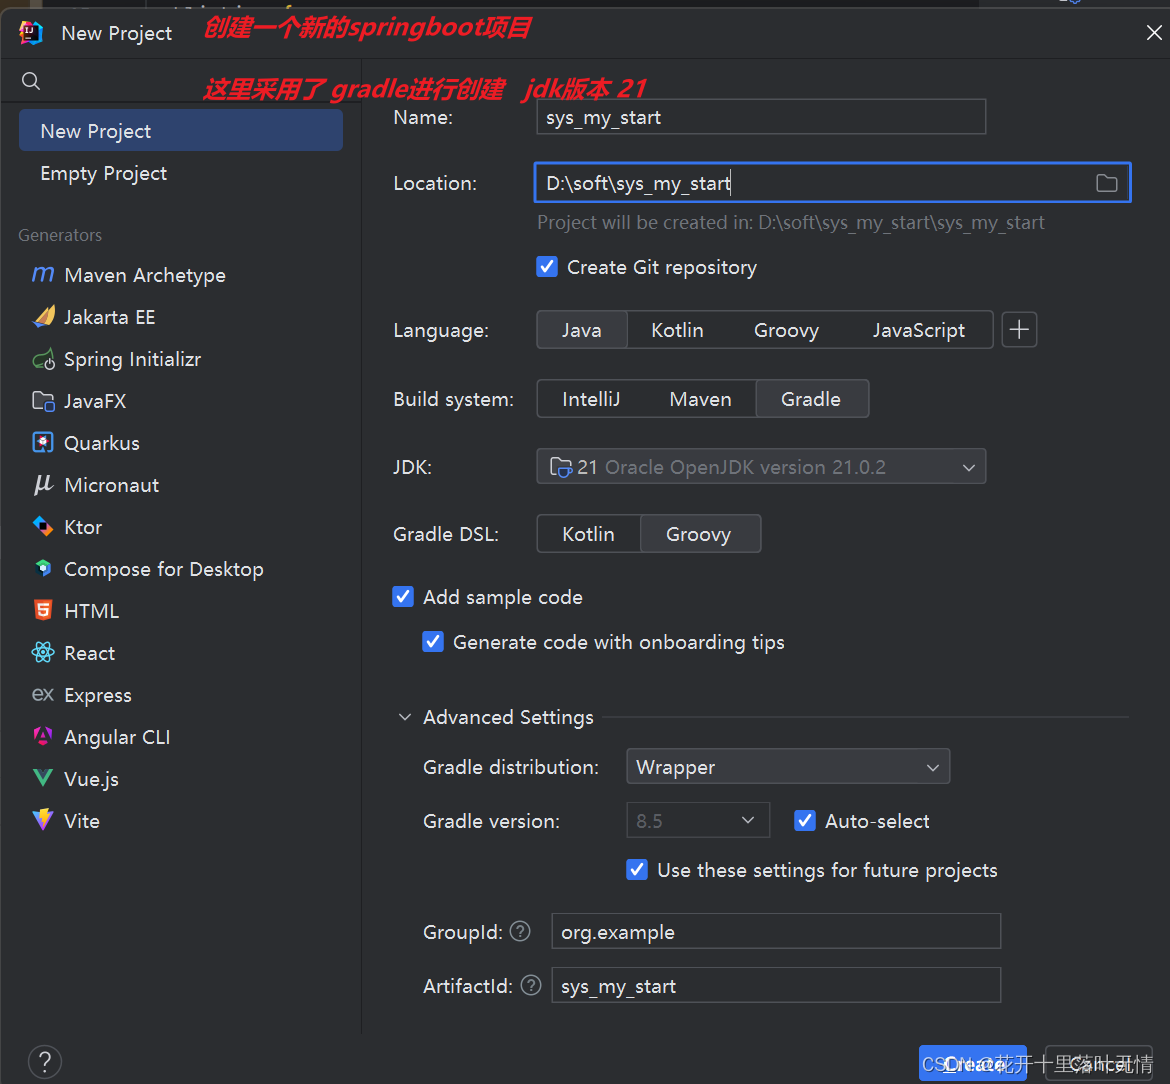
4.1.创建SpringBoot项目

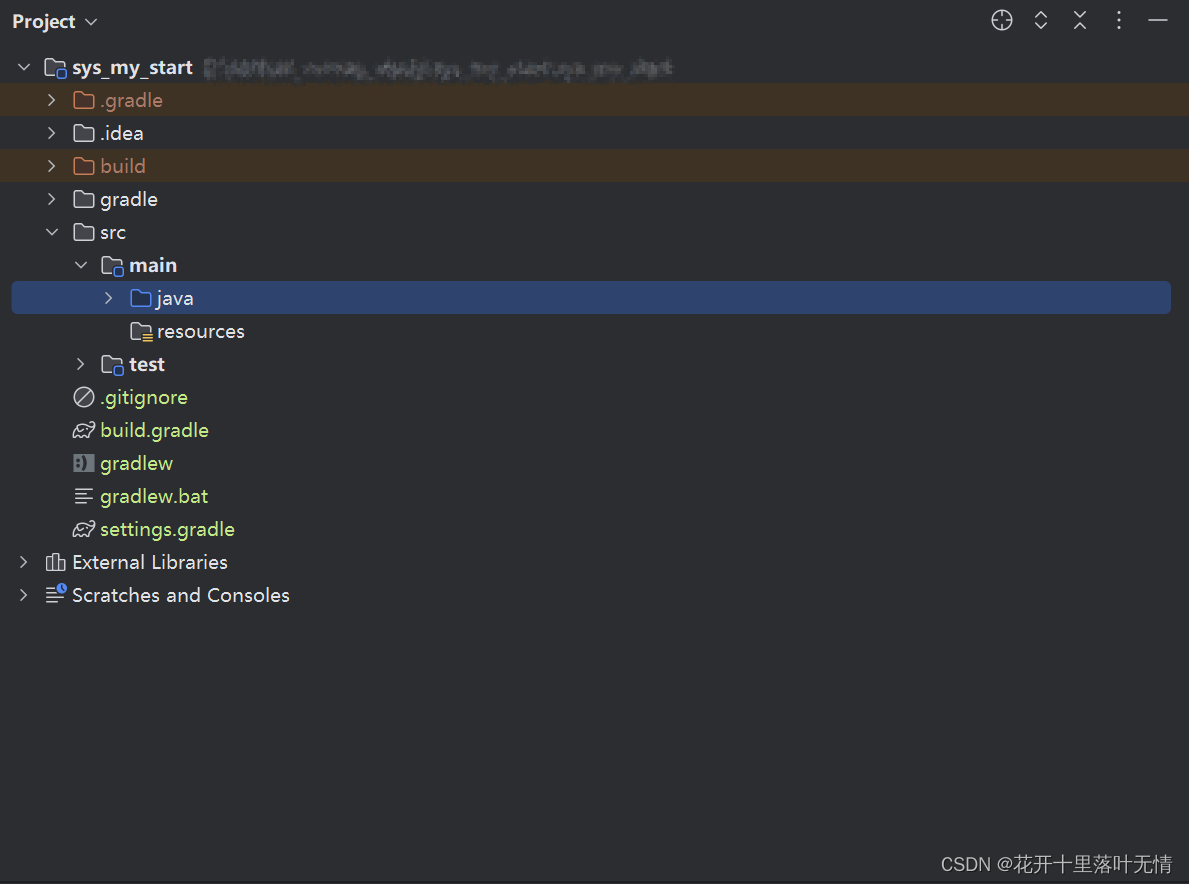
创建完成后项目结构

4.2.添加相关依赖
这里需要注意的是,在build.gradle文件中,我们在这里引入了 id 'java-library'
plugins {
    id 'java'
    // 添加 maven-publish 插件 主要是为了发布项目到 Maven 仓库
    id 'maven-publish'
    // 应用 Java Library 插件,提供 Java 项目的基本构建功能
    id 'java-library'
}
group = 'org.sys_my_start'
version = '1.0-SNAPSHOT'
ext {
    springfoxVersion = '3.2.2'
}
// 配置发布任务
publishing {
    // 定义发布内容
    publications {
        // 定义一个 MavenPublication 类型的发布
        mavenJava(MavenPublication) {
            // 发布内容来源于 Java 组件
            from components.java
            // 定义 Maven 坐标信息
            groupId 'org.sys_my_start' // Maven 项目的组织或公司标识
            artifactId 'com_sys_my_start' // 项目在 Maven 仓库中的唯一标识
            version '1.0-SNAPSHOT' // 项目的版本号,表示开发中的版本
        }
    }
}
repositories {
    mavenCentral()
}
/*  api: 这个依赖声明范围表示该依赖项不仅仅对当前项目的编译和运行时可见,而且对于其他依赖于当前项目的项目也是可见的。
    换句话说,当一个项目依赖于当前项目时,它也将自动获得该依赖项。(也就是最外层的可以访问最内层所引入的依赖)
    上面引入这个 也是为了使用api 因为 gradle 7.0 以后默认不支持 compile语法了废弃了,所以我们这里需要使用api
    id 'java-library'
*/
dependencies {
    api "org.springframework.boot:spring-boot-starter-web:$springfoxVersion"
}
test {
    useJUnitPlatform()
}
4.3.编写Starter 主要逻辑
4.3.1.编写异常处理类
package com.sys.my.start.exception;
import org.springframework.beans.factory.annotation.Autowired;
import org.springframework.http.HttpStatus;
import org.springframework.http.ResponseEntity;
import org.springframework.web.bind.annotation.ControllerAdvice;
import org.springframework.web.bind.annotation.ExceptionHandler;
import org.springframework.web.context.request.WebRequest;
@ControllerAdvice
public class GlobalExceptionHandler {
    private final ExceptionHandlerProperties properties;
    @Autowired
    public GlobalExceptionHandler(ExceptionHandlerProperties properties) {
        this.properties = properties;
    }
    /**
     * 处理自定义异常
     * @param ex 自定义异常
     * @param request 请求
     * @return ResponseEntity 返回异常信息
     */
    @ExceptionHandler(Exception.class)
    public ResponseEntity handleAnyException(Exception ex, WebRequest request) {
        if (properties.isEnabled()) {
            // 处理自定义异常, 返回异常信息
            ErrorResponse errorResponse = new ErrorResponse("500", ex.getMessage(), request.getDescription(false));
            return new ResponseEntity<>(errorResponse, HttpStatus.INTERNAL_SERVER_ERROR);
        } else {
            // 未启用全局异常处理 返回500
            return new ResponseEntity<>(HttpStatus.INTERNAL_SERVER_ERROR);
        }
    }
}
4.3.2.编写错误响应类
package com.sys.my.start.exception;
/**
 * 定义统一错误相应格式
 */
public class ErrorResponse {
    /**
     * 错误码
     */
    private String errorCode;
    /**
     * 错误信息
     */
    private String errorMessage;
    /**
     * 错误详情
     */
    private String errorDetails;
    public ErrorResponse(String number, String message, String description) {
        this.errorCode = number;
        this.errorMessage = message;
        this.errorDetails = description;
    }
    public String getErrorCode() {
        return errorCode;
    }
    public String getErrorMessage() {
        return errorMessage;
    }
    public String getErrorDetails() {
        return errorDetails;
    }
    public void setErrorCode(String errorCode) {
        this.errorCode = errorCode;
    }
    public void setErrorMessage(String errorMessage) {
        this.errorMessage = errorMessage;
    }
    public void setErrorDetails(String errorDetails) {
        this.errorDetails = errorDetails;
    }
}
4.3.3.编写扫描配置文件类
package com.sys.my.start.exception;
import org.springframework.boot.context.properties.ConfigurationProperties;
import org.springframework.stereotype.Component;
/**
 * 扫描 exception-handler:
 *      enabled: true
 * 为true时,启用全局异常处理
 */
@Component
@ConfigurationProperties(prefix = "exception-handler")
public class ExceptionHandlerProperties {
    private boolean enabled;
    public boolean isEnabled() {
        return enabled;
    }
    public void setEnabled(boolean enabled) {
        this.enabled = enabled;
    }
}
4.3.4.编写自动配置类
package com.sys.my.start.exception;
import org.slf4j.Logger;
import org.slf4j.LoggerFactory;
import org.springframework.context.annotation.Configuration;
import org.springframework.context.annotation.EnableAspectJAutoProxy;
import org.springframework.context.annotation.Import;
import java.lang.invoke.MethodHandles;
/**
 * 自动配置类
 * 通过@Import导入相关文件
 * EnableAspectJAutoProxy开启AOP代理自动配置
 * @author 13723
 * @version 1.0
 * 2024/2/16 19:16
 */
@Configuration
@EnableAspectJAutoProxy(
		exposeProxy = true
)
@Import({ExceptionHandlerProperties.class})
public class ErrorHandlerAutoProxy {
	private static final Logger logger = LoggerFactory.getLogger(MethodHandles.lookup().lookupClass());
}
4.3.5.编写spring.factories
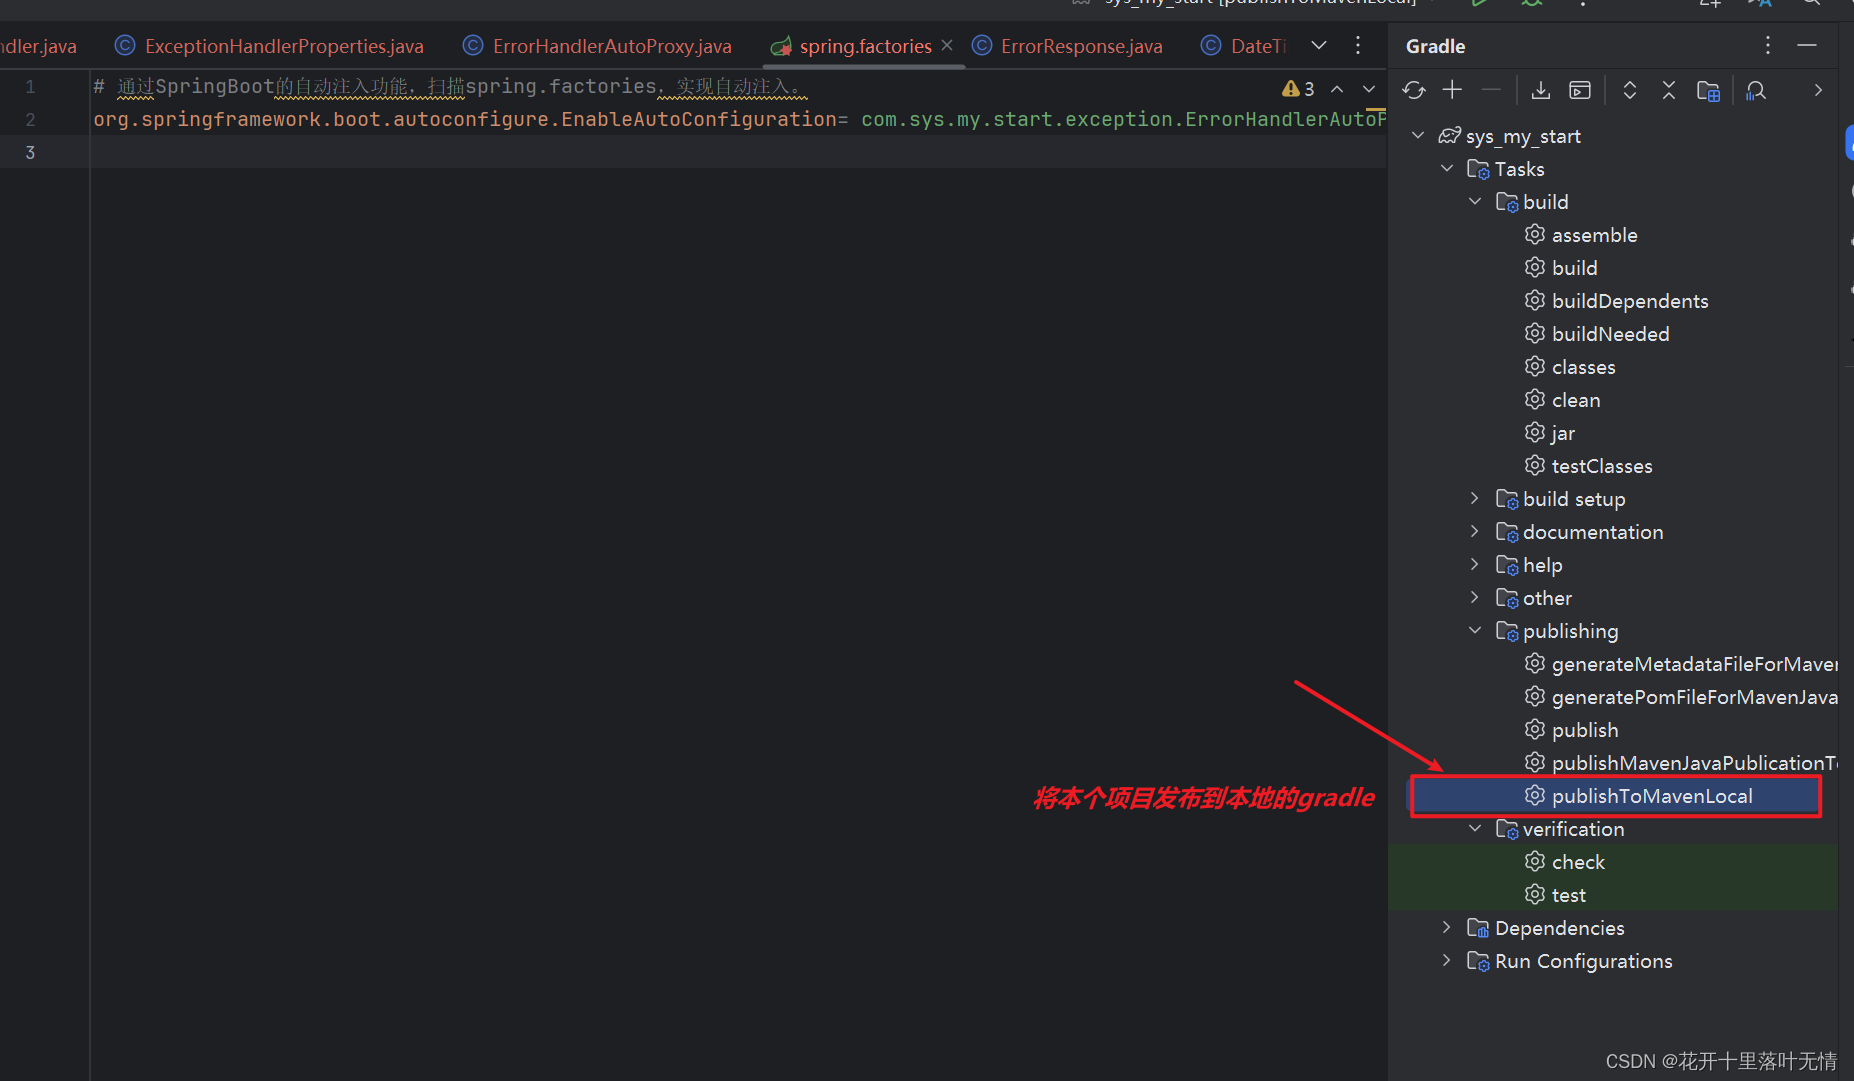
# 通过SpringBoot的自动注入功能,扫描spring.factories,实现自动注入。
org.springframework.boot.autoconfigure.EnableAutoConfiguration= com.sys.my.start.exception.ErrorHandlerAutoProxy
4.3.6.发布到本地gradle

5.测试
5.1.测试模块引入starter
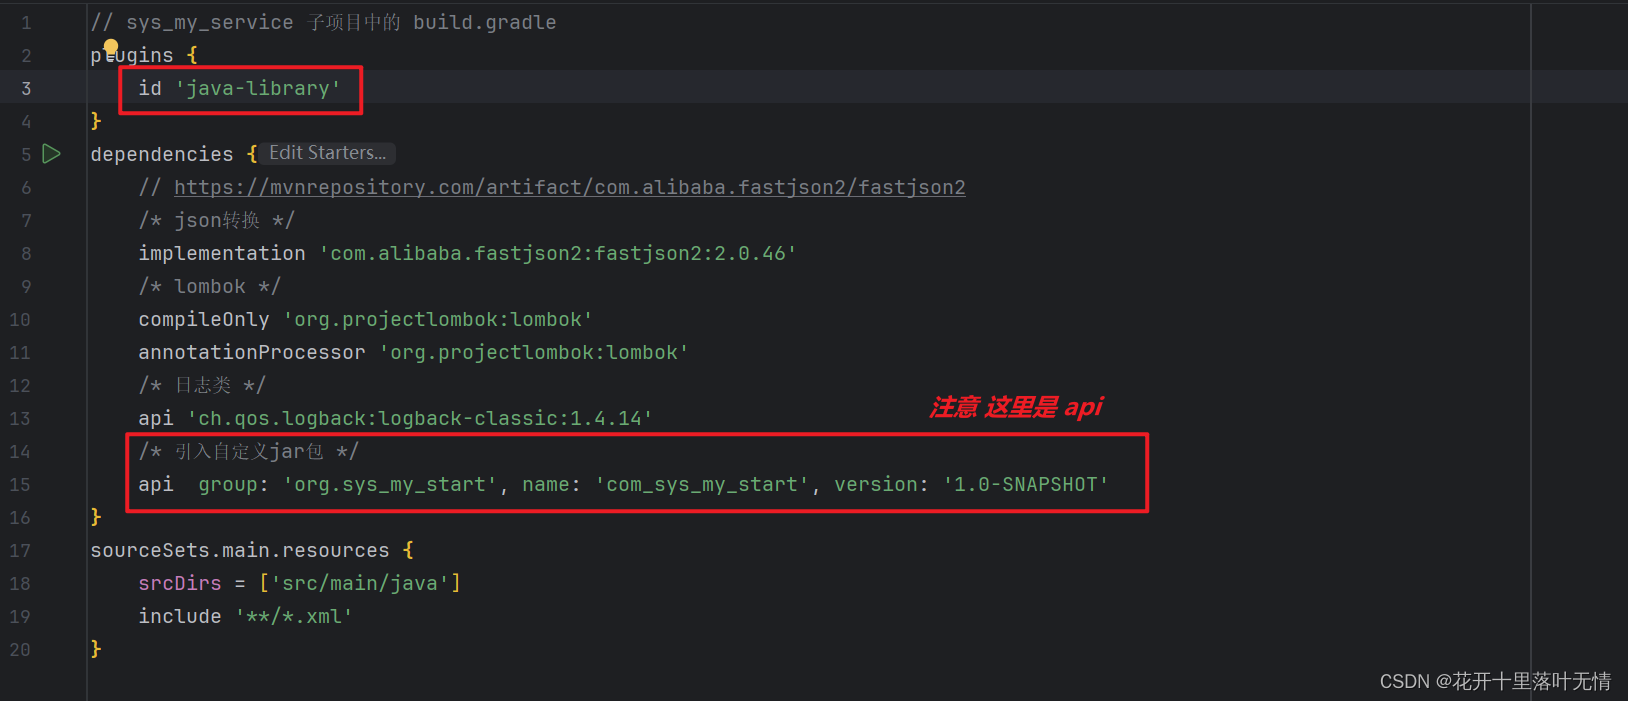
注意 这里为了保证测试的service模块能够使用到 starter引入springboot依赖,也需要使用api进行调用
// sys_my_service 子项目中的 build.gradle
plugins {
    id 'java-library'
}
dependencies {
    // https://mvnrepository.com/artifact/com.alibaba.fastjson2/fastjson2
    /* json转换 */
    implementation 'com.alibaba.fastjson2:fastjson2:2.0.46'
    /* lombok */
    compileOnly 'org.projectlombok:lombok'
    annotationProcessor 'org.projectlombok:lombok'
    /* 日志类 */
    api 'ch.qos.logback:logback-classic:1.4.14'
    /* 引入自定义jar包 */
    api  group: 'org.sys_my_start', name: 'com_sys_my_start', version: '1.0-SNAPSHOT'
}
sourceSets.main.resources {
    srcDirs = ['src/main/java']
    include '**/*.xml'
}


5.2.编写测试代码
/**
 * @author 13723
 * @version 1.0
 * 2024/2/16 13:32
 */
@RestController
@RequestMapping("/test")
public class TestController {
	private static final Logger logger = LoggerFactory.getLogger(MethodHandles.lookup().lookupClass());
	@Resource
	private TestService testService;
	@RequestMapping("/hello")
	public String hello(){
		return testService.hello();
	}
}
/**
 * @author 13723
 * @version 1.0
 * 2024/2/16 13:33
 */
@Service
public class TestService {
	private static final Logger logger = LoggerFactory.getLogger(MethodHandles.lookup().lookupClass());
	public String hello(){
		throw new RuntimeException("测试统一返回异常!");
	}
}
5.3.测试结果


6.总结
6.1.好处
自定义 Starter 是在 Spring Boot 中实现代码模块化和功能封装的强大工具。它的优势和用途包括:
- 模块化开发: 自定义 Starter 允许将应用程序的不同功能模块化,使得代码结构更清晰,易于维护和管理。
- 功能封装: Starter 可以封装特定功能的代码和配置,使得其他开发人员可以轻松地集成和使用这些功能。
- 提高开发效率: 使用自定义 Starter 可以加速新项目的开发过程,避免重复编写相似的代码,提高开发效率。
- 标准化配置: Starter 可以定义标准化的配置方式,使得不同项目之间的配置更一致,降低了配置错误的可能性。
通过自定义 Starter,开发团队可以实现代码的复用和标准化,从而提高了代码的复用性和可维护性,降低了开发和维护成本。
6.2.结语
本文介绍了如何创建自定义的 Spring Boot Starter,并详细解释了其优势、用途以及如何提高代码复用性和可维护性。通过自定义 Starter,开发人员可以更轻松地构建模块化的应用程序,并在团队内部实现功能的共享和复用。
鼓励读者在实际项目中尝试创建自己的自定义 Starter,将通用的功能模块化,并通过开源社区与他人分享,促进技术的共享和交流。这将有助于提高团队的开发效率,加速项目的上线和迭代过程,推动软件开发行业的发展。


