- 伪分布式hadoop+spark+scala 超详细搭建
- K8S--安装metrics-server,解决error: Metr
- jenkins+gitlab配置
- 动态规划的一个初步学习
- 【无线网络技术】——无线局域网(学习笔记)
- Docker进阶:容器与镜像的导入和导出
- 数据结构 -> 时间复杂度和空间复杂度的计算(做题助推器)
- IDEA实现ssh远程连接本地Linux服务器
- 亮数据代理IP轻松解决爬虫数据采集痛点
- 数字乡村创新实践探索农业现代化与乡村振兴新路径:科技赋能农村全面振兴与
- 宝塔面板安装Python和Flask(新版Python项目)
- C++项目工程(包含opencv库以及项目的依赖库移植)编译成andr
- 【Linux系列】Linux判断架构信息
- Python江苏南京二手房源爬虫数据可视化系统设计与实现
- 如何在SpringBoot集成mapstruct实现类型转换?一篇文章
- 手把手教你打造自己的 AI 虚拟主播
- 【python】flask中蓝图使用方法详细解析
- 主流Golang框架对比以及介绍
- SQL INSERT INTO 语句(在表中插入)
- 超简单的正则表达式从入门到精通
- 微信公众平台配置提示“token验证失败”(几乎全部踩坑贴,Sprin
- springboot 查看和修改内置 tomcat 版本
- Python 内置函数 float() 详解
- 篮球竞赛|基于Springboot的篮球竞赛预约平台系统设计与实现(源
- Spring之BeanPostProcessor
- 【python】flask结合SQLAlchemy,在视图函数中实现对
- Java IO与NIO-Java内存管理-Java虚拟机(JVM)-J
- 【Spring框架】一篇文章带你彻底搞懂Spring解决循环依赖的底层
- 【MySQL】超详细MySQL常用日期格式转换函数、字符串函数、聚合函
- Springer Latex投稿(编写中遇到问题及解决方案)
1)LNMP 架构
LNMP 是指一组通常一起使用来运行动态网站或者服务器的自由软件名称首字母缩写。L 指 Linux,N指 Nginx,M一般指 MySQL,也可以指 MariaDB,P 一般指 PHP,也可以指 Perl 或 Python。
1. LNMP 介绍
LNMP 代表的就是:Linux 系统下 Nginx+MySQL+PHP 这种网站服务器架构。
- Linux 是一 类 Unix 计算机操作系统 的统称,是目前最流行的免费操作系统。
代表版本有:Debian、CentOS、Ubuntu、Fedora、Gentoo 等。
- Nginx (engine x) 是一个 高性能的 HTTP 和反向代理 Web 服务器,同时也提供了 IMAP/POP3/SMTP 服务。其特点是占有内存少,并发能力强,事实上 nginx 的并发能力在同类型的网页服务器中表现较好。
- MySQL 是一种开放源代码的 关系型数据库管理系统(RDBMS),使用最常用的数据库管理语言 – 结构化查询语言(SQL)进行数据库管理。MySQL 不仅是开放源代码的,也因为其速度、可靠性和适应性而备受关注。大多数人都认为在不需要事务化处理的情况下,MySQL是管理内容最好的选择。
- PHP 即 超文本预处理器,是一种通用开源脚本语言。PHP是在服务器端执行的脚本语言,与C语言类似,是常用的网站编程语言。因为PHP的开源性、免费性、快捷性等特点使其成为目前最流行的编程语言。
2. 优点
四种软件均为 免费开源软件,组合到一起,成为一个免费、高效、扩展性强的网站服务系统。
Nginx 使用更少的资源,支持更多的并发连接,体现更高的效率。
Nginx 既可以在内部直接支持 Rails 和 PHP,也可以支持作为 HTTP 代理服务器对外进行服务。
Nginx 安装非常的简单,配置文件非常简洁(还能够支持perl语法)。Nginx 支持平滑加载新的配置,还能够在不间断服务的情况下进行软件版本的升级。
3. LNMP 工作原理
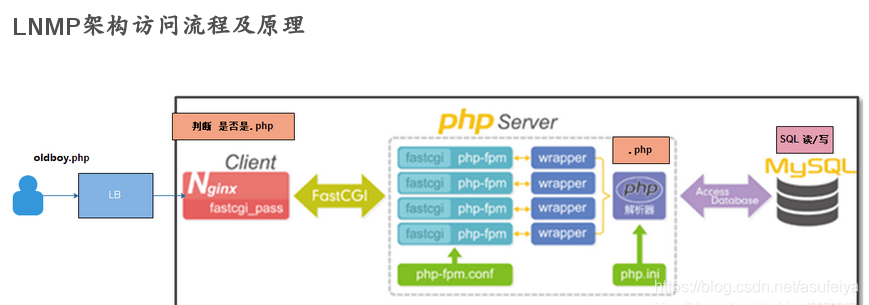
**第一步:**用户在浏览器输入 域名或者IP 访问网站
第二步:用户在访问网站的时候,向 Web 服务器 发出 http request 请求,服务器响应并处理 Web 请求,返回静态网页资源,如 CSS、Picture、Video 等,然后缓存在用户主机上。
第三步:服务器调用动态资源,PHP 脚本调用 fastCGI 传输给 php-fpm,然后 php-fpm 调用 PHP 解释器进程解析 PHP 脚本。
第四步:出现大流量高并发情况,PHP 解析器也可以开启多进程处理高并发,将解析后的脚本返回给 php-fpm,然后 php-fpm 再调给 Fast-cgi 将脚本解析信息传送给 Nginx,服务器再通过 http response 传送给用户浏览器。
第五步:浏览器再将服务器传送的信息进行解析与渲染,呈现给用户。
4. FastCGI
4.1 什么是 CGI
CGI 全称 “通用网关接口”(Common Gateway Interface),用于 HTTP 服务器与其它机器上的程序服务通信交流的一种工具,CGI 程序须运行在网络服务器上。
传统 CGI 接口方式的主要缺点是性能较差,因为每次 HTTP 服务器遇到动态程序时都需要重启解析器来执行解析,然后结果被返回给 HTTP 服务器。这在处理高并发访问几乎是不可用的,因此就诞生了 FastCGI。另外传统的 CGI 接口方式安全性也很差。
4.2 什么是 FastCGI
FastCGI 是一个可伸缩地、高速地在HTTP服务器和动态脚本语言间通信的接口(FastCGI接口在 Linux 下是socket(可以是文件socket,也可以是ip socket)),主要优点是把动态语言和HTTP服务器分离开来。多数流行的HTTP服务器都支持FastCGI,包括Apache、Nginx和lightpd。
同时,FastCGI 也被许多脚本语言所支持,比较流行的脚本语言之一为PHP。FastCGI接口方式采用C/S架构,可以将HTTP服务器和脚本解析服务器分开,同时在脚本解析服务器上启动一个或多个脚本解析守护进程。当HTTP服务器每次遇到动态程序时,可以将其直接交付给FastCGI进程执行,然后将得到的结构返回给浏览器。这种方式可以让HTTP服务器专一地处理静态请求或者将动态脚本服务器的结果返回给客户端,这在很大程度上提高了整个应用系统的性能。
FastCGI 的重要特点:
- FastCGI 是 HTTP 服务器和动态脚本语言间通信的接口或者工具。
- FastCGI 优点是把动态语言解析和 HTTP 服务器分离开来。
- Nginx、Apache、Lighttpd 以及多数动态语言都支持 FastCGI。
- FastCGI 接口方式采用C/S架构,分为客户端(HTTP服务器)和服务端(动态语言解析服务器)。
- PHP 动态语言服务端可以启动多个FastCGI的守护进程。
- HTTP 服务器通过 FastCGI 客户端和动态语言 FastCGI 服务端通信。
4.3 Nginx FastCGI 的运行原理
Nginx 不支持对外部动态程序的直接调用或者解析,所有的外部程序(包括PHP)必须通过FastCGI接口来调用。
FastCGI 接口在 Linux 下是 socket(可以是文件 socket,也可以是 ip socket)。为了调用CGI程序,还需要一个FastCGI 的 wrapper,这个 wrapper 绑定在某个固定 socket 上,如端口或者文件 socket。
当Nginx将CGI请求发送给这个socket的时候,通过 FastCGI 接口,wrapper 接收到请求,然后派生出一个新的线程,这个线程调用解释器或者外部程序处理脚本并读取返回数据;接着,wrapper再将返回的数据通过FastCGI 接口,沿着固定的 socket 传递给 Nginx;最后,Nginx 将返回的数据发送给客户端,这就是Nginx+FastCGI 的整个运作过程。
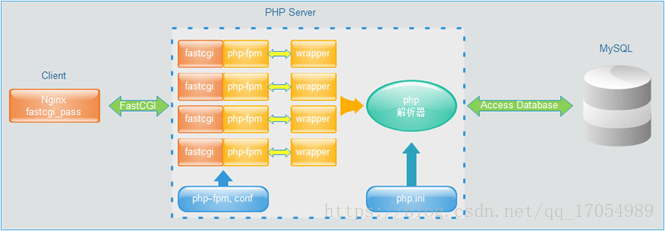
FastCGI 的主要优点是把动态语言和 HTTP 服务器分离开来,是 Nginx 专一处理静态请求和向后转发动态请求,而 PHP/PHP-FPM 服务器专一解析PHP动态请求。
5. 实战部署 LNMP 架构(基于 Yum 部署 WordPress 站点)
环境说明:
系统 主机名 IP 服务 CentOS7 Web01 10.0.59.114 NGINX、PHP、WordPress CentOS7 MySQL 10.0.59.115 MySQL 5.1)Nginx 服务
《 LNMP + WordPress 部署 》
1. Nginx 服务部署:
1.1 配置 nginx 官方 yum 源
vim /etc/yum.repos.d/nginx.repo
[nginx-stable]
name=nginx stable repo
baseurl=http://nginx.org/packages/centos/$releasever/$basearch/
gpgcheck=1
enabled=1
gpgkey=https://nginx.org/keys/nginx_signing.key
1.2 基于 yum 安装 nginx 软件
yum install -y nginx
1.3 启动 nginx 服务, 检查服务是否正常启用
systemctl start nginx
systemctl enable nginx
systemctl status nginx
1.4 关闭防火墙 and SELinux
systemctl stop firewalld
systemctl disable firewalld
setenforce 0
1.5 基于 Web 访问验证 nginx 服务
'出现 Welcome to nginx! 则成功访问到 Nginx 资源'
1.6 修改 nginx 进程所有者
useradd -s /sbin/nologin -M www
vim /etc/nginx/nginx.conf
user www;
systemctl reload nginx

5.2)MySQL 服务
2. Mysql 服务安装:
2.1 安装数据库软件		< '也可以部署在 Web01 同机器' >
yum install mariadb-server mariadb -y
2.2 启动数据库服务
systemctl start mariadb.service
systemctl enable mariadb.service
systemctl status mariadb.service
2.3 给 MySQL 数据库服务设置密码
mysqladmin -u root password 'P@ssw0rd123456' # 设置 MySQL 数据库服务密码
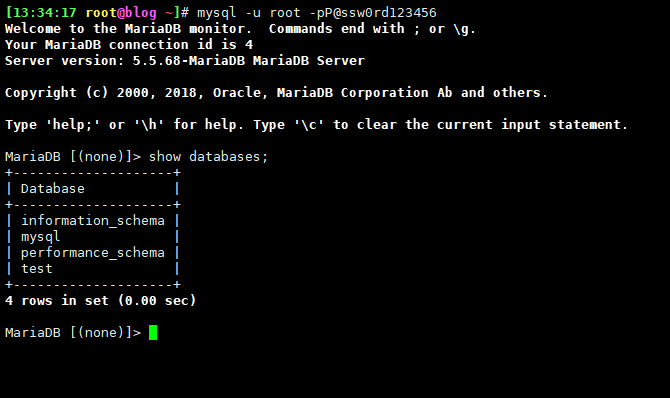
2.4 验证
mysql -u root -pP@ssw0rd123456
5.3)PHP 服务
3. PHP 服务部署:
3.1 更新 yum 源/卸载系统自带的 PHP 软件
yum remove php-mysql php php-fpm php-common
rpm -Uvh https://dl.fedoraproject.org/pub/epel/epel-release-latest-7.noarch.rpm
rpm -Uvh https://mirror.webtatic.com/yum/el7/webtatic-release.rpm
3.2 安装 PHP 软件
yum install -y php71w php71w-cli php71w-common php71w-devel php71w-embedded php71w-gd php71w-mcrypt php71w-mbstring php71w-pdo php71w-xml php71w-fpm php71w-mysqlnd php71w-opcache php71w-pecl-memcached php71w-pecl-redis php71w-pecl-mongodb
3.3 编写配置文件
vim /etc/php-fpm.d/www.conf
8 user = www			# 第八行
10 group = ww			# 第十行
PS: 保证 nginx 进程的管理用户和 PHP 服务进程的管理用户保持一致
3.4 启动 PHP 服务
systemctl start php-fpm
systemctl enable php-fpm
systemctl status php-fpm
4. 实现 LNMP 之间建立联系
1. 实现 nginx + php 建立关系
1.1 编写 nginx 文件
// 编写 nginx 配置文件
vim /etc/nginx/conf.d/default.conf
server {
    listen 80;
    server_name localhost;
    location / {
        root /usr/share/nginx/html;
        index index.html index.htm;
    }
    error_page 500 502 503 504 /50x.html;
    location = /50x.html {
        root /usr/share/nginx/html;
    }
    location ~ \.php$ { 							# 把下面所有注释取消
        root /usr/share/nginx/html; 	# 修改站点目录
        fastcgi_pass 127.0.0.1:9000;
        fastcgi_index index.php;
        fastcgi_param SCRIPT_FILENAME $document_root$fastcgi_script_name; # 修改配置
        include fastcgi_params;
    }
}
// 重启 nginx 服务
nginx -t
systemctl restart nginx
1.2 编写动态资源文件
[root@web01 conf.d] vim /usr/share/nginx/html/test.php

1.3 基于 Web 访问验证
http://10.0.59.114/test.php
5.4)WordPress 服务
2. 部署搭建网站页面
2.1 将代码解压, 将解压后信息放入到站点目录中
[root@web01 ~] cd /usr/share/nginx/html && wget https://cn.wordpress.org/latest-zh_CN.zip
[root@web01 html] unzip wordpress-6.3.2-zh_CN.zip
50x.html index.html test_php.php wordpress
2.2 编辑 nginx 配置文件, 修改站点目录
vim /etc/nginx/conf.d/default.conf
server {
    listen 80;
    server_name localhost;
    location / {
        root /usr/share/nginx/html/wordpress; 	# 修改站点目录
        index index.html index.htm index.php;
    }
    error_page 500 502 503 504 /50x.html;
    location = /50x.html {
        root /usr/share/nginx/html;
    }
    location ~ \.php$ {
        root /usr/share/nginx/html/wordpress; 	# 修改站点目录
        fastcgi_pass 127.0.0.1:9000;
        fastcgi_index index.php;
        fastcgi_param SCRIPT_FILENAME $document_root$fastcgi_script_name;
        include fastcgi_params;
    }
}
// 重新加载 nginx
[root@web01 html] nginx -t
[root@web01 html] systemctl reload nginx
2.3 修改站点目录权限
[root@web01 html] chown -R www.www wordpress/
2.4 对数据库服务进行配置
[root@web01 html] mysql -uroot -pP@ssw0rd123456
创建数据库: create database wordpress;
检查: show databases;
创建数据库管理用户: grant all on wordpress.* to 'wordpress'@'%' identified by 'P@ssw0rd123456';
刷新数据库: flush privileges;
检查: select user,host from mysql.user;
2.5 登录网页, 初始化配置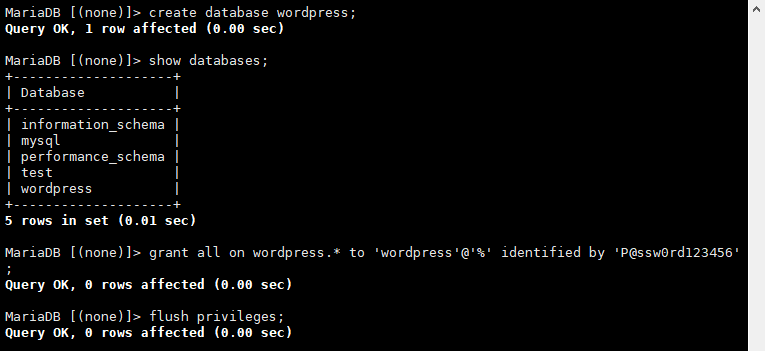
访问:http://10.0.59.114/
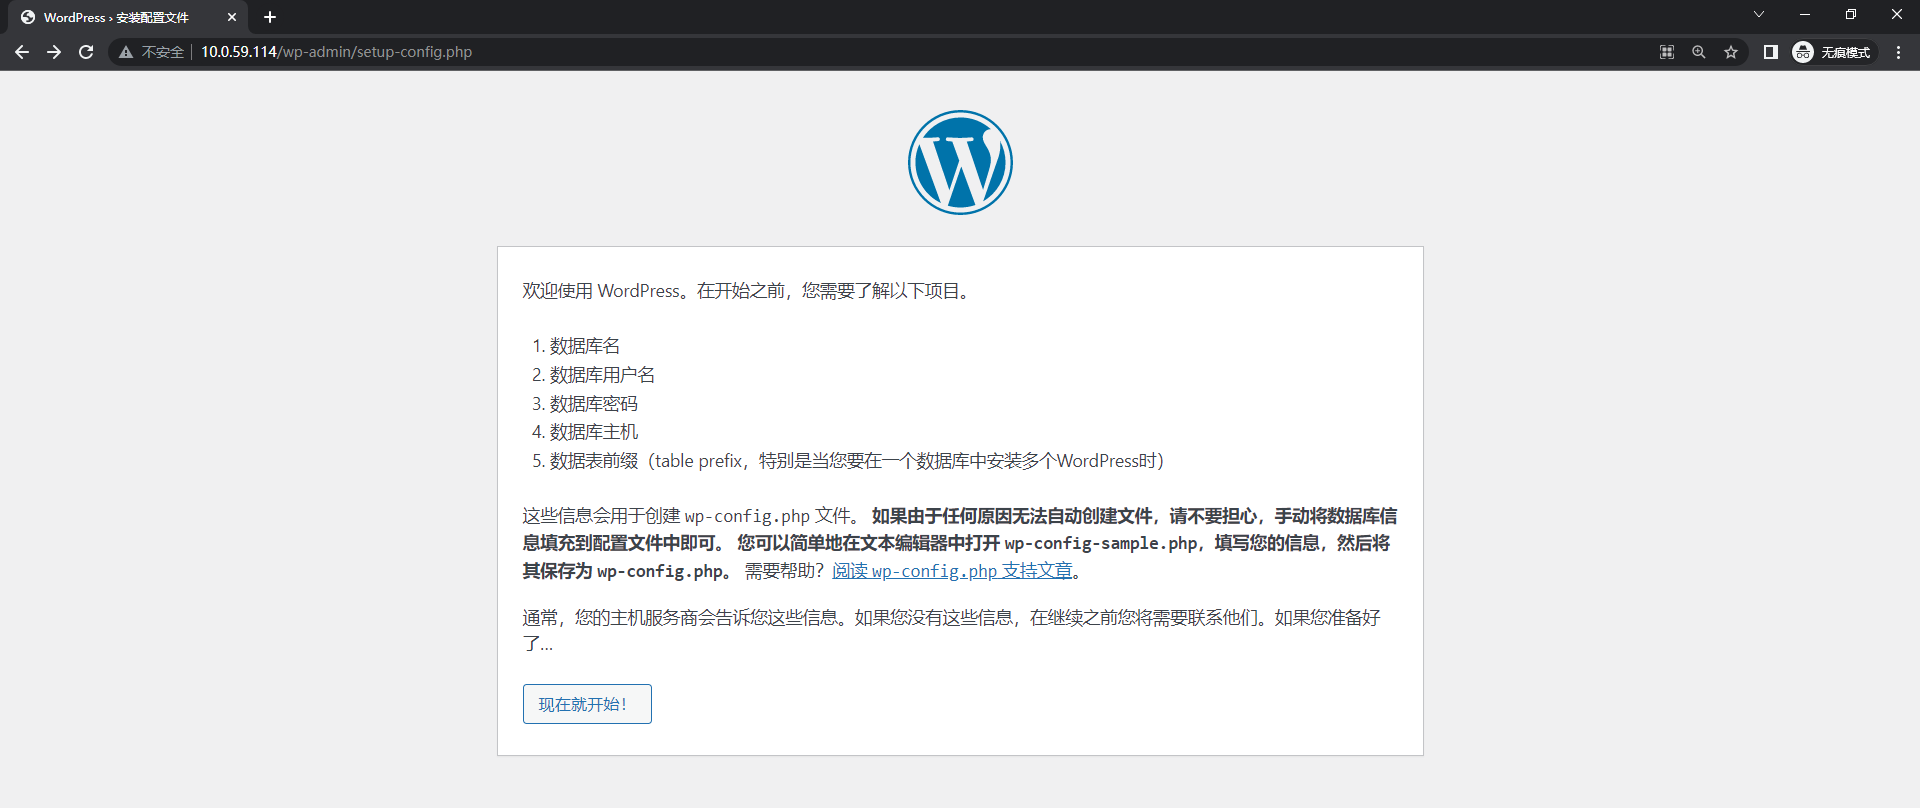
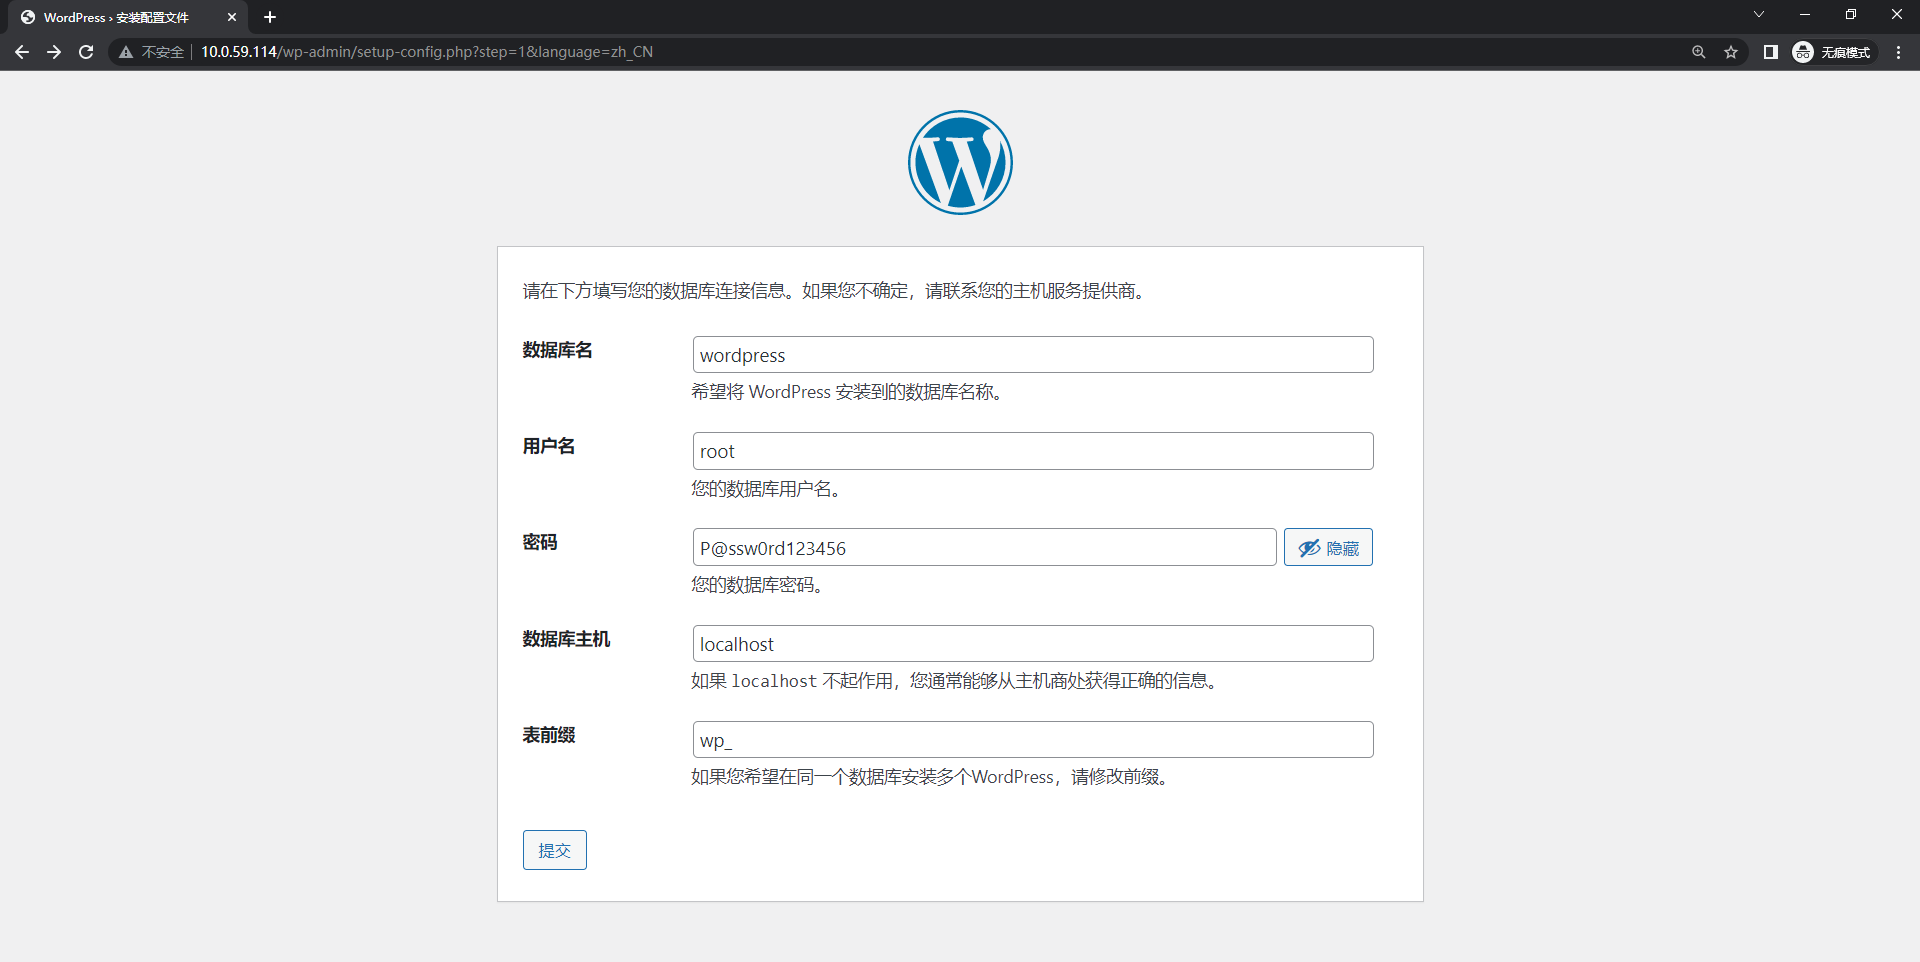
填写 数据库信息
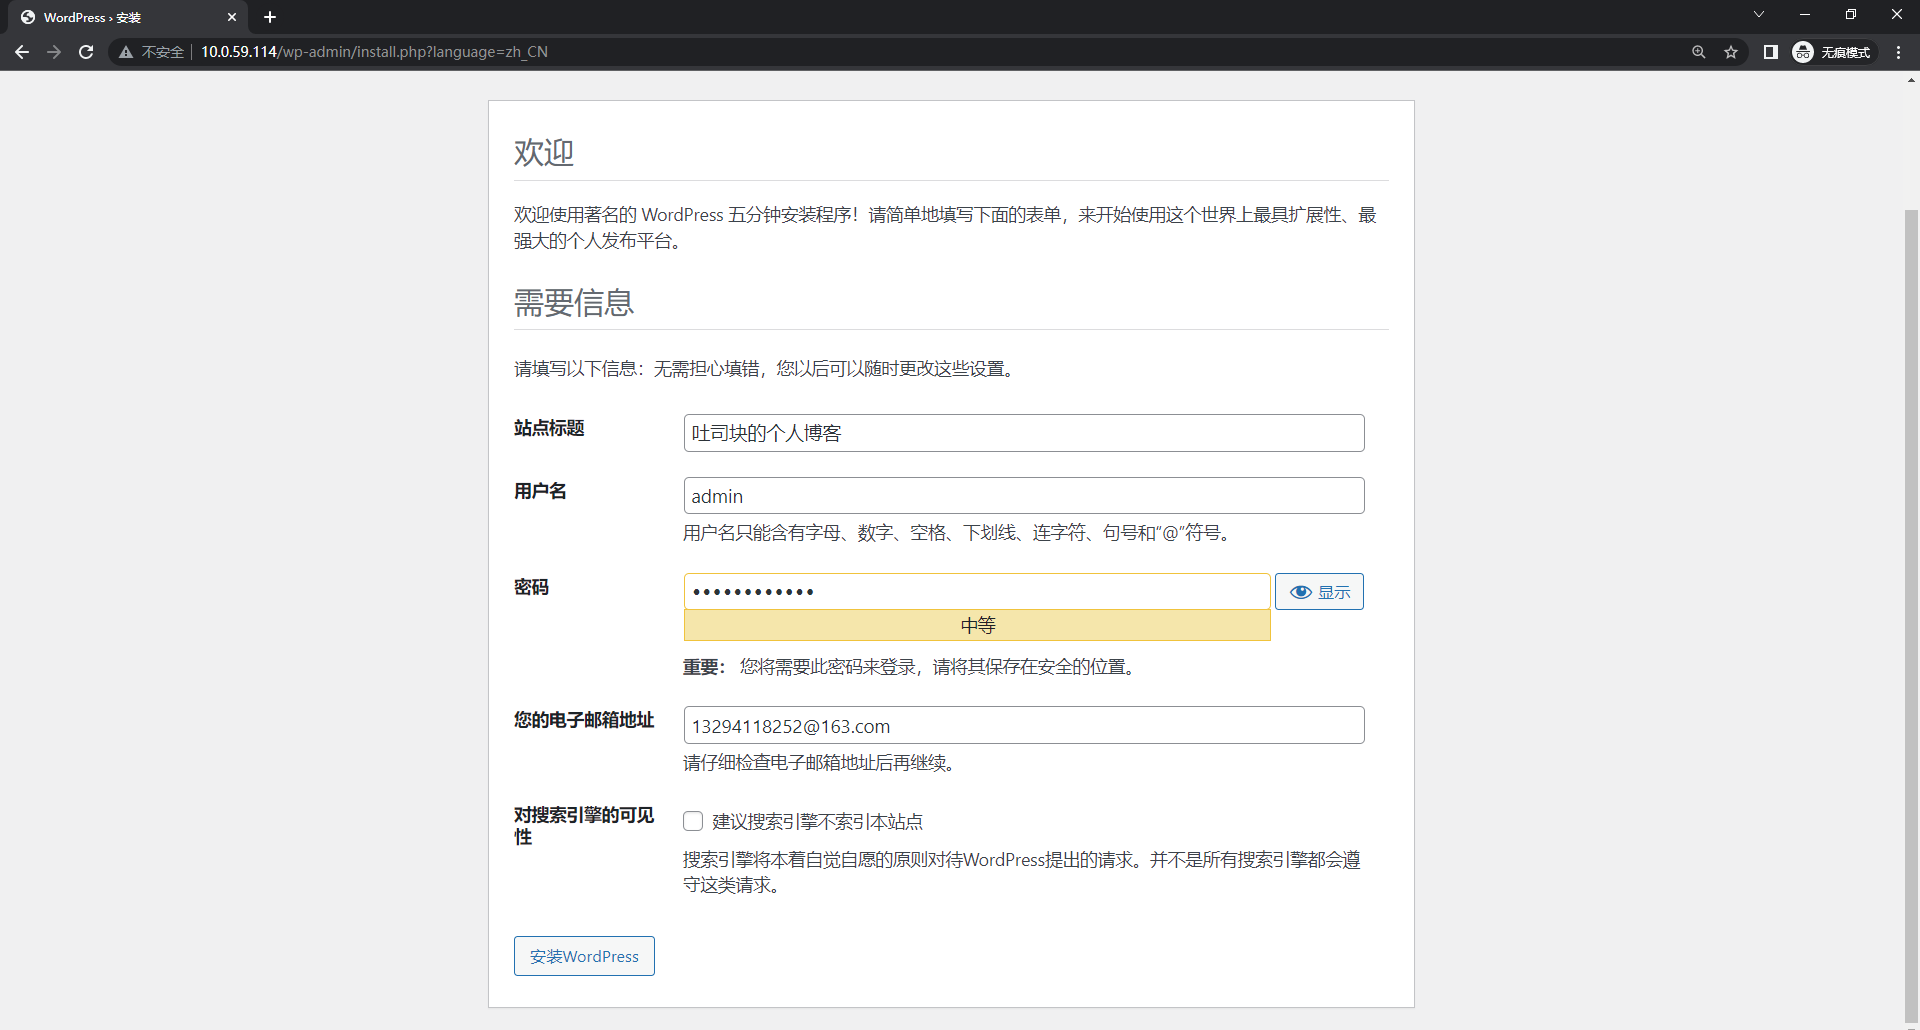
运行 安装程序

填写 站点信息
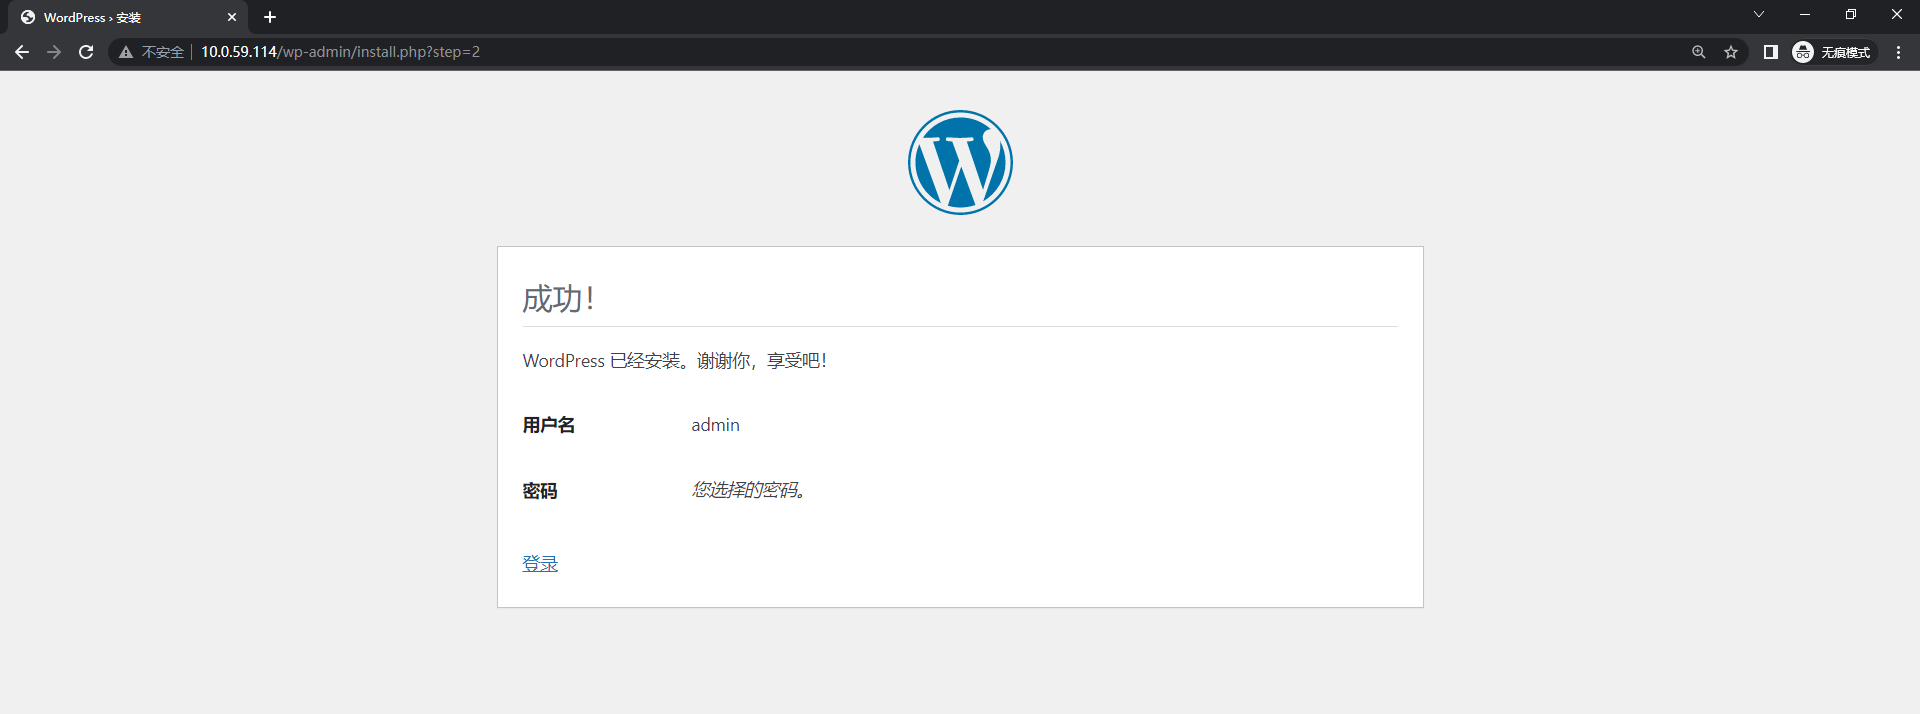
完成
管理后台
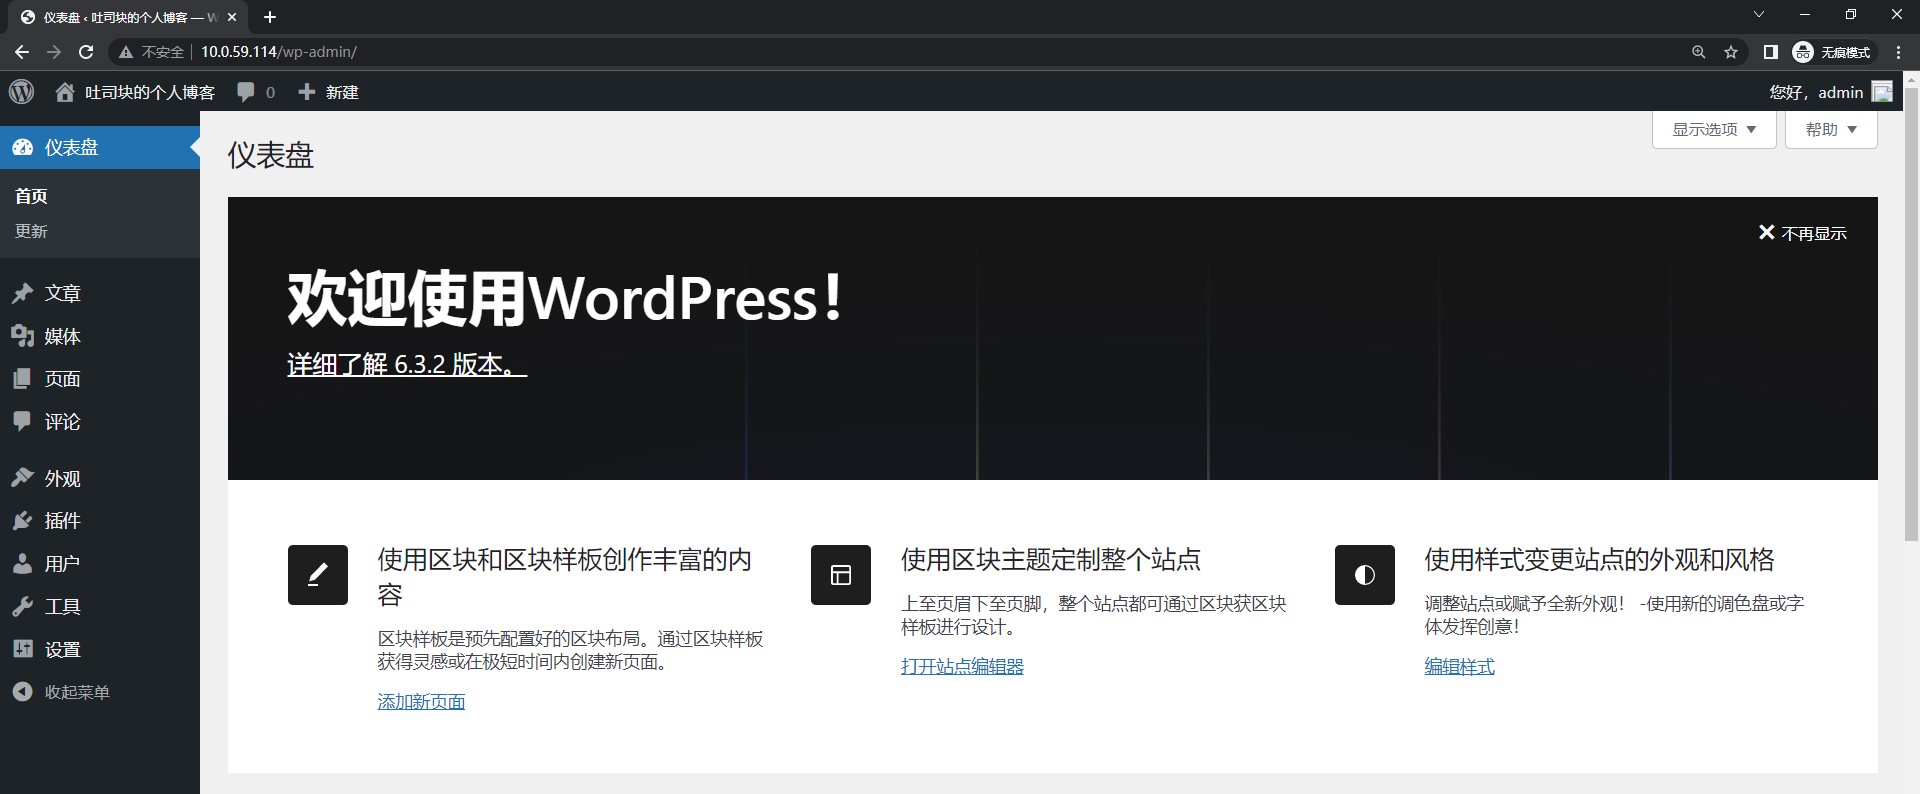
大功告成~


