- 掌握Go语言:Go语言类型转换,解锁高级用法,轻松驾驭复杂数据结构(3
- Kubernetes(K8s)与虚拟GPU(vGPU):实现高效管理和
- Python副业技术总结,手把手教你用宝塔面板部署Django程序
- 查看mysql 或SQL server 的连接数,mysql超时、最大
- SQL LIKE 运算符:用法、示例和通配符解释
- Python进阶(一)(MySQL,Navicat16免费安装)
- 使用Node.js搭建服务器
- 微信公众平台配置提示“token验证失败”(几乎全部踩坑贴,Sprin
- Java八股文(Spring Boot)
- 【算法专题】FloodFill 算法
- java.lang.NoClassDefFoundError: org
- Matlab方程组拟合【案例源码+视频教程】
- SQL拆分字段内容(含分隔符)
- 2024最新!一文看懂Spring Batch批处理(大白话版,干货满
- idea2023专业版安装破解+maven配置教程
- 速学数据结构 | 用队列实现栈你都被难住了?那是你没掌握好技巧
- 【数据结构】链表面试题
- .Net4.0 Web.config 配置实践
- 【postgresql 基础入门】入门教程成形了,八大章节,涵盖库,表
- 智慧工地管理平台APP源码基于物联网、云计算、大数据等技术
- Nginx使用教程
- 分布式WEB应用中会话管理的变迁之路
- SQL中 JOIN 的两种连接类型:内连接(自然连接、自连接、交叉连接
- 12.Mysql 多表数据横向合并和纵向合并
- springboot + vue 前后端加密传输 RSA互相加解密、加
- Python+Mysql实现登录注册
- MySQL 中内连接、左连接、右连接有什么区别?
- Python淘宝书籍图书销售数据爬虫可视化分析大屏全屏系统
- 用Python手把手教你实现一个爬虫(含前端界面)
- go: go.mod file not found in curren

Nginx配置文件位置
源码编译安装方式
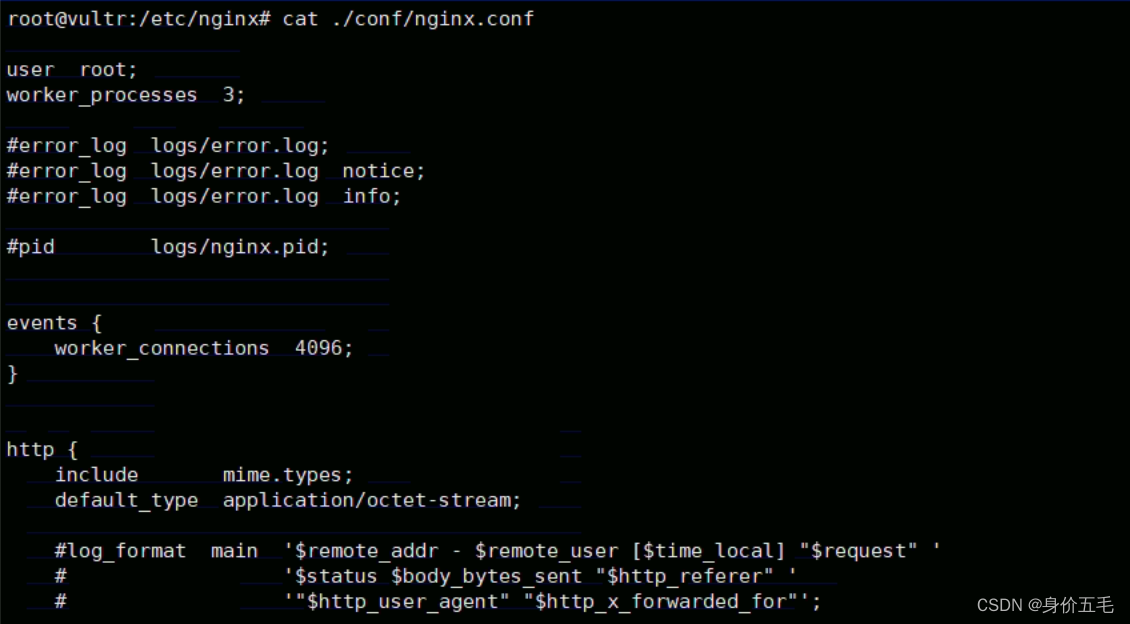
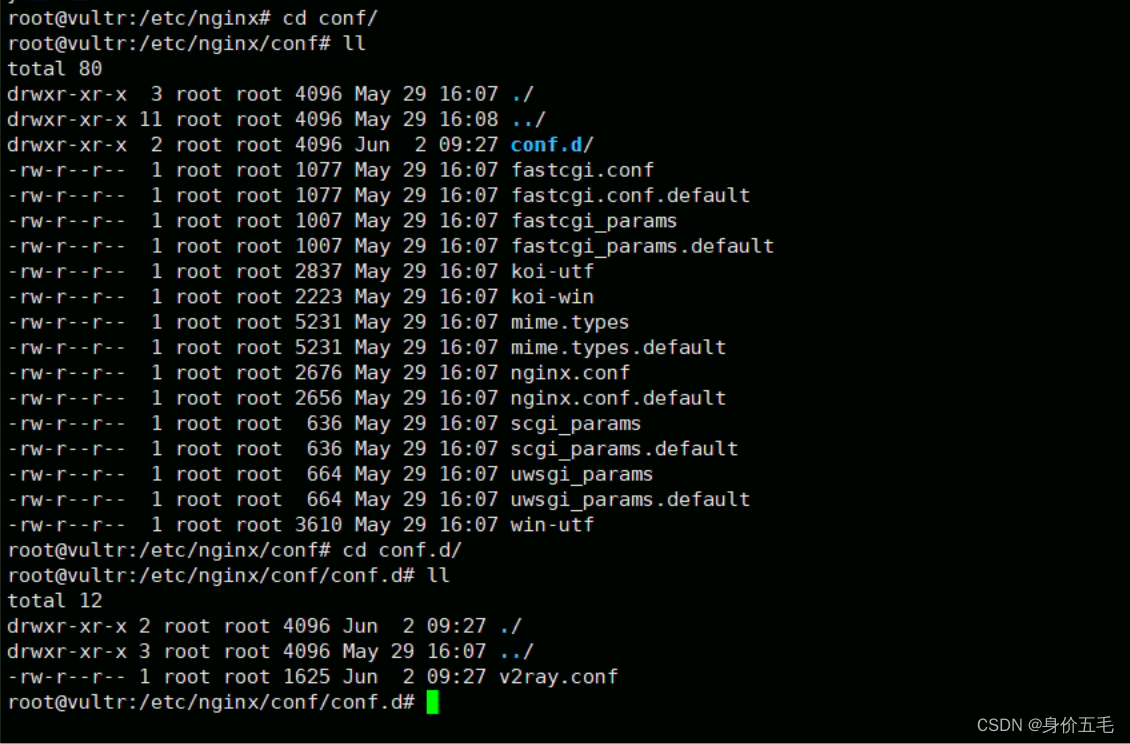
在安装目录下的conf目录下,比如我的安装目录是/etc/nginx,那么他的配置文件就在/etc/nginx/conf目录下。
若安装目录是/usr/local/nginx,则配置文件即为/usr/local/nginx/conf目录。(即/usr/local/nginx/conf/nginx.conf为配置文件)
apt安装方式 或 yum安装方式(apt install nginx OR yum install nginx)
在安装目录的根路径下,通常在/etc/nginx/目录下。(即/etc/nginx/nginx.conf为配置文件)
Yum(全称为 Yellow dog Updater, Modified)是一个在Fedora和RedHat以及CentOS中的Shell前端软件包管理器。基于RPM包管理,能够从指定的服务器自动下载RPM包并且安装,可以自动处理依赖性关系,并且一次安装所有依赖的软件包,无须繁琐地一次次下载、安装。
区别
多了一级,conf文件夹。
ubuntu常采用编译安装或apt-get安装,centos通常采用yum安装。
Nginx目录结构及文件功能如下:
[root@localhost ~]# tree /usr/local/nginx
/usr/local/nginx
├── client_body_temp           # POST 大文件暂存目录
├── conf                       # Nginx所有配置文件的目录
│   ├── fastcgi.conf          # fastcgi相关参数的配置文件
│   ├── fastcgi.conf.default  # fastcgi.conf的原始备份文件
│   ├── fastcgi_params        # fastcgi的参数文件
│   ├── fastcgi_params.default
│   ├── koi-utf
│   ├── koi-win
│   ├── mime.types            # 媒体类型
│   ├── mime.types.default
│   ├── nginx.conf            # 这是Nginx默认的主配置文件,日常使用和修改的文件
│   ├── nginx.conf.default
│   ├── scgi_params           # scgi相关参数文件
│   ├── scgi_params.default
│   ├── uwsgi_params          # uwsgi相关参数文件
│   ├── uwsgi_params.default
│   └── win-utf
├── fastcgi_temp               # fastcgi临时数据目录
├── html                       # Nginx默认站点目录
│   ├── 50x.html              # 错误页面优雅替代显示文件,例如出现502错误时会调用此页面
│   └── index.html            # 默认的首页文件
├── logs                       # Nginx日志目录
│   ├── access.log            # 访问日志文件
│   ├── error.log             # 错误日志文件
│   └── nginx.pid             # pid文件,Nginx进程启动后,会把所有进程的ID号写到此文件
├── proxy_temp                 # 临时目录
├── sbin                       # Nginx 可执行文件目录
│   └── nginx                 # Nginx 二进制可执行程序
├── scgi_temp                  # 临时目录
└── uwsgi_temp                 # 临时目录
Nginx主配置和其他配置
结论:Nginx的配置文件的路径上还可能会再多一级文件夹。
原因:Nginx的配置文件通常分为多个文件,可以在主配置文件中使用”include”指令包含其他配置文件。这些额外的配置文件通常存储在conf.d文件夹中。
因此,结合上面两种不同的安装方式,Nginx的主配置和其他配置可能会分别放在:
1.源码编译安装方式
主配置文件:/etc/nginx/conf/nginx.conf
其他配置文件:/etc/nginx/conf/conf.d/xxxx.conf
2.apt安装方式 或 yum安装方式
主配置文件:/etc/nginx/nginx.conf
其他配置文件:/etc/nginx/conf.d/xxxx.conf
为什么会区分主配置文件 及 如何使用?
Nginx 的配置很灵活,支持include配置文件,如果我们的域名都配置到nginx.conf。这个文件就会比较乱,也影响管理和阅读,所以直接拆分出来,分成不同的配置文件。
这种方式的好处是:我们可以编辑主配置文件来修改Nginx的全局配置,也可以在conf.d目录中创建新的配置文件可以为不同的虚拟主机或网站定义不同的配置。
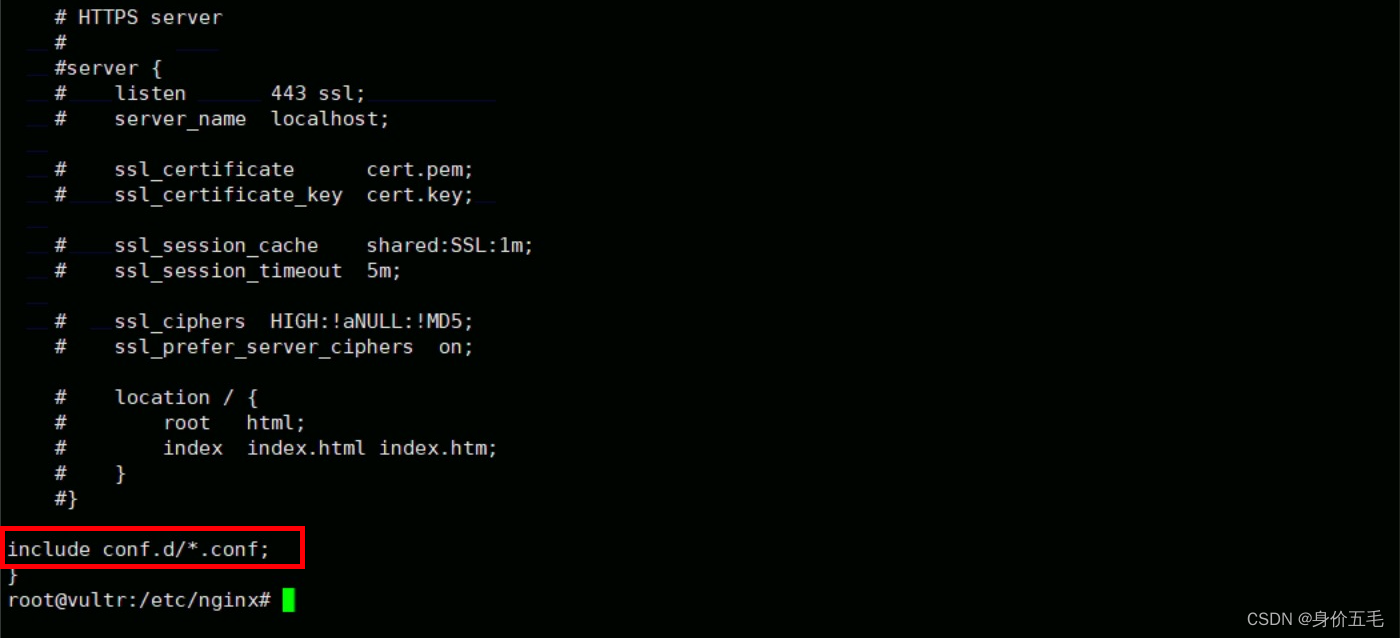
即主配置文件在nginx.conf文件中,include /etc/nginx/conf.d目录下名称为xxx的配置文件。
示例:

文件末尾添加:include conf.d/*.conf;

此处的*号可以一次性添加conf.d文件夹中的全部配置。
在conf.d文件夹中可以编写多个配置文件。
 主配置文件nginx.conf中指定包含其他扩展配置文件,从而简化nginx主配置文件,实现多个站点功能。
Nginx常用命令
1.安装NGINX
apt-get install nginx
2.NGINX操作命令
#配置环境变量
nginx -c nginx配置文件地址
#修改nginx的配置文件后重启服务
nginx -s reload
#重新打开日志
nginx -s reopen
#启停控制
service nginx start  #启动
service nginx reload #重新加载配置文件
service nginx restart #重启
service nginx status #查看运行状态
或者将 service 替换为 systemctl 。(Linux服务管理的两种方式service和systemctl可参考:service和systemctl的区别_systemctl和service区别_Xu-小安安的博客-CSDN博客)
# 查看nginx服务状态
systemctl status nginx
# 启动nginx
systemctl start nginx
# 重新启动nginx
systemctl restart nginx
# 停止nginx
systemctl stop nginx
# 重新加载nginx配置
systemctl reload nginx
3.卸载NGINX
apt-get remove nginx nginx-common # 卸载删除除了配置文件以外的所有文件。
apt-get purge nginx nginx-common # 卸载所有,包括删除配置文件。
apt-get autoremove # 在上面命令结束后执行,主要是卸载删除Nginx的不再被使用的依赖包。
apt-get remove nginx-full nginx-common #卸载删除两个主要的包。
Nginx官网的一些常用链接
下载Nginx:http://nginx.org/en/download.html
安装Nginx:http://nginx.org/en/docs/installation.html
文档:http://nginx.org/en/docs/
社区:http://nginx.org/en/support.html
常见问题(FAQ):http://nginx.org/en/docs/faq.html
Nginx Plus:https://www.nginx.com/products/nginx/
参考教程
nginx目录结构和配置文件详解 - 哔哩哔哩
Ubuntu 下NGINX 的简单使用_51CTO博客_yum 安装nginx
Nginx安装和使用_apt install nginx 配置_白昼之时的博客-CSDN博客
Linux下查找Nginx配置文件位置_查看nginx配置文件位置_tingfenyijiu的博客-CSDN博客
Nginx安装及配置文件详解(Linux版本)_linuxnginx配置文件目录_sunsineq的博客-CSDN博客
nginx入门详解(三)- 配置文件解读 - 知乎


