- PTA L1-064 估值一亿的AI核心代码,详解+每一个测试点的分析
- 一篇讲明白 Hadoop 生态的三大部件
- 适合初学者的简单正则表达式技巧
- 简单爬虫:东方财富网股票数据爬取(20231230)
- 30天拿下Rust之深入Cargo
- 【Go语言快速上手(三)】数组, 切片与映射
- Mac 版 IDEA 中配置 GitLab
- 【爬虫实战】Python爬取知网文献信息
- 让工作自动化起来!无所不能的Python
- node.js 常用命令71条详解
- 【大数据实时数据同步】超级详细的生产环境OGG(GoldenGate)
- Springboot项目从Nacos读取MySQL数据库配置错误:Pu
- 【Docker】未来已来 | Docker技术在云计算、边缘计算领域的
- SpringBoot前端传递数组后端怎么接收
- SpringBoot使用WebSocket
- Java租赁汽车租车系统设计与实现(Idea+Springboot+m
- Springboot JPA打印SQL语句及参数(2024最新版)
- 分享 GoLand 2024.1 激活的方案,支持JetBrains全
- Postman测试金蝶云星空Webapi【协同开发云】
- 2024年第十七届 认证杯 网络挑战赛 (D题)| AI图片判断 |
- CC++之(五)洛谷刷题基础题 --- 新年好
- 基于springboot大学生兼职平台管理系统(完整源码+数据库)
- 升级php版本(简单明了,轻松升级php任意版本)
- SpringBoot整合Druid数据库连接池&多数据源&am
- mysql 中OPTIMIZE TABLE语句用法详解
- 如何在SpringBoot集成mapstruct实现类型转换?一篇文章
- Node.js教程(想入门就来点进来看看)
- springboot与tomcat关系
- slurm深度解析:探索作业调度系统的架构和术语
- 初始SpringBoot:详解特性和结构
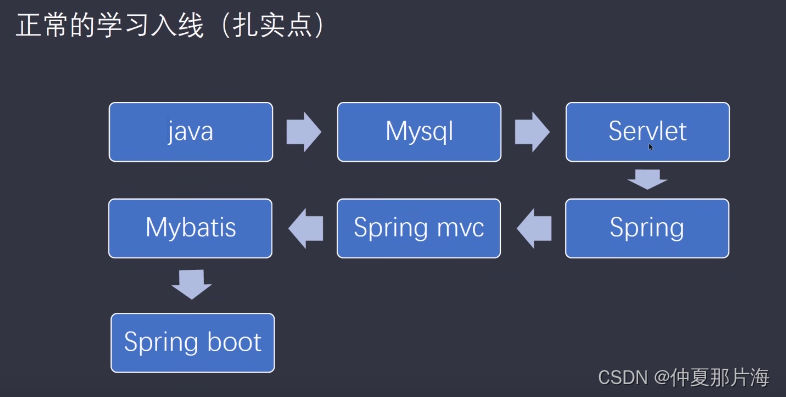
快速入门为主主要届介绍java web接口API的编写
java编辑器首选IntelliJ IDEA
官方链接:https://www.jetbrains.com/idea/
IEDA
前言
实例项目主要是web端API接口的使用,项目使用mysql数据库,把从数据库中的数据的查询出来后通过接口json数据返回
项目创建
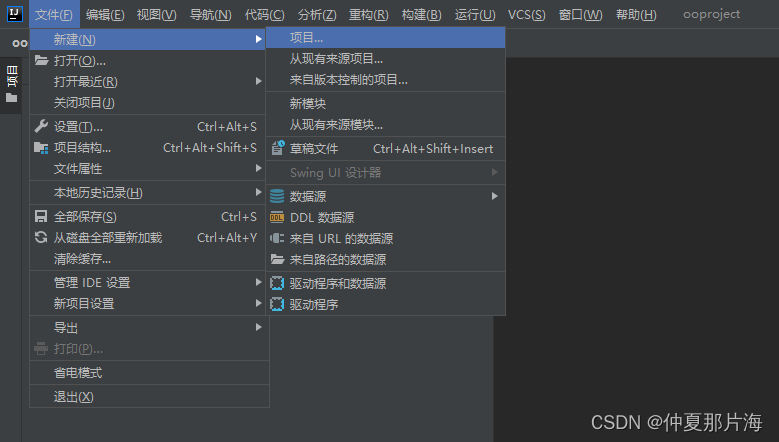
选中 文件–>新建–>项目
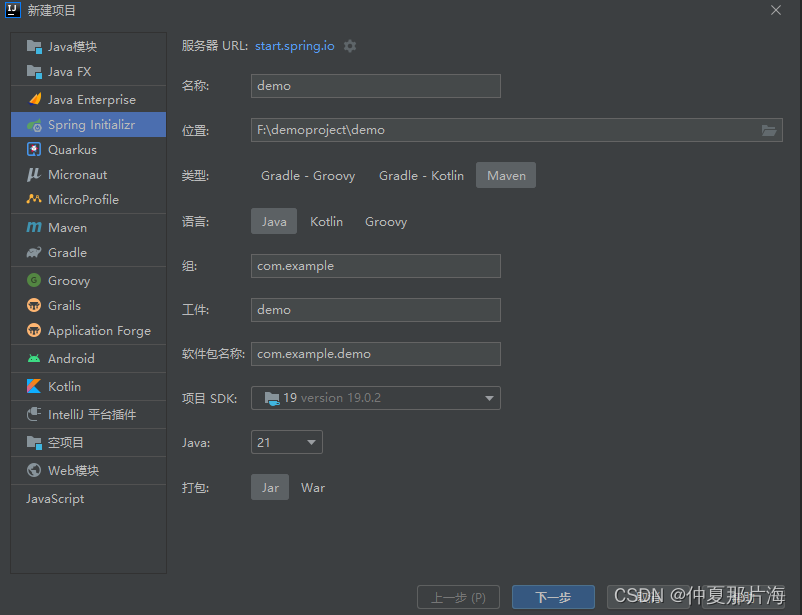
选择Spring Initializr --> 配置依赖源服务器 URL地址、项目名称及位置、组名称、选择所需的java SDK,java环境
、打包的方式
选择要引入的依赖:mysql的驱动(Mysql Driver)、Spring web、JDBC API、Mybatis
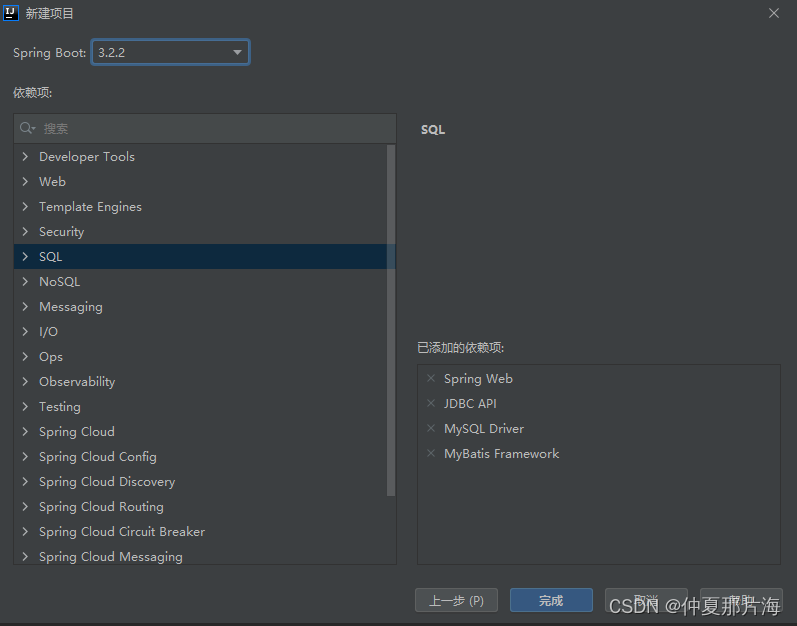
完成后等待IDEA下载环境依赖
创建后常见问题
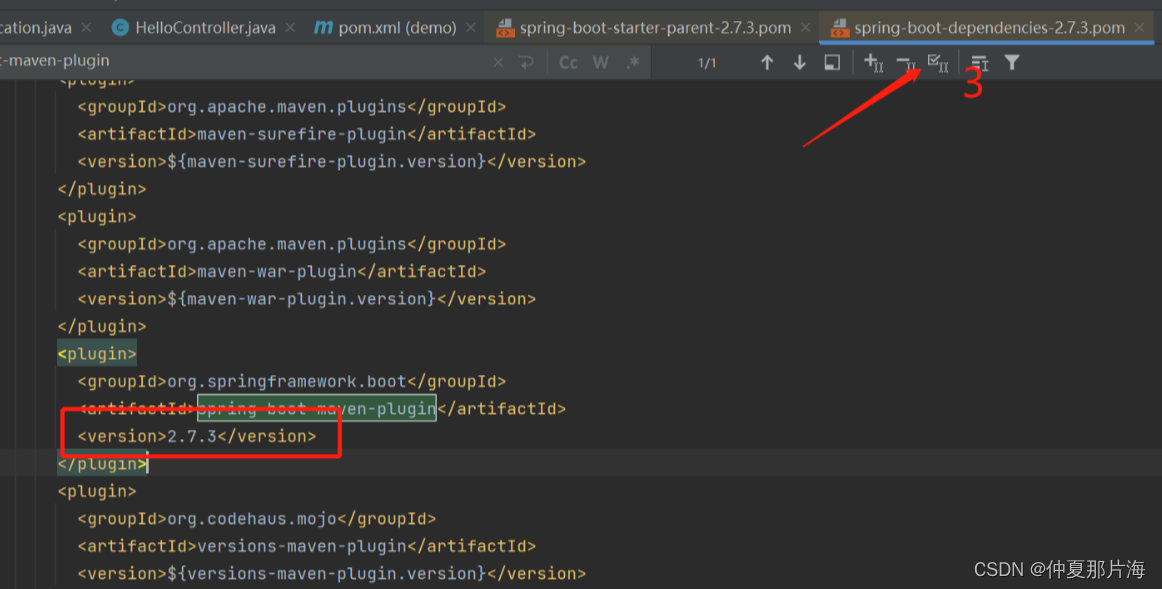
出现pom文件找不到插件 ‘org.springframework.boot:spring-boot-maven-plugin:‘问题,
可能是因为版本没有绑定好,去一级父类依赖找对应的插件版本,在pom文件中加上。

把父类的version加到pom中
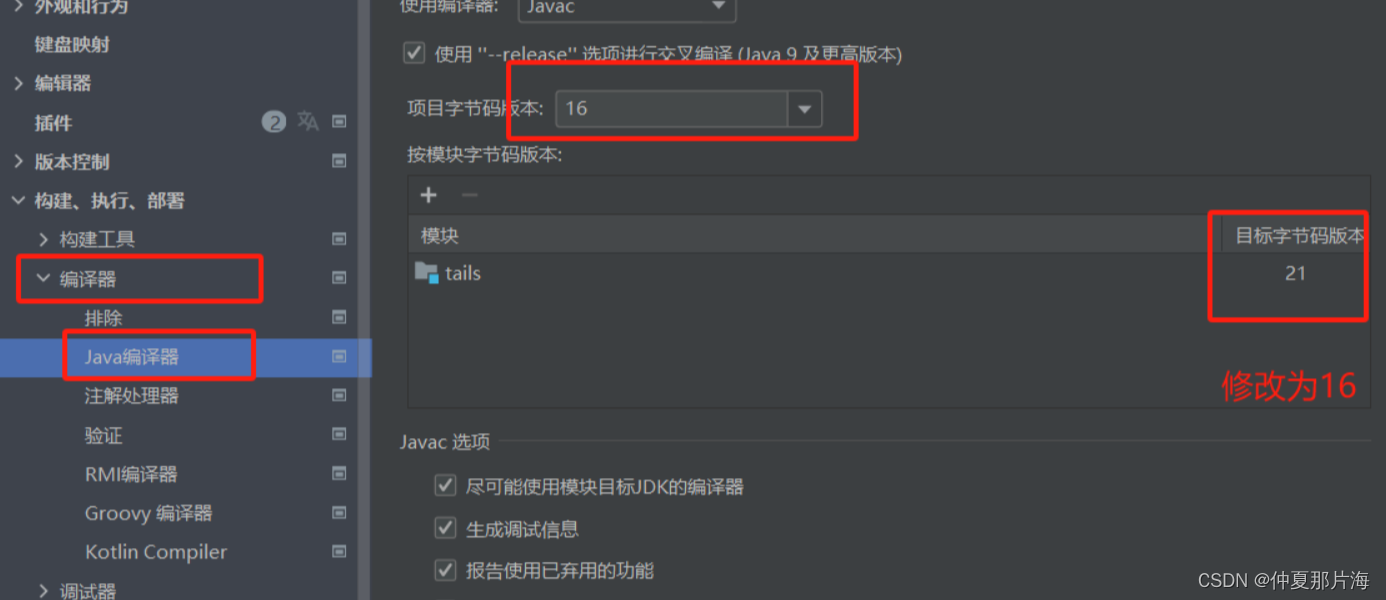
出现解决 java: 错误: 不支持发行版本 21

Maven包无法加载
问题:
使用中国移动的宽带会出现网络污染,不能够正确的下载Maven库中的maven包,导致Spring项目在加载是会出现报错。
解决方法:
思路:
网络污染无非 是不能够对于外网的Maven包拿不过来,但是在国内阿里云的镜像也是会随时更新的。可以配置使用国内阿里云的镜像Maven。(不只是Maven,其他诸如树莓派的也可以)
方式一: 全局配置
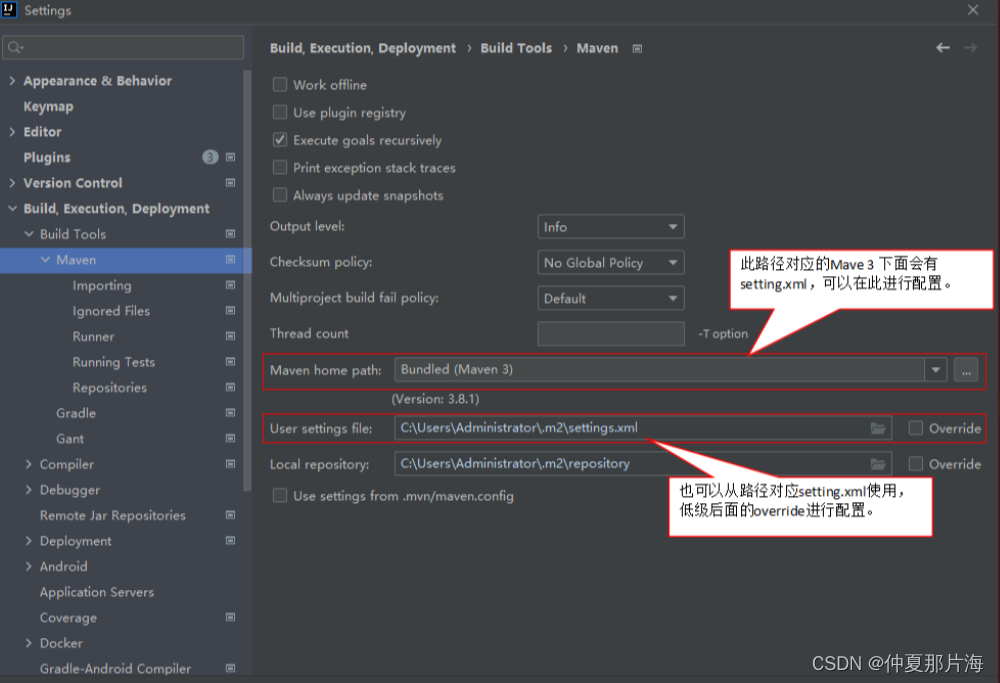
可以添加阿里云的镜像到maven的setting.xml配置中,这样就不需要每次在pom中,添加镜像仓库的配置,在mirrors节点下面添加子节点:
    nexus-aliyun
    central
    Nexus aliyun
    http://maven.aliyun.com/nexus/content/groups/public
注:< mirrorOf>可以设置为哪个中央仓库做镜像,为名为“central”的中央仓库做镜像,写作< mirrorOf>central< /mirrorOf>;为所有中央仓库做镜像,写作< mirrorOf>< /mirrorOf>。Maven默认中央仓库的id 为 central。id是唯一的。除非你有把握,否则不建议使用< mirrorOf>< /mirrorOf>的方式。
在配置maven的setting.xml中如图所示,加入上述代码的这个内容,具体setting.xml依照各自的配置所在路径。
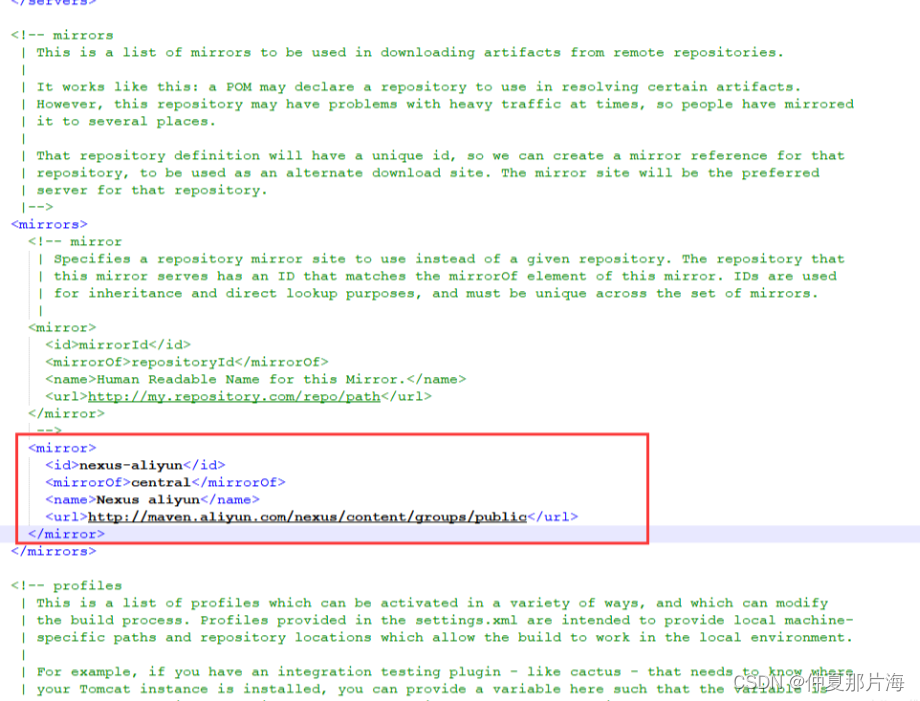
如果使用idea的话,可以依据此方式进行配置setting.xml
方式二: 单项目配置
单项目配置时,需要修改pom文件。pom文件中,没有mirror元素。在pom文件中,通过覆盖默认的中央仓库的配置,实现中央仓库地址的变更。
修改项目的pom文件:
    4.0.0
    com.test
    conifg
    war
    0.0.1-SNAPSHOT


            central
            aliyun maven

            http://maven.aliyun.com/nexus/content/groups/public/
            default


                true


                false
注:Maven默认中央仓库的id 为 central。id是唯一的。因此使用< id>central< /id>覆盖了默认的中央仓库。
启动项目
可以在IDEA中配置启动

以上是没有配置数据库的url所导致的,把resources目录下的application.properties文件后缀改成yml文件进行配置
配置的内容如下:
server:
  port: 8081
spring:
#  数据库相关配置
  datasource:
    url: jdbc:mysql://127.0.0.1:3306/javaboot?characterEncoding=utf-8&useSSL=false&serverTimezone=UTC
    driver-class-name: com.mysql.cj.jdbc.Driver
    username: javaboot
    password: javaboot
#mybatis的相关配置
mybatis:
  #mybatis配置文件
  mapper-locations: classpath:mapper/*.xml
  type-aliases-package: com.example.demo.entity
Spring boot 简单步骤
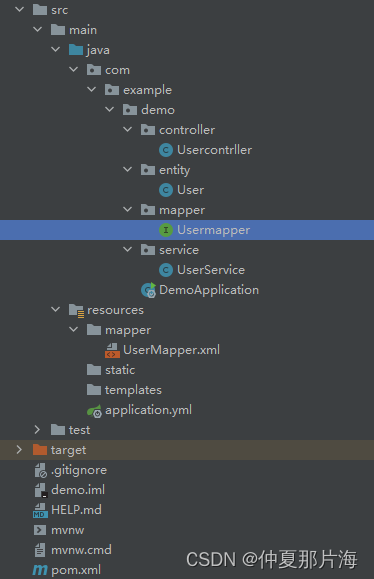
文件目录如下:
controller 做展示的,只跟前端交互
entity 只做数据库映射
mapper 跟数据库交互的
service是业务逻辑(操作、计算)
1.建立实体类,跟数据库表字段保持一致
实体类中定义的的字段要与数据库表的字段保持一致
实体类中要实现构造方法和每个值得get()方法、set()方法
package com.example.demo.entity;
//实体类
//    实体类中定义的的字段要与数据库表的字段保持一致
//    里面要实现构造方法和每个值得get()方法、set()方法
public class User {
    private int id;
    private String name;
    private int age;
    private String email;
    public int getId() {
        return id;
    }
    public void setId(int id) {
        this.id = id;
    }
    public String getName() {
        return name;
    }
    public void setName(String name) {
        this.name = name;
    }
    public int getAge() {
        return age;
    }
    public void setAge(int age) {
        this.age = age;
    }
    public String getEmail() {
        return email;
    }
    public void setEmail(String email) {
        this.email = email;
    }
    public User(int id, String name, int age, String email) {
        this.id = id;
        this.name = name;
        this.age = age;
        this.email = email;
    }
}
2.建立mapper接口,定义要操作数据库的动作
@Mapper是实例化Usermapper 对象
package com.example.demo.mapper;
import com.example.demo.entity.User;
import org.apache.ibatis.annotations.Mapper;
import java.util.List;
@Mapper
public interface Usermapper {
    List findAll();
}
3.建立mapper的xml文件,写具体的sql语句
4.建立service类,处理业务逻辑
@Service -----实例化对象
@Autowired 从容器中拿出来用
package com.example.demo.service;
import com.example.demo.entity.User;
import com.example.demo.mapper.Usermapper;
import org.springframework.beans.factory.annotation.Autowired;
import org.springframework.stereotype.Service;
import java.util.List;
@Service
public class UserService {
    @Autowired
    private Usermapper usermapper;
    public List fandAll(){
        return usermapper.findAll();
    }
}
5.在controller类中展示处理的结果
package com.example.demo.controller;
import com.example.demo.entity.User;
import com.example.demo.service.UserService;
import org.springframework.beans.factory.annotation.Autowired;
import org.springframework.web.bind.annotation.RequestMapping;
import org.springframework.web.bind.annotation.RestController;
import java.util.List;
@RestController
public class Usercontrller {
    @Autowired
    private UserService userservice;
    @RequestMapping("/user")
    public List getUser(){
        return userservice.fandAll();
    }
}
6、启动服务,访问链接
最后访问 http://127.0.0.1:8081/user


