- Spring boot高频面试题及答案,面试官看完也得跪!
- ruoyi-vue(若依前后端分离版本)环境搭建 用idea 安装re
- 【爬虫实战】python文本分析库——Gensim
- SpringBoot【问题 05】PostgreSQL数据库启用SSL
- sqlplus远程连接oracle ip
- Linux【OSMCTools 02】OpenStreetMap数据处
- SpringBoot 使用【AOP 切面+注解】实现在请求调用 Con
- 运维:mysql常用的服务器状态命令
- 【粉丝福利社】 Node.js从入门到精通(软件开发视频大讲堂)(文末
- MySQL 之 安装与配置环境变量
- 解决pymysql.err.OperationalError: (20
- 华为ensp中链路聚合两种(lacp-static)模式配置方法
- mongodb中的多表查询aggregate中排序不是按全表排序,而是
- SpringAI——Java生态接入LLM
- 详细分析Mysql中的LOCATE函数(附Demo)
- Node.js 连接 mysql 数据库(Navicat)超详细!!!
- Docker部署nginx,挂载,并配置nginx.conf
- mysql中varchar长度为多少
- Docker - 基本概念、与虚拟机的区别、架构、镜像操作、容器操作、
- 前端(四)——vue.js、vue、vue2、vue3
- MSTP协议配置(华为ensp)
- JVM垃圾回收(GC)
- Java校园失物招领系统设计与实现(Idea+Springboot+m
- 【python】flask结合SQLAlchemy,在视图函数中实现对
- 求组合数的三种算法
- SQL Server数据库以及Management Studio详细安
- 前端实现调用打印机和小票打印(TSPL )功能
- Spring IoC&DI(3)
- 【解决】Spring Boot创建项目常见问题
- 解决SpringBoot日期序列化问题:[Java 8 datetim
目录
1.什么是Springboot
2.Springboot框架的特点
3.创建Springboot工程
3.1.准备条件
3.2. 创建springboot的方式有两种
3.2.1. 使用idea快速创建
3.2.2. 基于maven的形式创建
4.介绍springboot中pom文件
5. springboot常见的两种配置文件
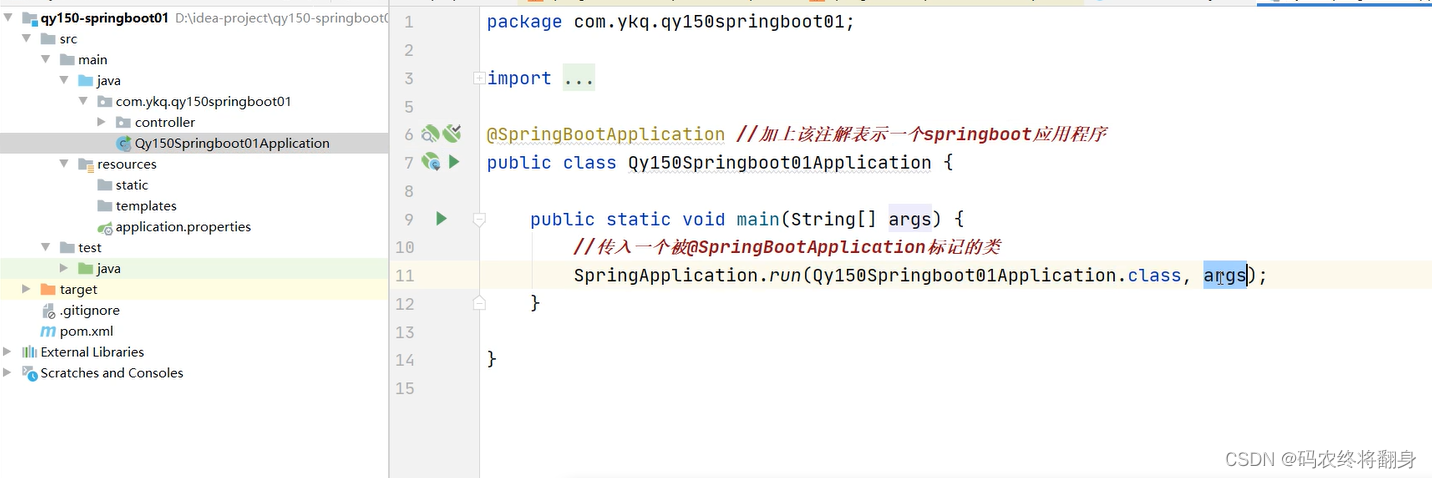
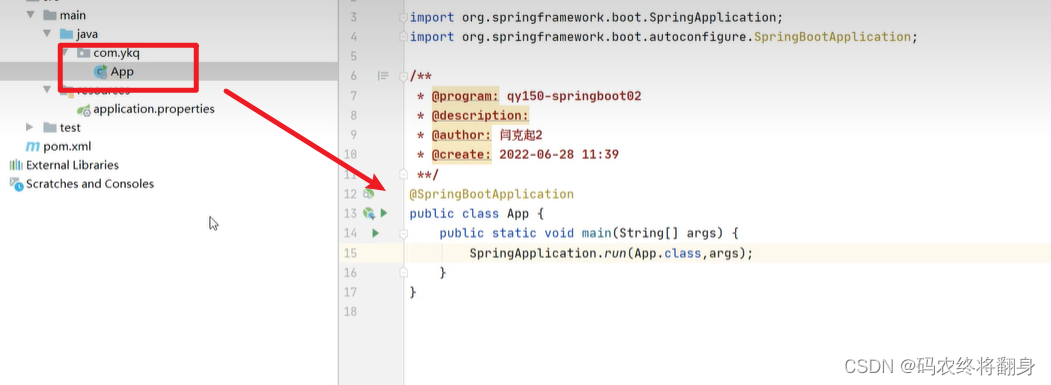
简单介绍主启动类
6.读取springboot配置文件中的内容
6.1.@ConfigurationProperties注解
6.2. @Value注解
7.多环境下开发下的配置---profiles配置详解
7.1.为什么要使用profiles
7.2. 使用方法
8. Springboot注册web三大组件
8.1.注册Servlet到Springboot内置的Tomcat
8.2.注册Filter到springboot内置tomcat
9.springboot整合拦截器
10.springboot自动包扫描
10.1.如何自动扫描
10.2.如何扫描指定包
11.springboot自动装配原理--->重要
11.1.如何加载自动配置类
11.2.Springboot自动装配的原理
12.springboot整合jdbc数据源
12.1.集成druid数据源
13.springboot整合mybatis
14.springboot整合PageHelper分页插件
15.springboot整合swagger2
15.1 什么是swagger
15.2 为什么使用swagger
15.3 整合swagger2
16.springboot整合定时器
1.什么是Springboot
Spring Boot 是由 Pivotal 团队提供的全新框架。Spring Boot 是所有基于 Spring Framework 5.0 开发的项目的起点。Spring Boot 的设计是为了让你尽可能快的跑起来 Spring 应用程序并且尽可能减少你的配置文件。
springboot可以帮你简化spring的搭建,并且快速创建一个spring的应用程序。该框架使用了特定的方式来进行配置,从而使开发人员不再需要定义样板化的配置
2.Springboot框架的特点
(1)可以创建独立的Spring应用程序,并且基于其Maven或Gradle插件,可以创建可执行的JARs和WARs;
(2)内嵌Tomcat或Jetty等Servlet容器;
(3)提供自动配置的“starter”项目对象模型(POMS)以简化Maven配置;
(4)尽可能自动配置Spring容器;
(5)提供准备好的特性,如指标、健康检查和外部化配置;
(6)绝对没有代码生成,不需要XML配置。
3.创建Springboot工程
3.1.准备条件
(1)JDK 环境必须是 1.8 及以上,传送门:jdk1.8.191 下载
(2)后面要使用到 Maven 管理工具 3.2.5 及以上版本.
(3)开发工具建议使用 IDEA,
(4) spring的jar必须5.0以上
3.2. 创建springboot的方式有两种
可以有两种创建springboot工程的方式
【1】快速建立---联网
【2】基于maven创建---没有网也可以,但是下jar包还是需要的
3.2.1. 使用idea快速创建
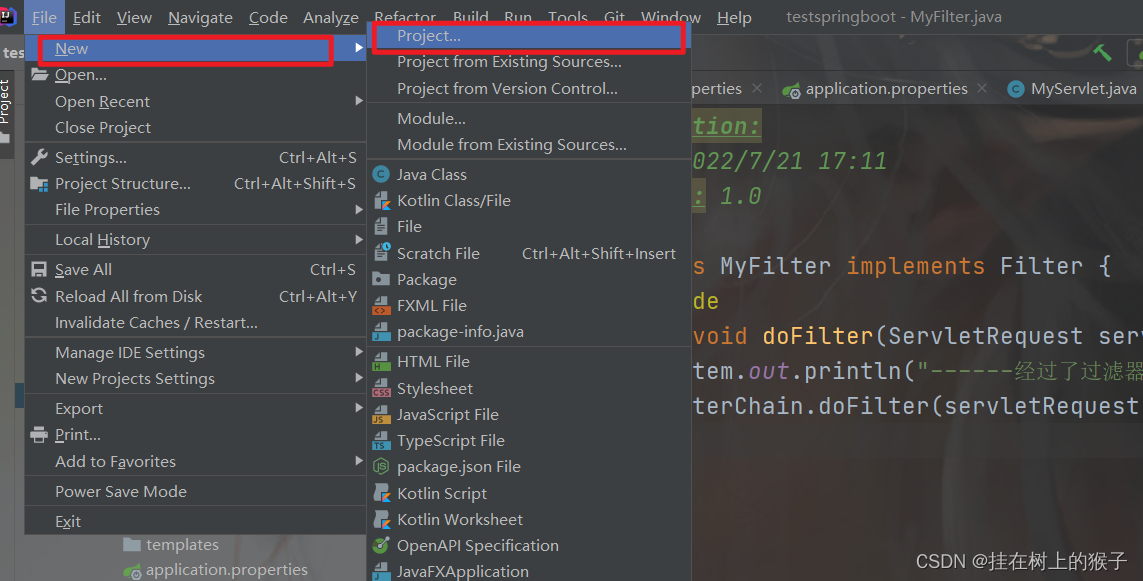
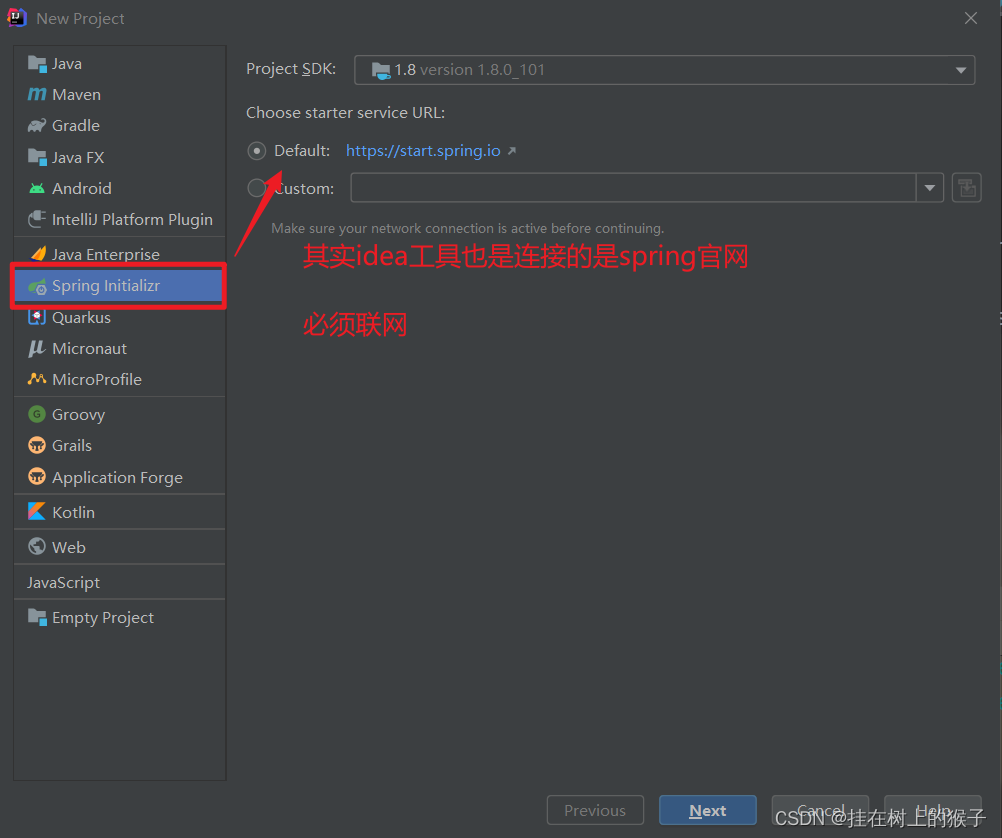
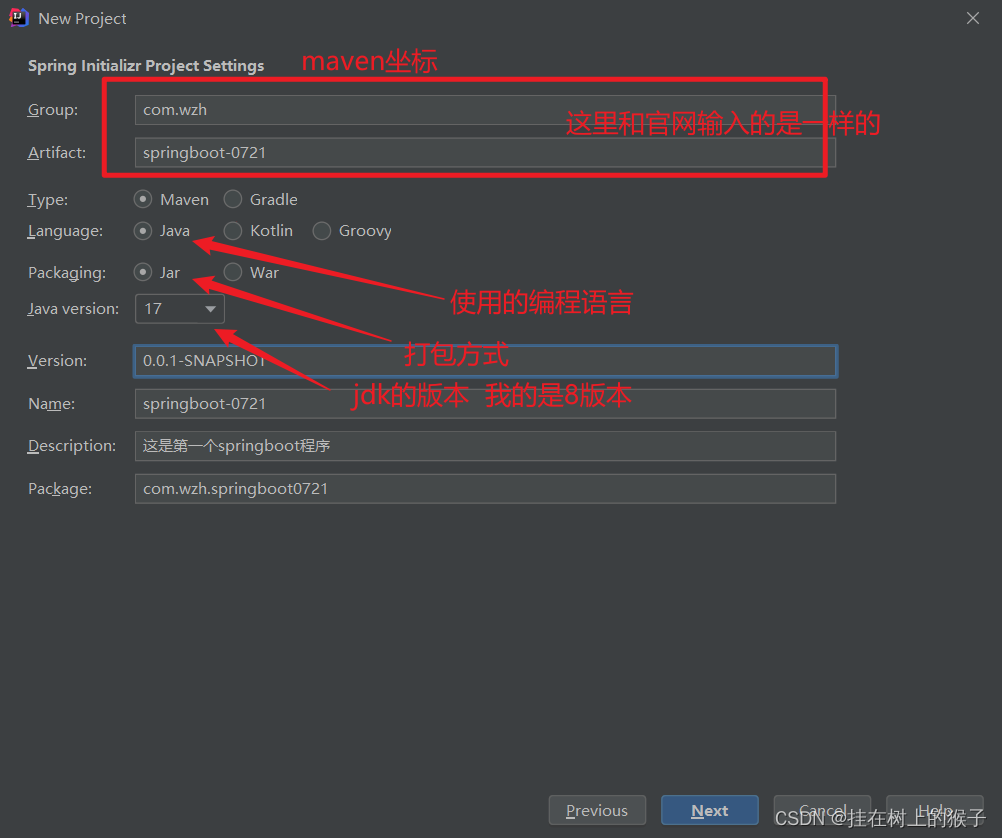
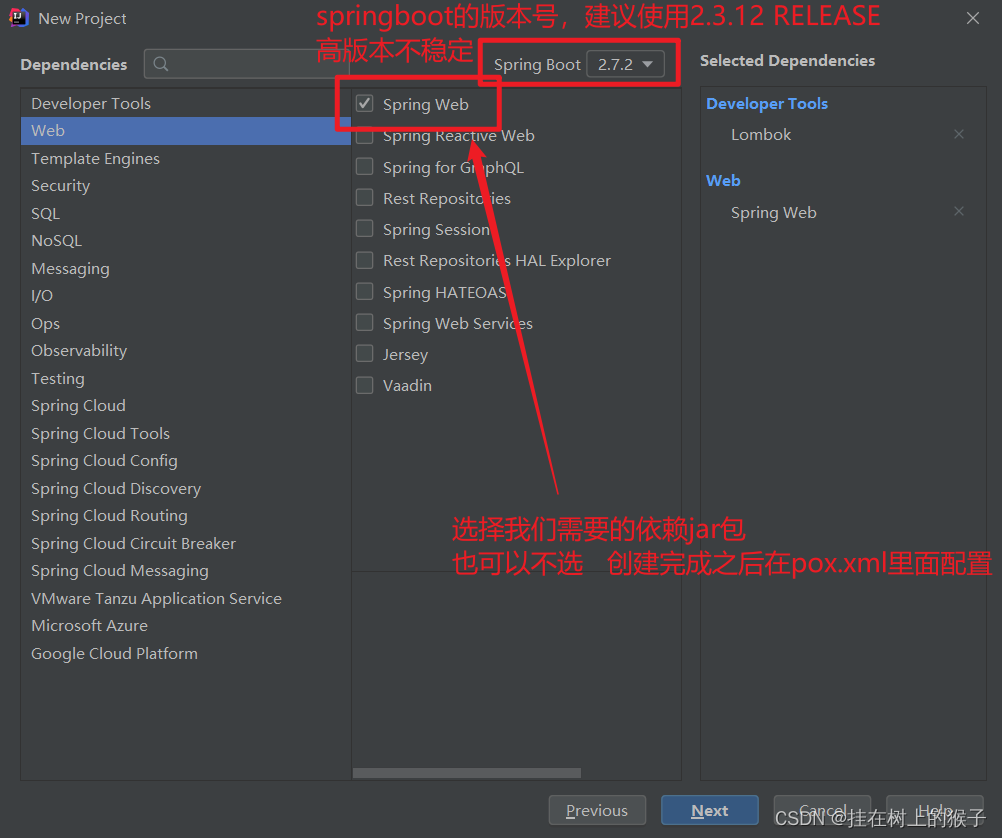
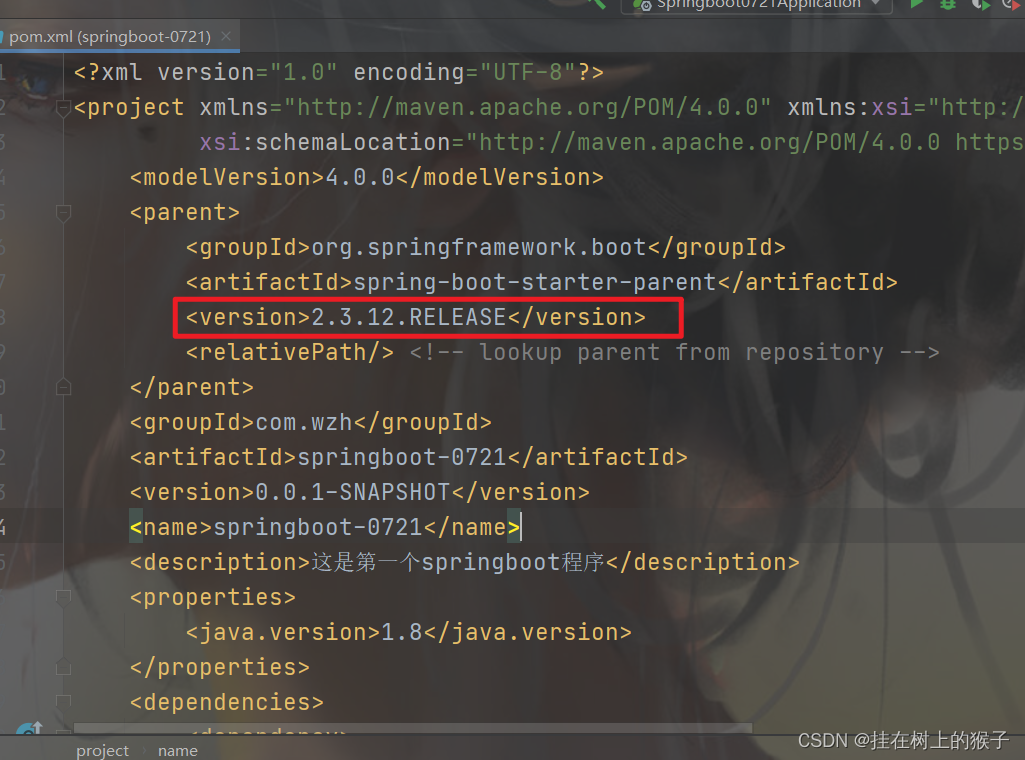
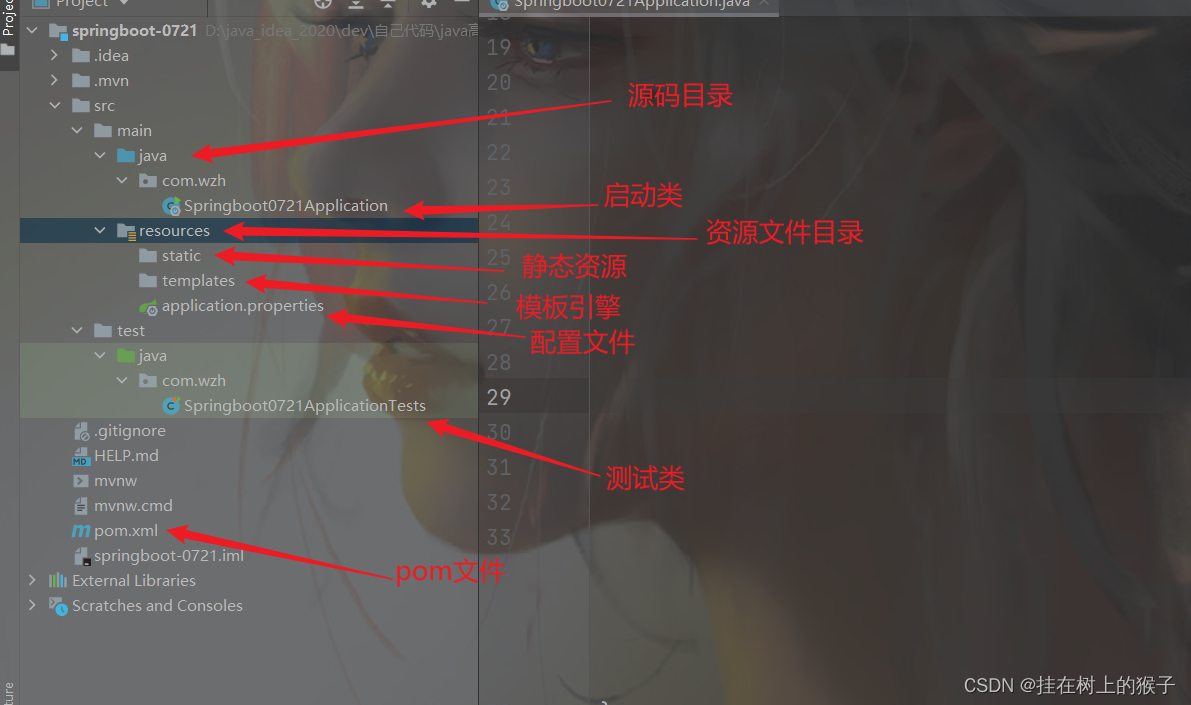
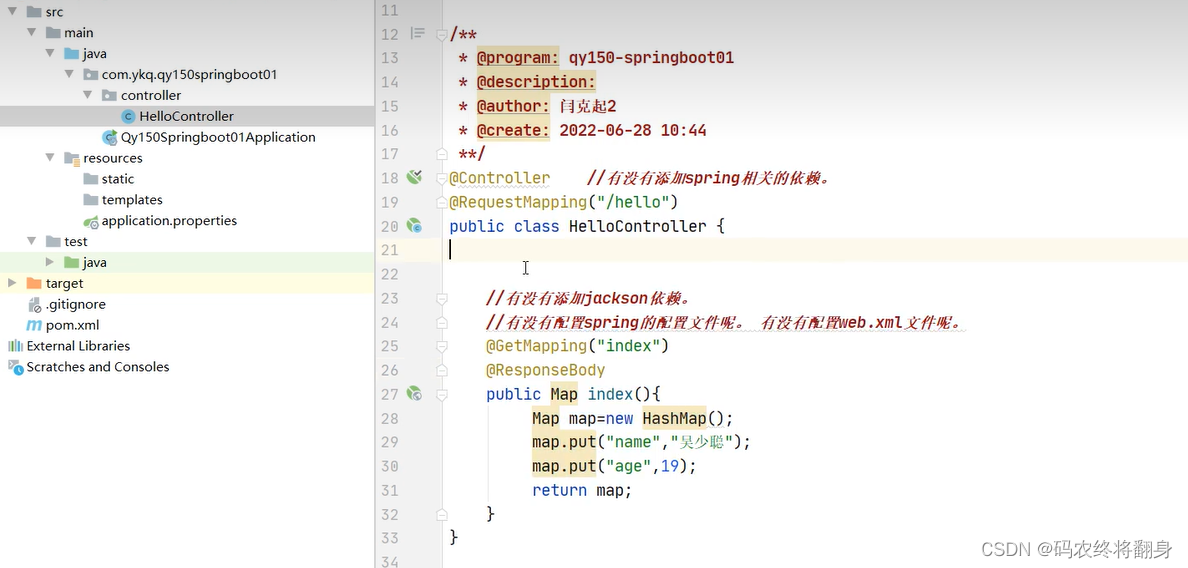
目录结构的介绍
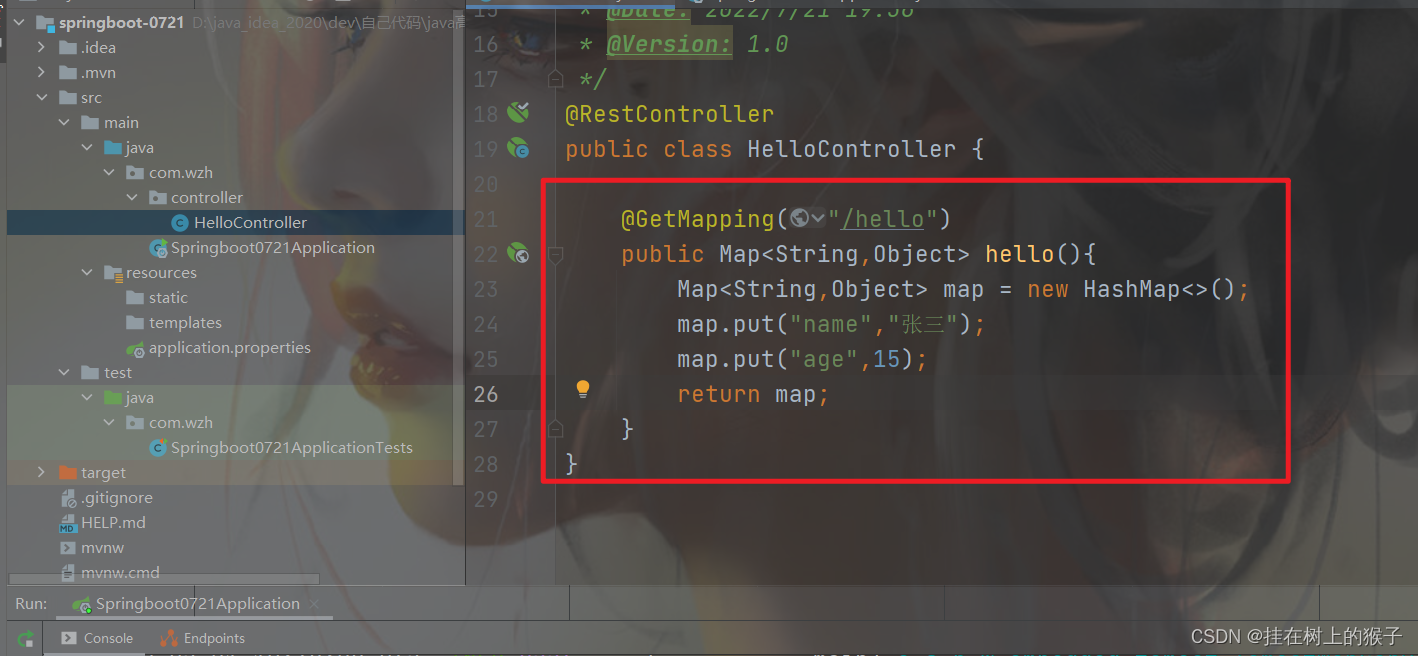
创建一个HelloController类,该类所在的包必须是主函数下的包或子包下。
3.2.2. 基于maven的形式创建
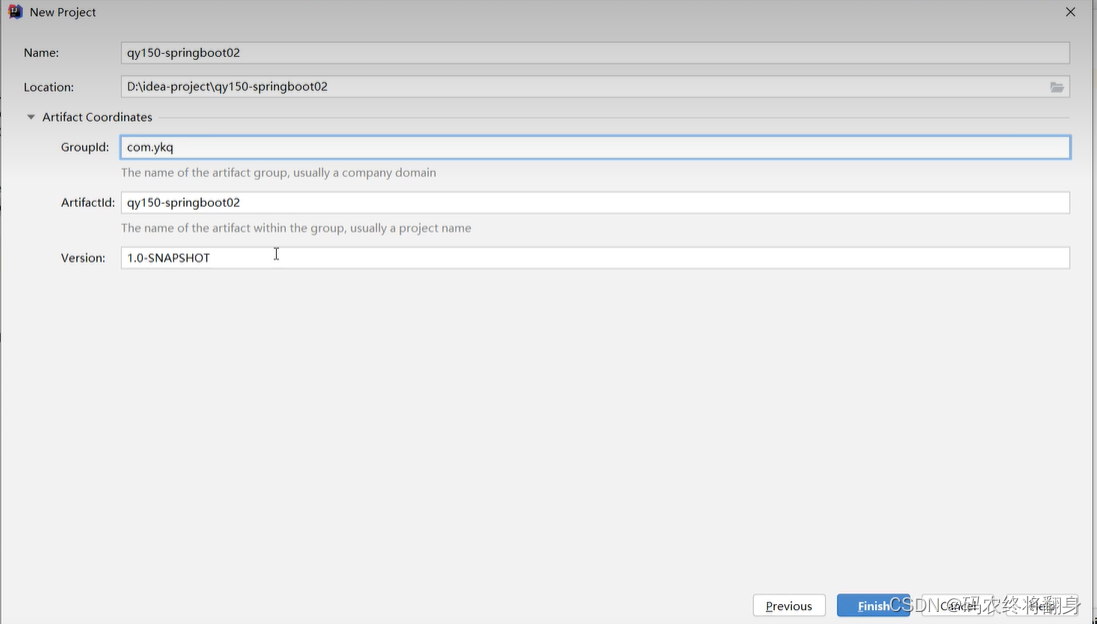
创建maven工程
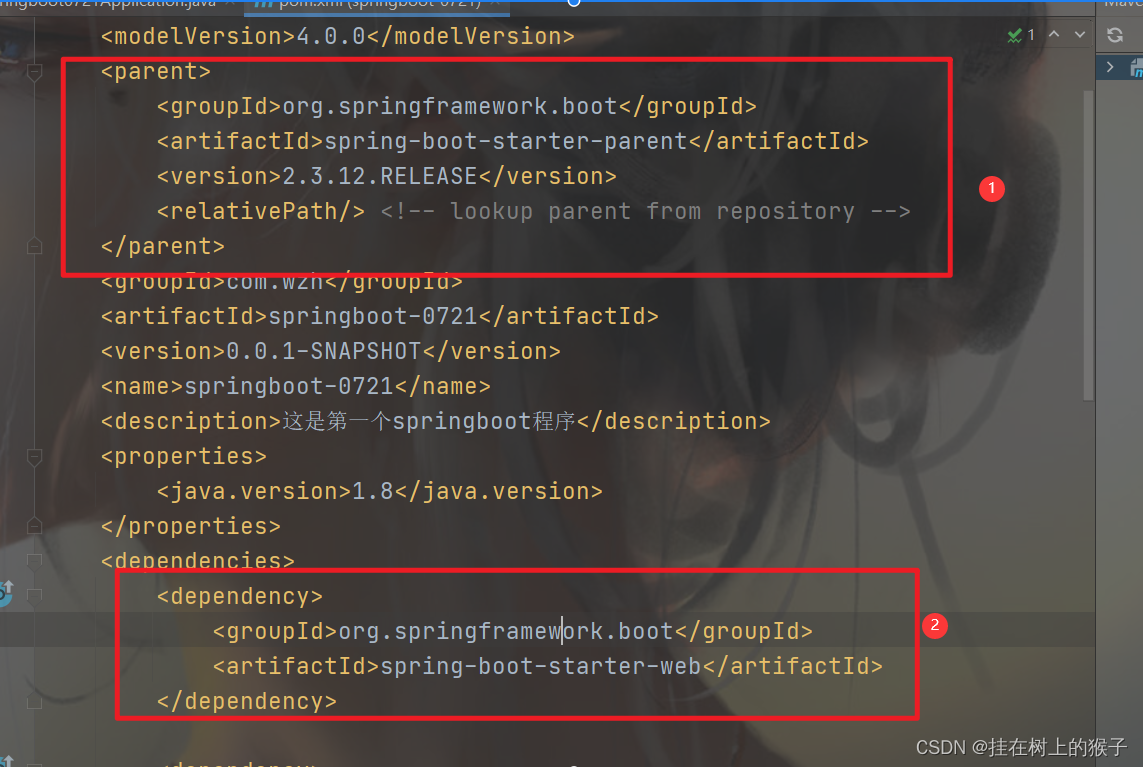
 修改pom.xml
1. 引入父工程
2. 加入web依赖
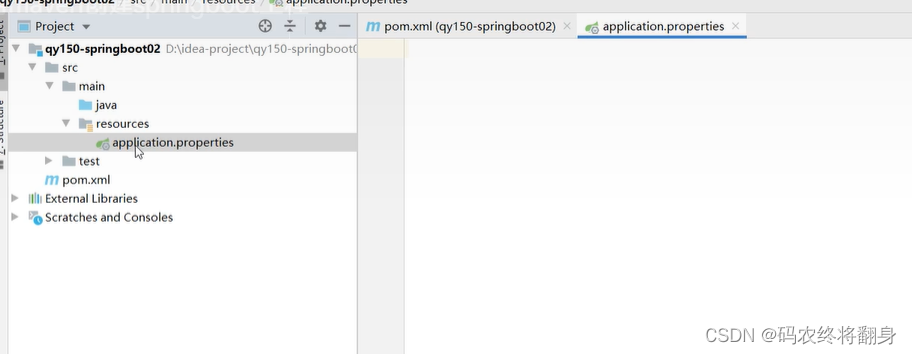
添加applicaiton.properties配置文件
创建主启动类
创建一个controller类
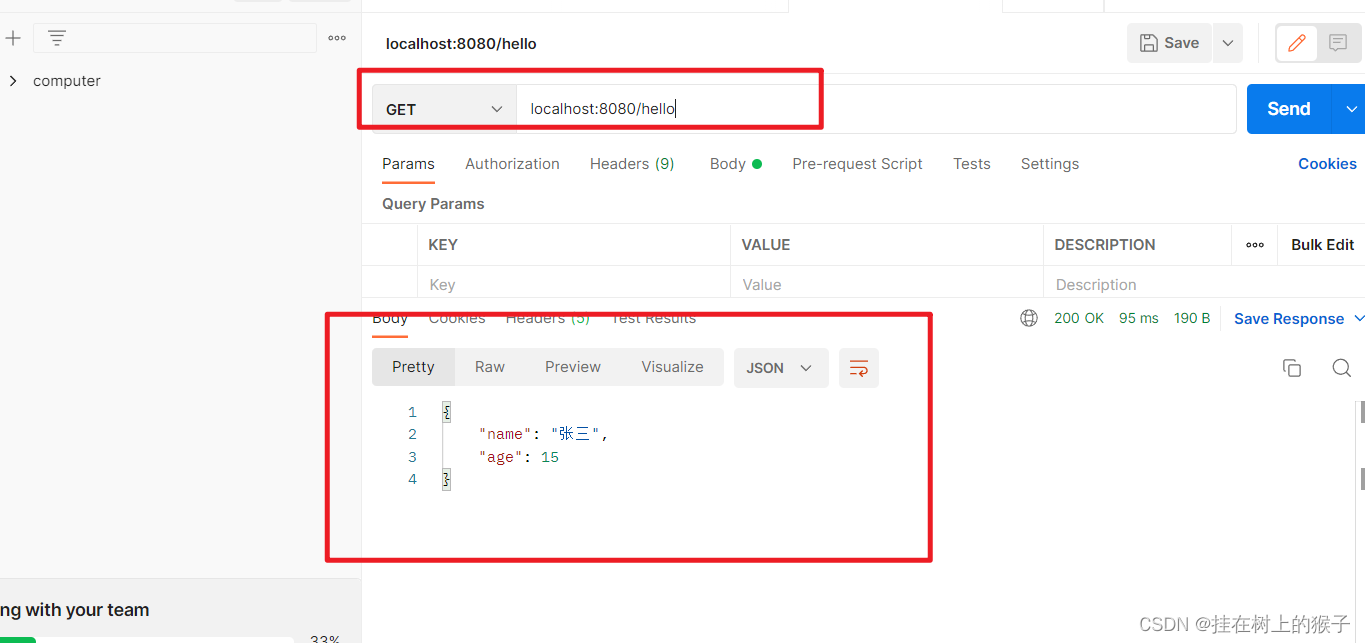
启动springboot工程并浏览器访问:
4.介绍springboot中pom文件
4.0.0 org.springframework.boot spring-boot-starter-parent2.3.12.RELEASE com.ykq qy151-springboot0.0.1-SNAPSHOT qy151-springboot Demo project for Spring Boot 1.8 org.springframework.boot spring-boot-starter-weborg.projectlombok lomboktrue org.springframework.boot spring-boot-starter-testtest org.springframework.boot spring-boot-maven-pluginorg.projectlombok lombok

注意:
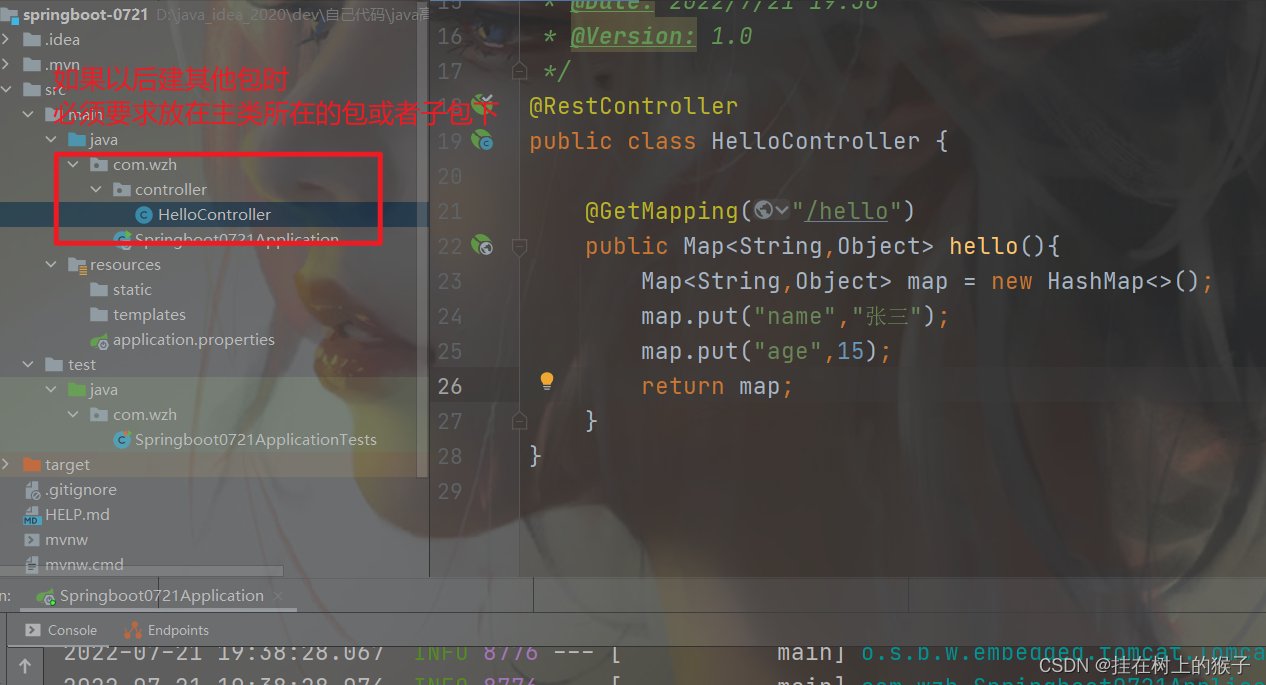
默认springboot扫描的包为主启动类所在的包以及子包。
5. springboot常见的两种配置文件
有两种格式的配置文件:
第一种:properties文件 key=值
第二种:yaml文件【缩写为yml】 格式: key:值
不管是哪种只是后缀不同,名称都是以applicaiton开头
第一种: application.properties属性文件
#修改sprintboot中tomcat的端口号
server.port=8081
#修改上下文访问路径
server.servlet.context-path=/qy151
student.id=1
student.name=zhangsan
student.age=20
#student.hobby=LOL,DNF,CF,CSGO    #这其实是字符串  实体类数组类型会自动用逗号分隔,变成数组类型
student.hobby[0]=Lol #这才是数组的定义
student.hobby[1]=ppp
student.lists=LOL,AAA,BB,CCC   #这里是个字符串,而不是数组
student.maps.clazz=151
student.maps.stuno=110
student.maps.k1=${eee.age}
student.sets=A,B,C,D,D
student.birth=2012/10/01
aaa.age=${random.int}
bbb.age=${random.int(1,100)}
ccc.age=${random.long}
ddd.age=${random.long(1,200)}
eee.age=${random.uuid}
student.hobby=LOL,DNF,CF,CSGO #这其实是字符串 实体类数组类型会自动用逗号分隔,变成数组类型
student.hobby[0]=Lol #这才是数组的定义
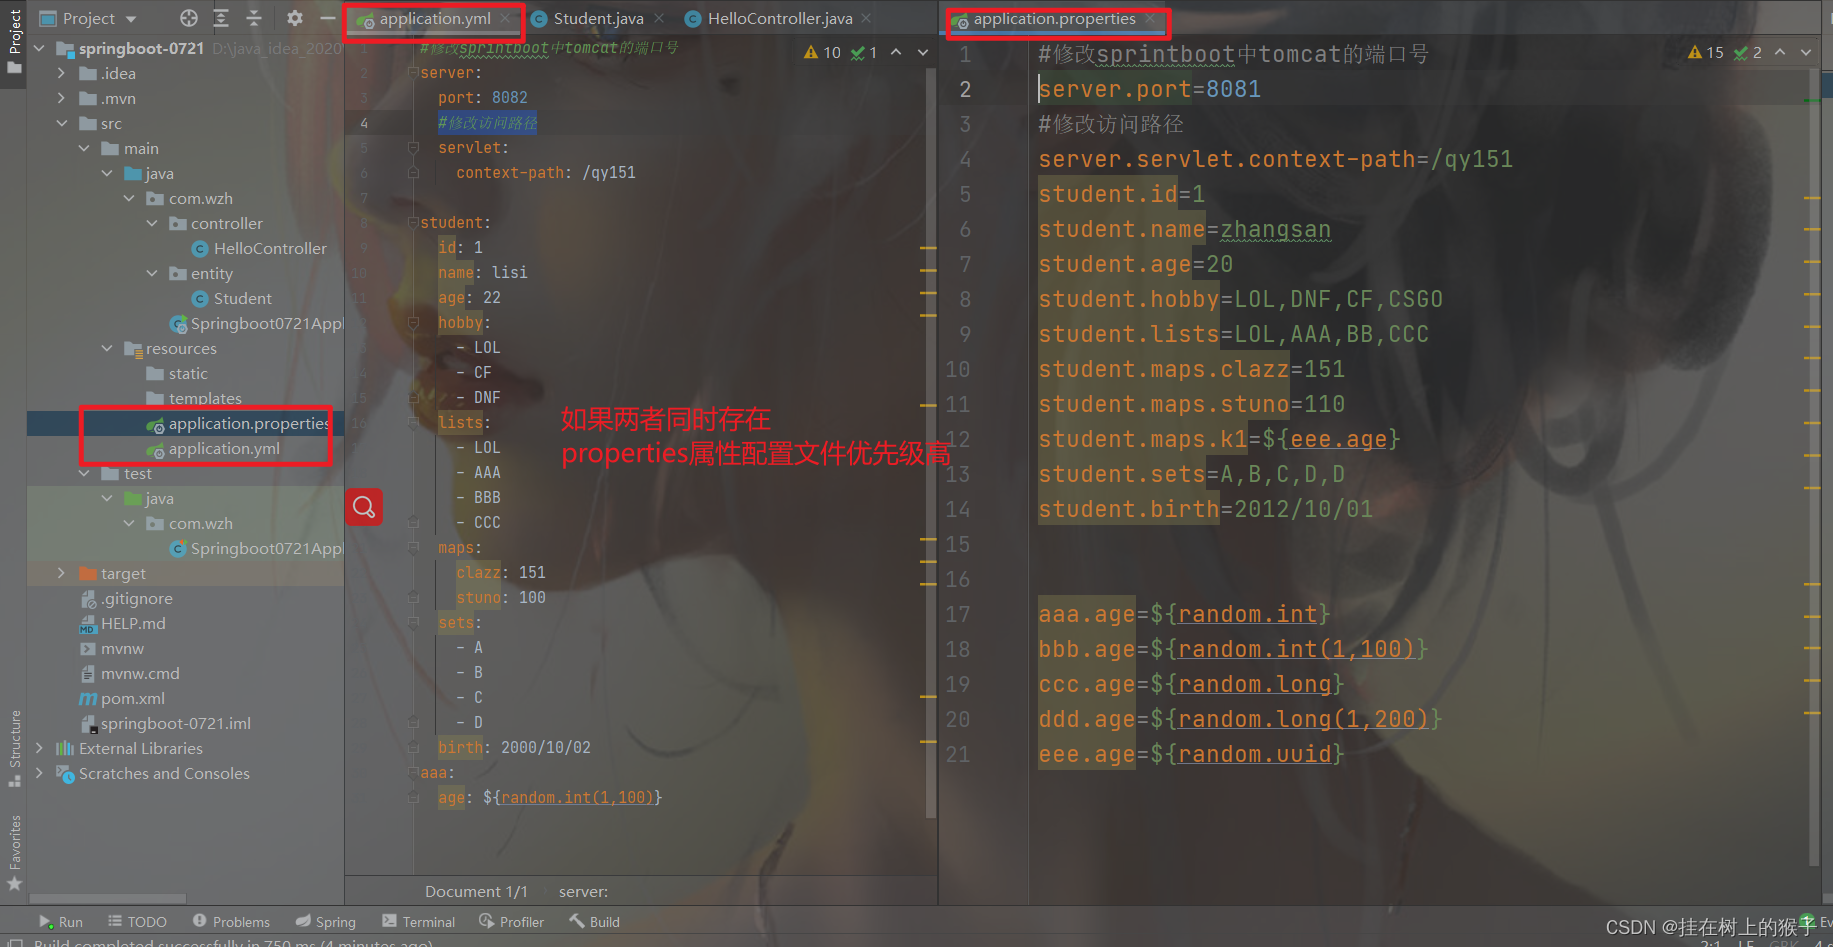
第二种: application.yml文件
# 他们具有层级结构
# key和value 必须有空格
# 这里面如果两个都配置了相同的内容,属性文件properties的优先级高于yml文件
# 如果两个文件的内容内容不同,合并内容
#修改sprintboot中tomcat的端口号
server:
  port: 8082
  #修改访问路径
  servlet:
    context-path: /qy151
student:
  id: 1
  name: lisi
  age: 22
  hobby:
    - LOL
    - CF
    - DNF
  lists:
    - LOL
    - AAA
    - BBB
    - CCC
  maps:
    clazz: 151
    stuno: 100
  sets:
    - A
    - B
    - C
    - D
  birth: 2000/10/02
aaa:
  age: ${random.int(1,100)}
不管是哪种,他们的名字必须以application开始。
如果两个配置文件同时存在,而且有些内容一样。按照properties的优先级高。如果有些不一样,两个配置文件不一样的会合并在一起。
Properties 没有层级关系 使用=赋值
Yml 有层级关系 使用: 赋值
两种语法的配置是互补的
简单介绍主启动类
6.读取springboot配置文件中的内容
例如OSS文件上传
密钥和bucket名称等---密钥和bucket都写死在java代码中。如果后期修改密钥和bucket的值,你必须修改源码代码。 我们要写在配置文件。然后通过代码在读取配置文件中的密钥和bucket.
如何读取springboot配置文件的内容呢?
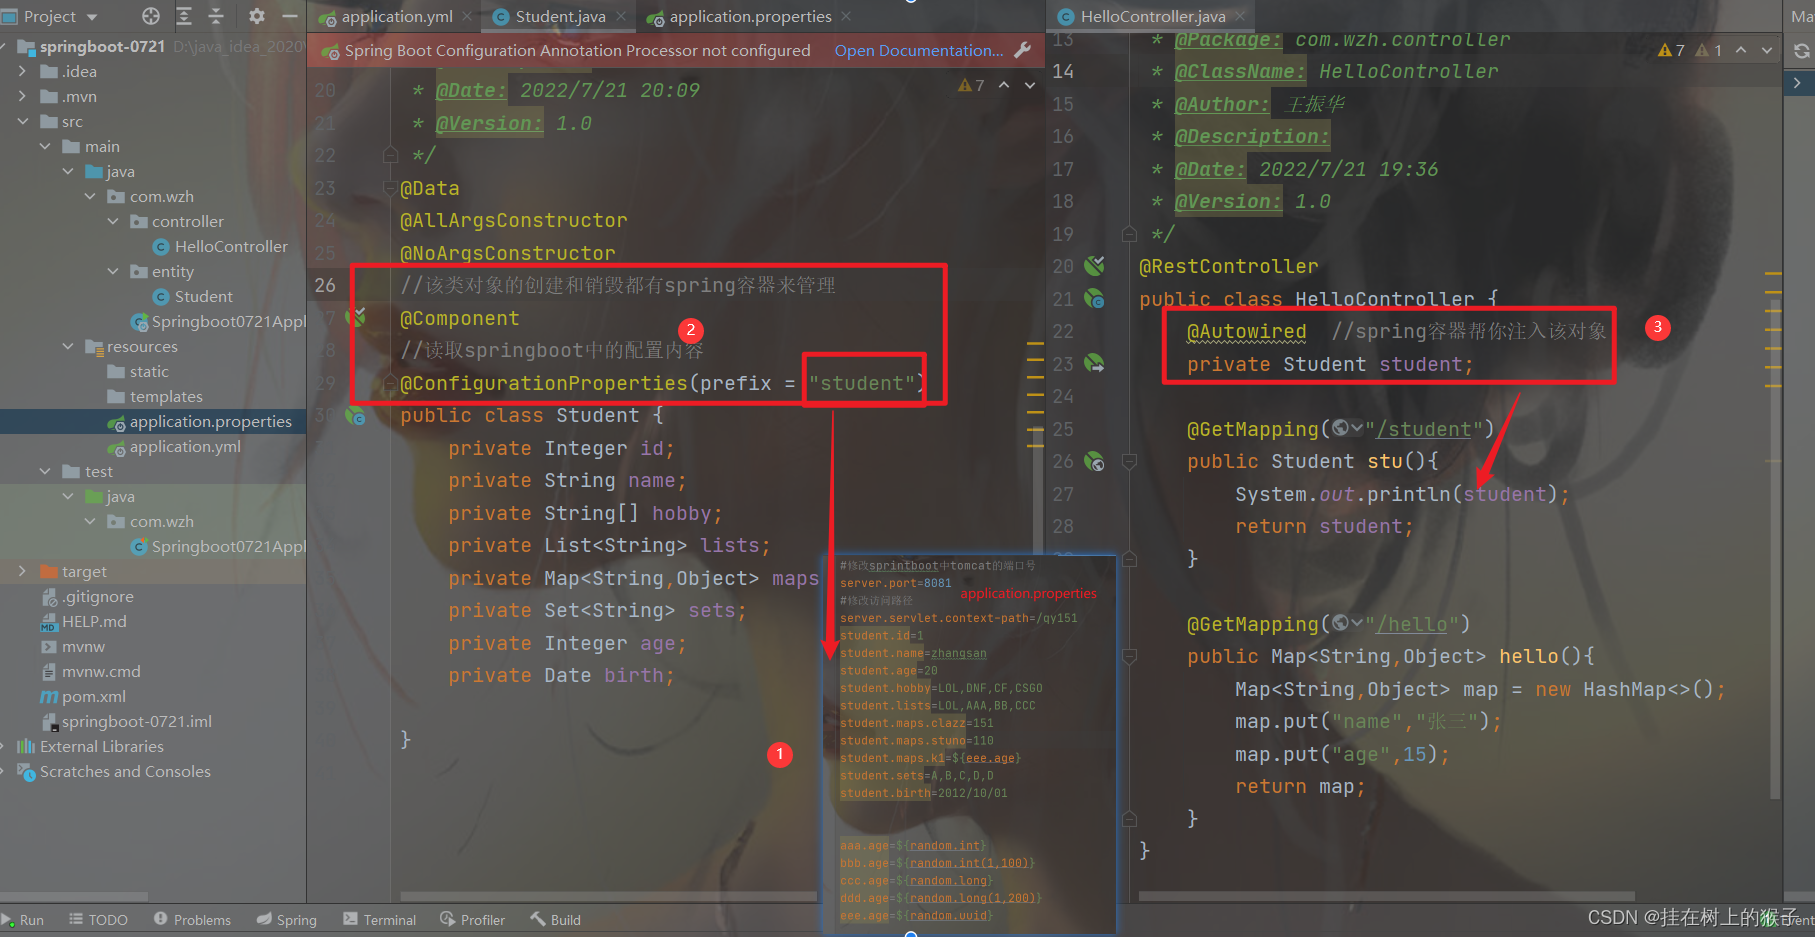
(1)@ConfigurationProperties----在类上使用。
(2)@Value注解----直接在类属性上使用。
6.1.@ConfigurationProperties注解
该注解使用在类上。
package com.wzh.entity;
import lombok.AllArgsConstructor;
import lombok.Data;
import lombok.NoArgsConstructor;
import org.springframework.boot.context.properties.ConfigurationProperties;
import org.springframework.stereotype.Component;
import java.util.Date;
import java.util.List;
import java.util.Map;
import java.util.Set;
/**
 * @ProjectName: springboot-0721
 * @Package: com.wzh.entity
 * @ClassName: Student
 * @Author: 王振华
 * @Description:
 * @Date: 2022/7/21 20:09
 * @Version: 1.0
 */
@Data
@AllArgsConstructor
@NoArgsConstructor
@Component //该类对象的创建和销毁都有spring容器来管理
@ConfigurationProperties(prefix = "student") //读取springboot中的配置内容
public class Student {
    private Integer id;
    private String name;
    private String[] hobby;
    private List lists;
    private Map maps;
    private Set sets;
    private Integer age;
    private Date birth;
}
package com.wzh.controller;
import com.wzh.entity.Student;
import org.springframework.beans.factory.annotation.Autowired;
import org.springframework.web.bind.annotation.GetMapping;
import org.springframework.web.bind.annotation.RestController;
import java.util.HashMap;
import java.util.Map;
/**
 * @ProjectName: springboot-0721
 * @Package: com.wzh.controller
 * @ClassName: HelloController
 * @Author: 王振华
 * @Description:
 * @Date: 2022/7/21 19:36
 * @Version: 1.0
 */
@RestController
public class HelloController {
    @Autowired  //spring容器帮你注入该对象
    private Student student;
    @GetMapping("/student")
    public Student stu(){
        System.out.println(student);
        return student;
    }
    @GetMapping("/hello")
    public Map hello(){
        Map map = new HashMap<>();
        map.put("name","张三");
        map.put("age",15);
        return map;
    }
}
6.2. @Value注解
只能放在我们的类属性上。而且它只能读取基本类型和字符串类型。
package com.wzh.entity;
import lombok.AllArgsConstructor;
import lombok.Data;
import lombok.NoArgsConstructor;
import org.springframework.beans.factory.annotation.Value;
import org.springframework.boot.context.properties.ConfigurationProperties;
import org.springframework.stereotype.Component;
import java.util.Date;
import java.util.List;
import java.util.Map;
import java.util.Set;
/**
 * @ProjectName: springboot-0721
 * @Package: com.wzh.entity
 * @ClassName: Student
 * @Author: 王振华
 * @Description:
 * @Date: 2022/7/21 20:09
 * @Version: 1.0
 */
@Data
@AllArgsConstructor
@NoArgsConstructor
//该类对象的创建和销毁都有spring容器来管理
@Component
//读取springboot中的配置内容
//@ConfigurationProperties(prefix = "student")
public class Student {
    @Value("${student.id}")
    private Integer id;
    @Value("${student.name}")
    private String name;
    @Value("${student.hobby}")
    private String[] hobby;
    //@Value("${student.lists}")
    private List lists;
    //@Value("${student.maps}")
    private Map maps;
    private Set sets;
    @Value("${student.age}")
    private Integer age;
    @Value("${student.birth}")
    private Date birth;
}
package com.wzh.controller;
import com.wzh.entity.Student;
import org.springframework.beans.factory.annotation.Autowired;
import org.springframework.beans.factory.annotation.Value;
import org.springframework.web.bind.annotation.GetMapping;
import org.springframework.web.bind.annotation.RestController;
import java.util.HashMap;
import java.util.Map;
/**
 * @ProjectName: springboot-0721
 * @Package: com.wzh.controller
 * @ClassName: HelloController
 * @Author: 王振华
 * @Description:
 * @Date: 2022/7/21 19:36
 * @Version: 1.0
 */
@RestController
public class HelloController {
    @Autowired  //spring容器帮你注入该对象
    private Student student;
    @Value("${student.id}")
    private Integer id;
    @GetMapping("/student")
    public Student stu(){
        System.out.println(student);
        return student;
    }
    @GetMapping("/hello")
    public Map hello(){
        Map map = new HashMap<>();
        map.put("name","张三");
        map.put("age",15);
        return map;
    }
}
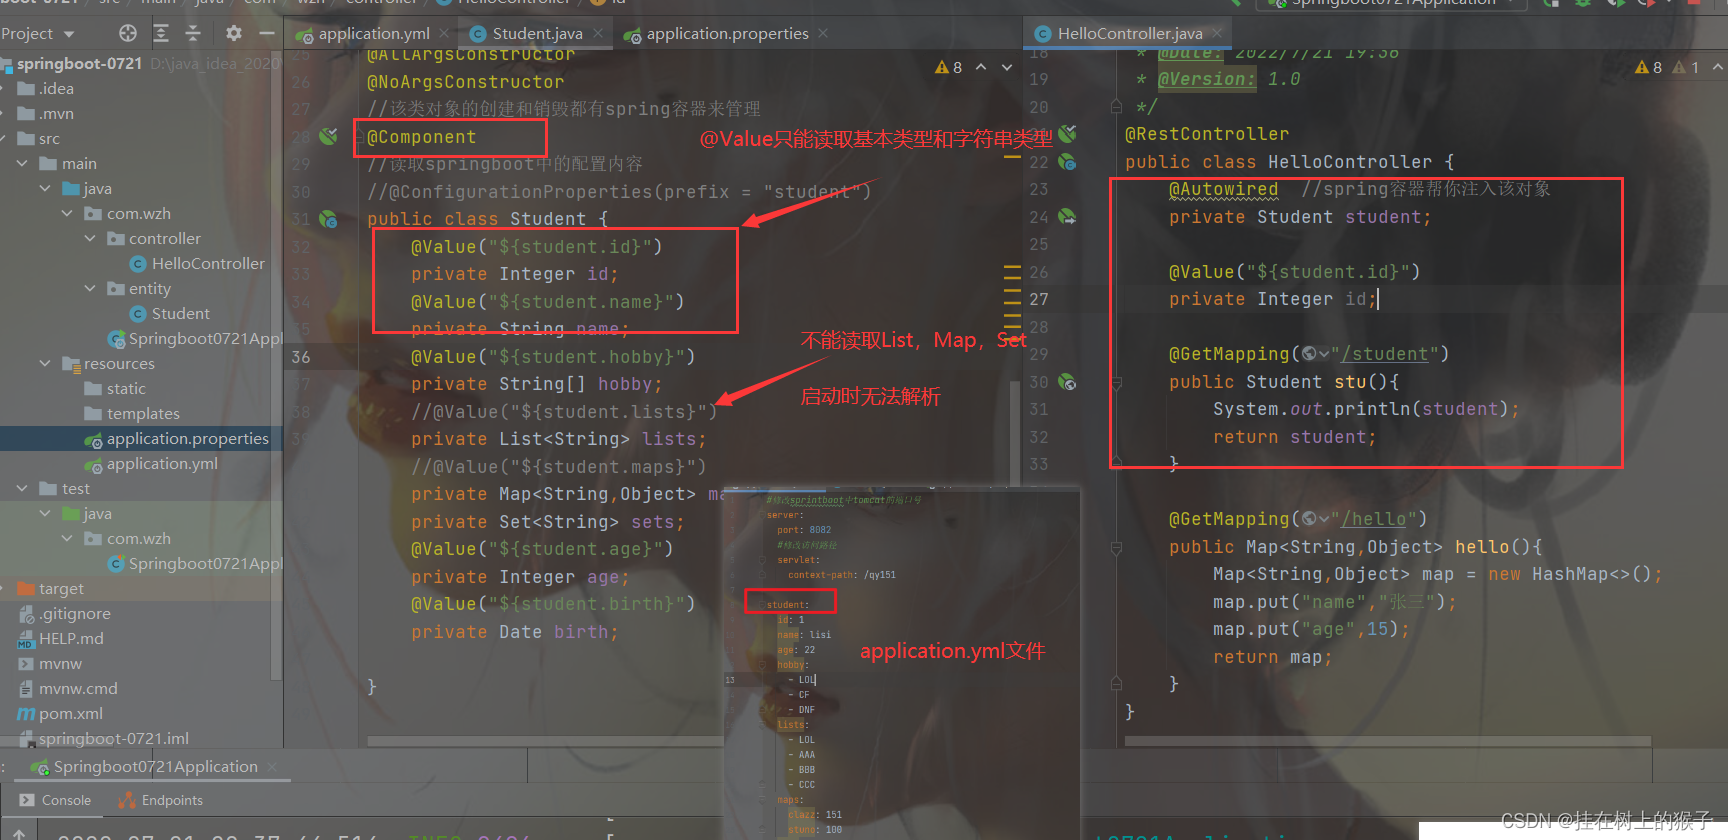
注意:
1,如果配置是写在properties里面
只有Map不能取到
2,如果配置写在yml 数组 集合 都取不到
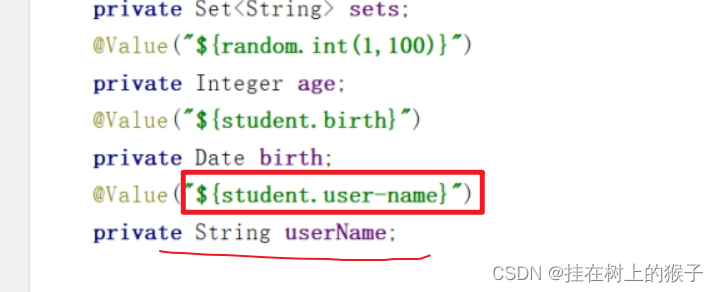
3,如果属性是使用驼峰命名法则不能使用属性名注入,要使用@Value("${student.user-name}")来取值
不能使用@Value("${student.userName}")来取值
7.多环境下开发下的配置---profiles配置详解
7.1.为什么要使用profiles
思考: 我们在实际开发中,环境有哪些?
开发环境---->测试环境---->上线环境 由于环境的不同,那么就会有不同的配置内容。
难道我们不断的修改配置内容。----不会
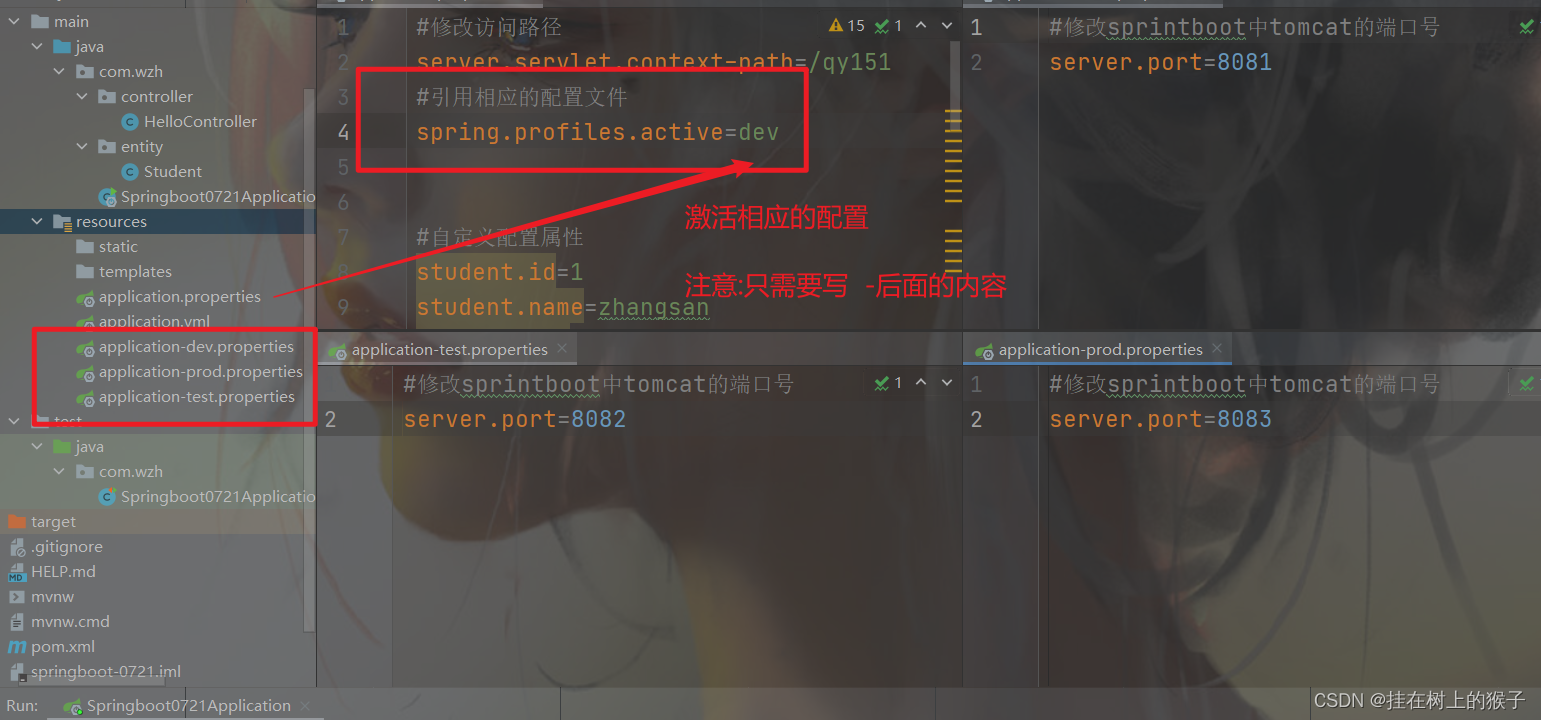
实际工作中,针对不同的环境配置不同的配置文件,然后再总的配置文件中激活相应的配置文件。那么如何快速的切换呢,这里就要使用profiles文件
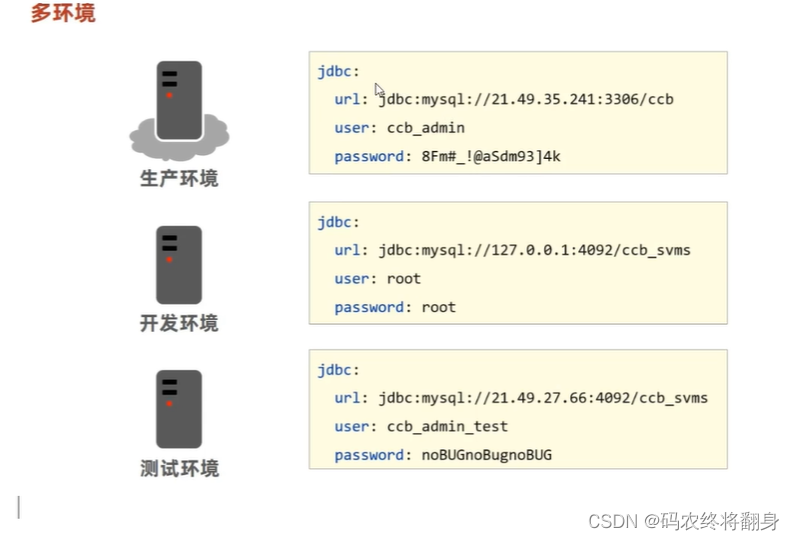
针对不同的环境设置不同的配置文件,然后在主配置中激活相应环境的配置。
applicaiton-环境.properties[yml]
7.2. 使用方法
1,创建applicatin-dev.properties
server.port=8081
2,创建applicatin-test.properties
server.port=8082
3,创建applicatin-prod.properties
server.port=8083
4,修改application.properties
spring.profiles.active=dev在application.properteis里面激活哪个文件就会使用哪个端口
只需要写-后面的内容
8. Springboot注册web三大组件
什么是web的三个组件?
Servlet和Filter以及Linstener监听器。
为什么要注册这三个组件呢?
因为我们未来在开发时,有可能要集成第三方框架,而第三方框架的底层可能就依赖于过滤器或者servlet.
第三方就要求你把人家的filter注册到springboot中。比如:shiro权限框架,它的底层就是基于Filter过滤器,把该过滤器注册到Tomcat容器。因为我们的springboot没有了web.xml文件。
8.1.注册Servlet到Springboot内置的Tomcat
如何注册呢?
思考: 早期:
<1>Servlet类
<2>注册到Tomcat容器web.xml
Servlet类
/
现在:都没有web.xml
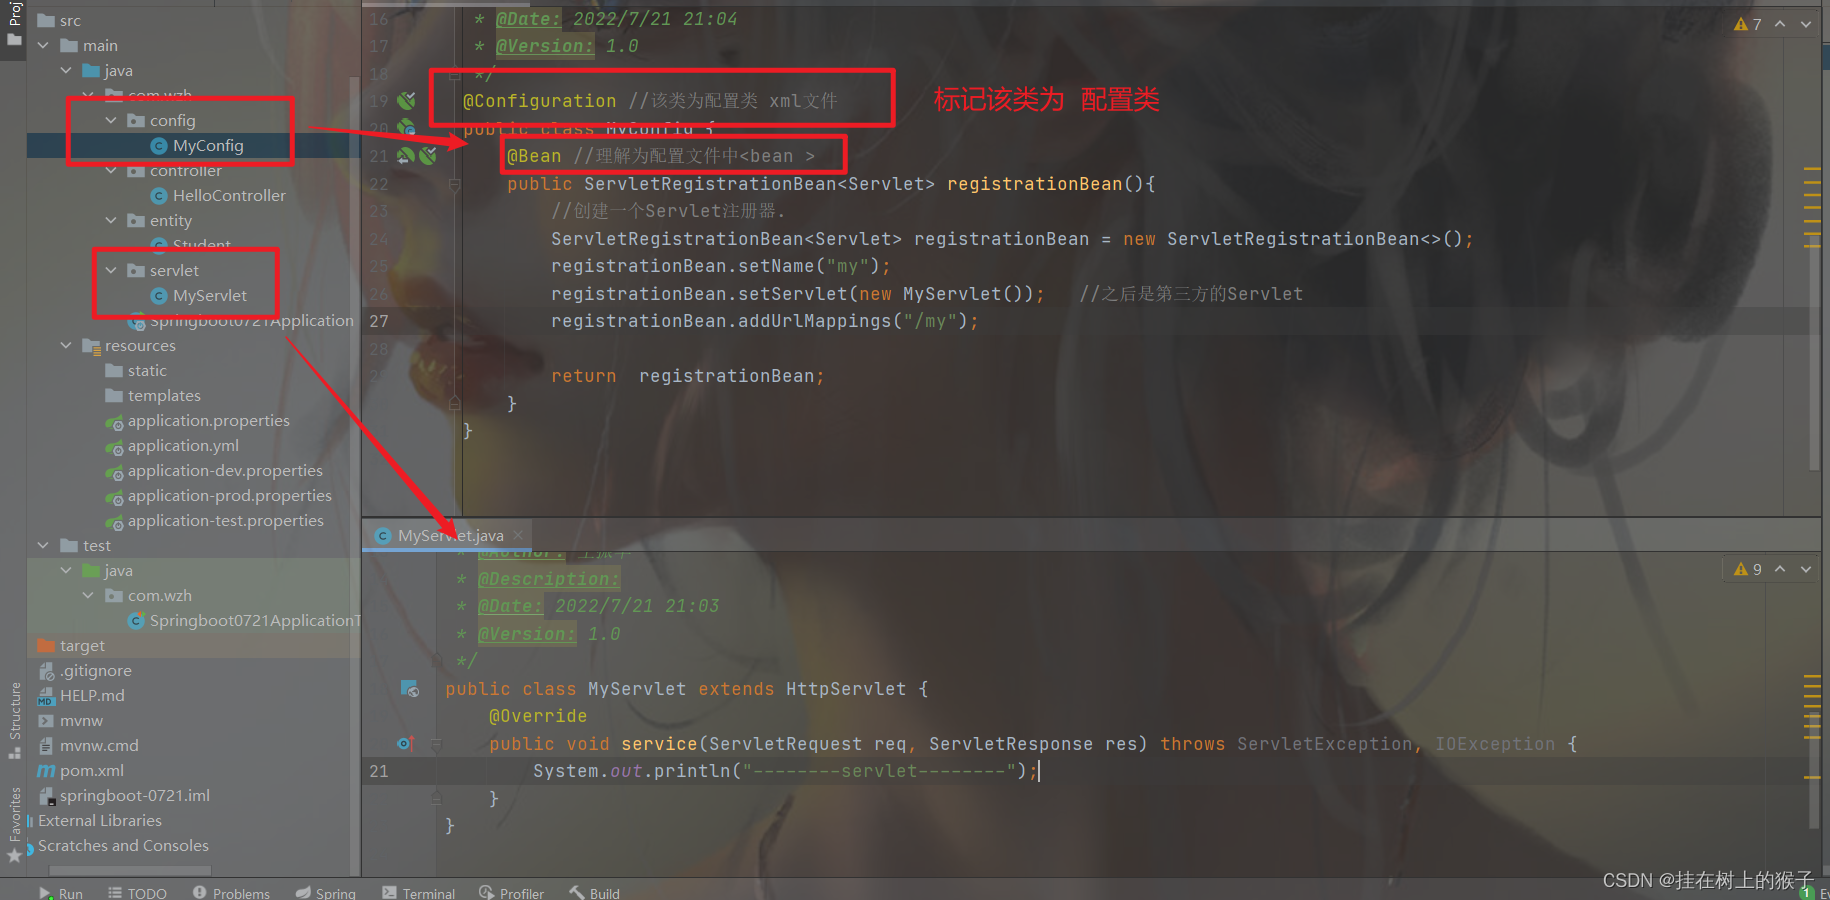
(1)创建一个Servlet
package com.wzh.servlet;
import javax.servlet.ServletException;
import javax.servlet.ServletRequest;
import javax.servlet.ServletResponse;
import javax.servlet.http.HttpServlet;
import java.io.IOException;
/**
 * @ProjectName: springboot-0721
 * @Package: com.wzh.servlet
 * @ClassName: MyServlet
 * @Author: 王振华
 * @Description:
 * @Date: 2022/7/21 21:03
 * @Version: 1.0
 */
public class MyServlet extends HttpServlet {
    @Override
    public void service(ServletRequest req, ServletResponse res) throws ServletException, IOException {
        System.out.println("--------servlet--------");
    }
}
(2)创建一个配置类:
package com.wzh.config;
import com.wzh.servlet.MyServlet;
import org.springframework.boot.web.servlet.ServletRegistrationBean;
import org.springframework.context.annotation.Bean;
import org.springframework.context.annotation.Configuration;
import javax.servlet.Servlet;
/**
 * @ProjectName: springboot-0721
 * @Package: com.wzh.config
 * @ClassName: MyConfig
 * @Author: 王振华
 * @Description: 配置类
 * @Date: 2022/7/21 21:04
 * @Version: 1.0
 */
@Configuration //该类为配置类 等价于.xml文件
public class MyConfig {
    @Bean //把返回的对象,放入到spring容器。  理解为配置文件中
    public ServletRegistrationBean registrationBean(){
        //创建一个Servlet注册器.
        ServletRegistrationBean registrationBean = new ServletRegistrationBean<>();
        registrationBean.setName("my");//设置servlet名称
         //注册我们的servlet
        registrationBean.setServlet(new MyServlet());   //注册自定义servlet,之后是第三方的Servlet
     //设置servlet的初始化参数
        Map map=new HashMap<>();
        map.put("name","张三");
        registrationBean.setInitParameters(map);
      //设置servlet的映射,请求路径
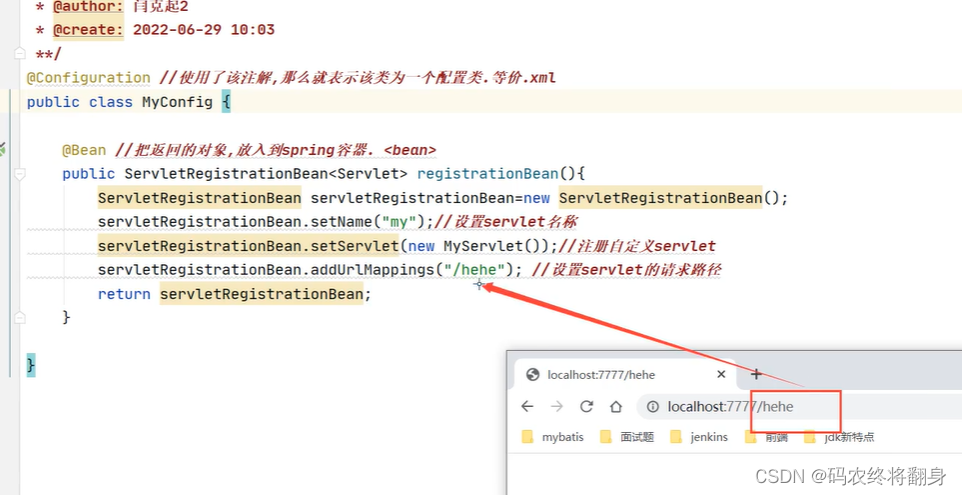
        registrationBean.addUrlMappings("/my","/userServlet","/hehe");
        return  registrationBean;
    }
}
测试
8.2.注册Filter到springboot内置tomcat
以前如何注册过滤器: web.xml
(1)创建Filter类,未来使用第三方的
public class AppFilter implements Filter {
    @Override
    public void init(FilterConfig filterConfig) throws ServletException {
        String env = filterConfig.getInitParameter("env");
        String hello = filterConfig.getInitParameter("hello");
        System.out.println(env+"  "+hello);
    }
    @Override
    public void doFilter(ServletRequest request, ServletResponse response, FilterChain chain) throws IOException, ServletException {
        System.out.println("doFilter");
        chain.doFilter(request,response);
    }
    @Override
    public void destroy() {

    }
}
(2)filter注册到配置类中
//配置filetr
    @Bean
    public FilterRegistrationBean filterRegistrationBean(){
        FilterRegistrationBean bean = new FilterRegistrationBean<>();
        bean.setName("myFilter");
        bean.setFilter(new AppFilter());
        bean.addUrlPatterns("/*");
        return bean;
    }
9.springboot整合拦截器
拦截器:他只会对静态资源和接口路径进行拦截,不会拦截jsp模板引擎。
(1)自定义拦截器
package com.wzh.intercepter;
import org.springframework.web.servlet.HandlerInterceptor;
import javax.servlet.http.HttpServletRequest;
import javax.servlet.http.HttpServletResponse;
/**
 * @ProjectName: springboot-0721
 * @Package: com.wzh.intercepter
 * @ClassName: MyInterceptor
 * @Author: 王振华
 * @Description:
 * @Date: 2022/10/27 13:48
 * @Version: 1.0
 */
public class MyInterceptor implements HandlerInterceptor {
    @Override
    public boolean preHandle(HttpServletRequest request, HttpServletResponse response, Object handler) throws Exception {
        System.out.println("============拦截器==========");
        return false;
    }
}
(2)修改配置文件,继承WebMvcConfigurationSupport类,注册自定义拦截器。
package com.wzh.config;
import com.wzh.filter.AppFilter;
import com.wzh.intercepter.MyInterceptor;
import com.wzh.servlet.MyServlet;
import org.springframework.boot.web.servlet.FilterRegistrationBean;
import org.springframework.boot.web.servlet.ServletRegistrationBean;
import org.springframework.context.annotation.Bean;
import org.springframework.context.annotation.Configuration;
import org.springframework.web.servlet.config.annotation.InterceptorRegistry;
import org.springframework.web.servlet.config.annotation.WebMvcConfigurationSupport;
import javax.servlet.Filter;
import javax.servlet.Servlet;
/**
 * @ProjectName: springboot-0721
 * @Package: com.wzh.config
 * @ClassName: MyConfig
 * @Author: 王振华
 * @Description: 配置类
 * @Date: 2022/7/21 21:04
 * @Version: 1.0
 */
@Configuration //该类为配置类 xml文件
public class MyConfig extends WebMvcConfigurationSupport {
    //注册自定义拦截器:拦截器只会拦截controller接口路径,不会拦截servlet路径
    @Override
    protected void addInterceptors(InterceptorRegistry registry) {
        //excludePathPatterns("/hello") 放行路径
        // addPathPatterns("/**")   拦截路径
        registry.addInterceptor(new MyInterceptor()).excludePathPatterns("/hello").addPathPatterns("/**");
    }
    @Bean //理解为配置文件中
    public ServletRegistrationBean registrationBean() {
        //创建一个Servlet注册器.
        ServletRegistrationBean registrationBean = new ServletRegistrationBean<>();
        registrationBean.setName("my");
        registrationBean.setServlet(new MyServlet());   //之后是第三方的Servlet
        registrationBean.addUrlMappings("/my");
        return registrationBean;
    }
    //配置filetr
    @Bean
    public FilterRegistrationBean filterRegistrationBean() {
        FilterRegistrationBean bean = new FilterRegistrationBean<>();
        bean.setFilter(new AppFilter());
        bean.addUrlPatterns("/*");
        return bean;
    }
}
package com.wzh.controller;
import com.wzh.entity.Student;
import org.springframework.beans.factory.annotation.Autowired;
import org.springframework.beans.factory.annotation.Value;
import org.springframework.web.bind.annotation.GetMapping;
import org.springframework.web.bind.annotation.RestController;
import java.util.HashMap;
import java.util.Map;
/**
 * @ProjectName: springboot-0721
 * @Package: com.wzh.controller
 * @ClassName: HelloController
 * @Author: 王振华
 * @Description:
 * @Date: 2022/7/21 19:36
 * @Version: 1.0
 */
@RestController
public class HelloController {
    @Autowired  //spring容器帮你注入该对象
    private Student student;
    @Value("${student.id}")
    private Integer aaa;
    @GetMapping("/student")
    public Student stu() {
        System.out.println(aaa);
        return null;
    }
    @GetMapping("/hello")
    public Map hello() {
        Map map = new HashMap<>();
        map.put("name", "张三");
        map.put("age", 15);
        return map;
    }
    @GetMapping("/index")
    public String index(){
        System.out.println("index");
        return "index";
    }
}
这里只会拦截student和index,hello被设置为放行路径
10.springboot自动包扫描
默认springboot自动扫描,主启动类所在的包及其子包都可以自动扫描
10.1.如何自动扫描

@SpringBootApplication
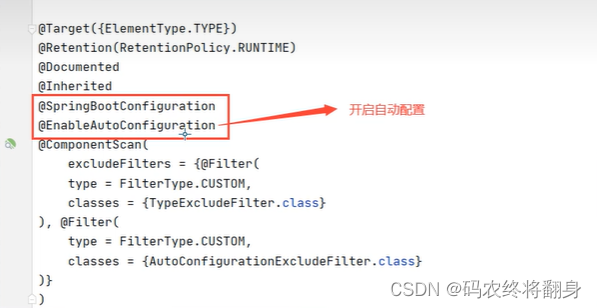
@EnableAutoConfiguration
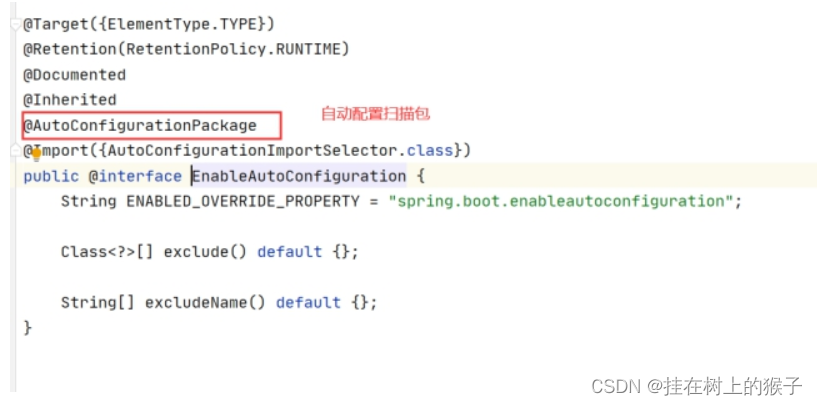
@AutoConfigurationPackage
 点进Registrar
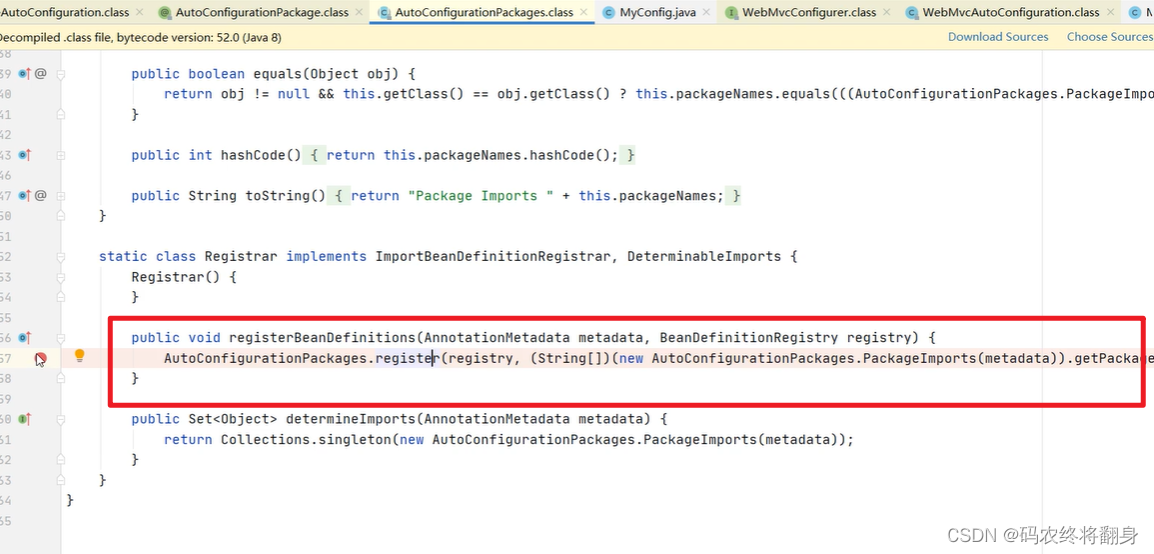
public void registerBeanDefinitions(AnnotationMetadata metadata, BeanDefinitionRegistry registry) {
    AutoConfigurationPackages.register(registry, (String[])(new AutoConfigurationPackages.PackageImports(metadata)).getPackageNames().toArray(new String[0]));
}
找到getPackageNames()方法,debug断点运行一遍就能看到扫描的包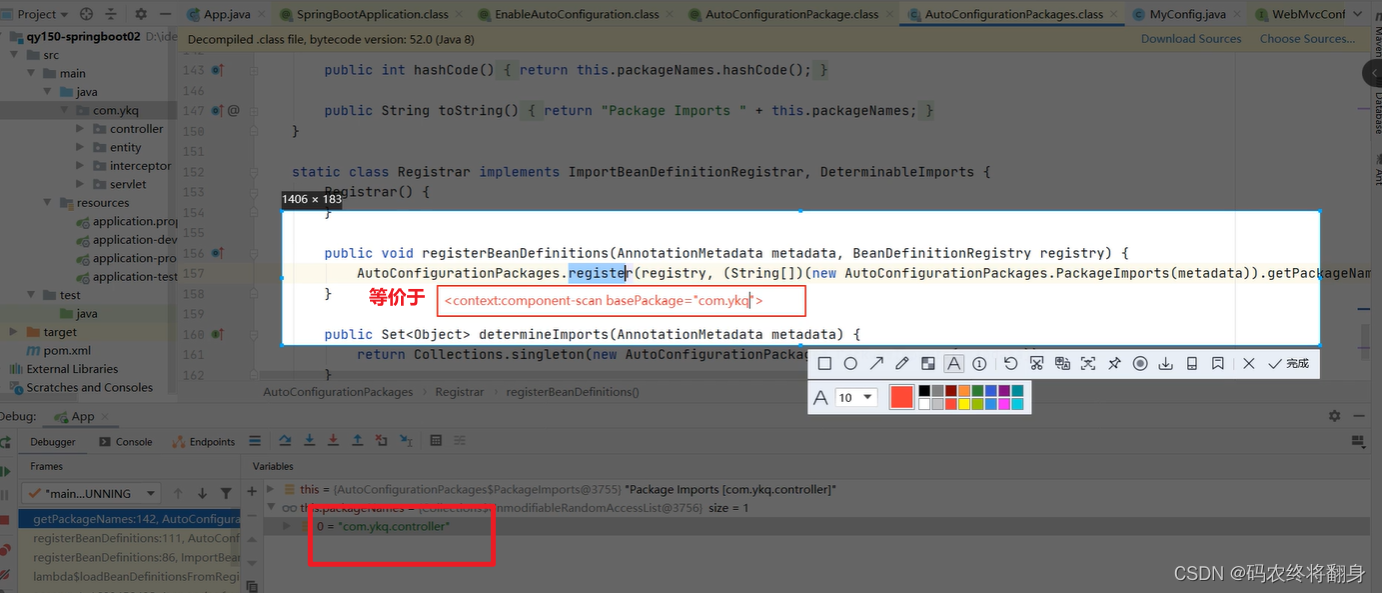

10.2.如何扫描指定包
package com.wzh;
import org.springframework.boot.SpringApplication;
import org.springframework.boot.autoconfigure.SpringBootApplication;
//指定扫描的包以及子包
@SpringBootApplication(scanBasePackages = "com.wzh")
public class Springboot0721Application {
    //加载那含有@SpringBootApplication注解的类,它的特殊之处就是该类使用了@SpringBootApplication ,它是一个复合注解。
    //@EnableAutoConfiguration
    public static void main(String[] args) {
        SpringApplication.run(Springboot0721Application.class, args);
    }
}

11.springboot自动装配原理--->重要
我们没有配置任何关于spring的配置,为什么可以有效果。springboot会自动加载很多装载类,而这些装配类,可以完成相应的装配功能。
非常详细的SpringBoot-自动装配原理 - 帅哥的爸爸 - 博客园 (cnblogs.com)
什么是自动装配?
无需手动加载某些配置,而由Springboot自动加载进来。
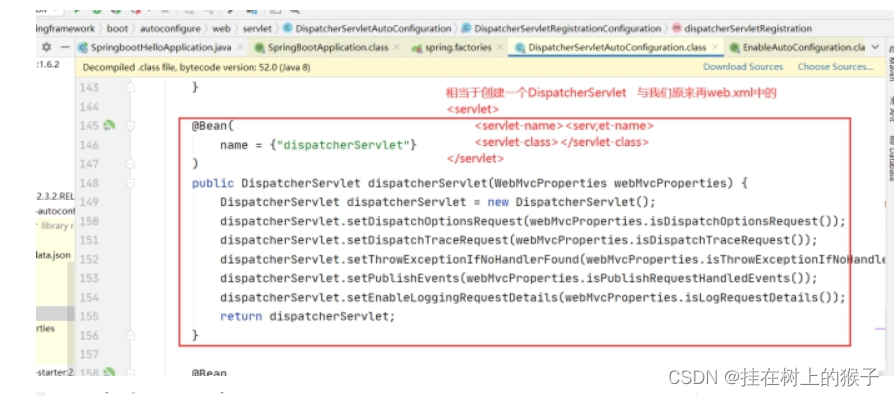
譬如: 自己加载DispatcherServlet.
11.1.如何加载自动配置类

可以看到该注解是一个复合注解,该复合注解中最重要的组件@EnableConfiguration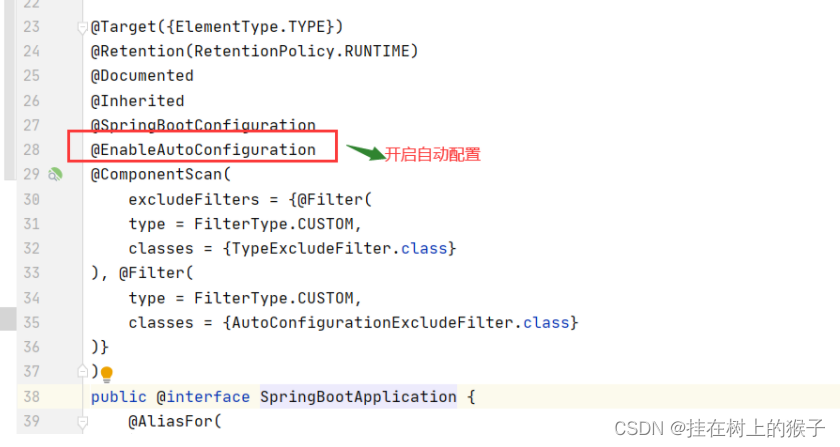
可以看到@EnableAutoConfiguration 他还是一个复合注解,该注解中最重要的是:
@Import({AutoConfigurationImportSelector.class})
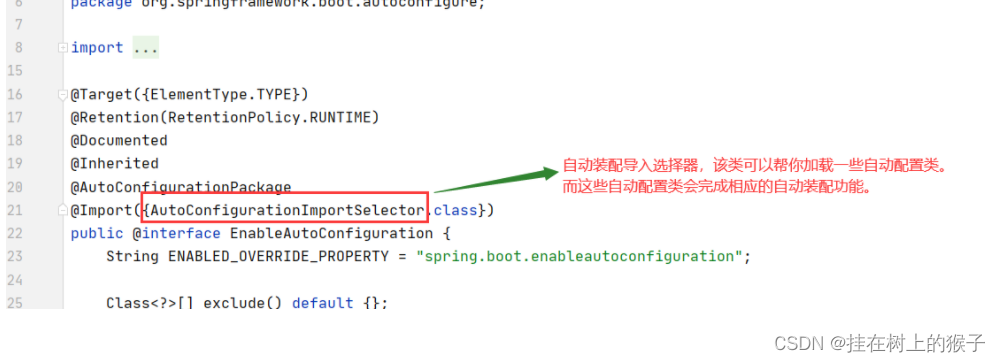
@Import(AutoConfigurationImportSelector.class)
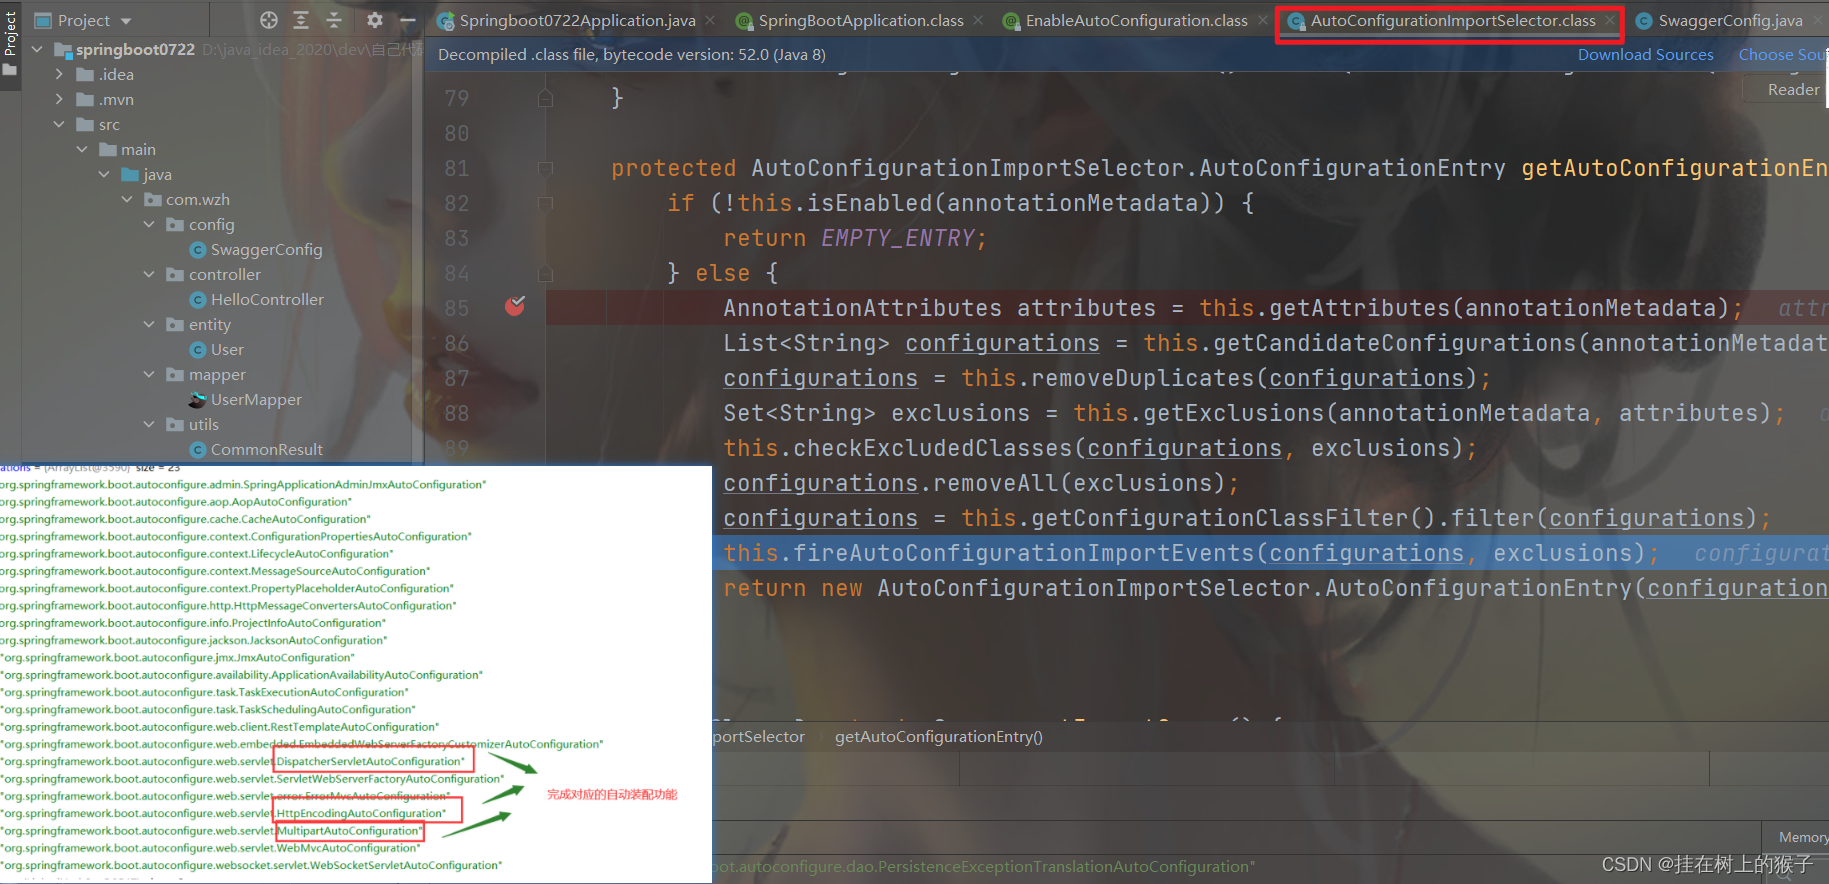
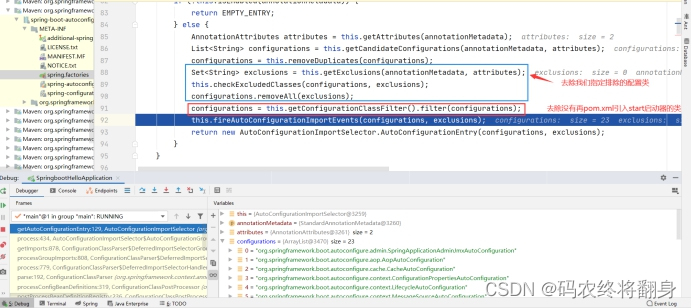
AutoConfigurationImportSelector的下面的方法会当Springboot启动时默认加载127【2.7.1】个自动配置类
然后再排除不生效的配置类
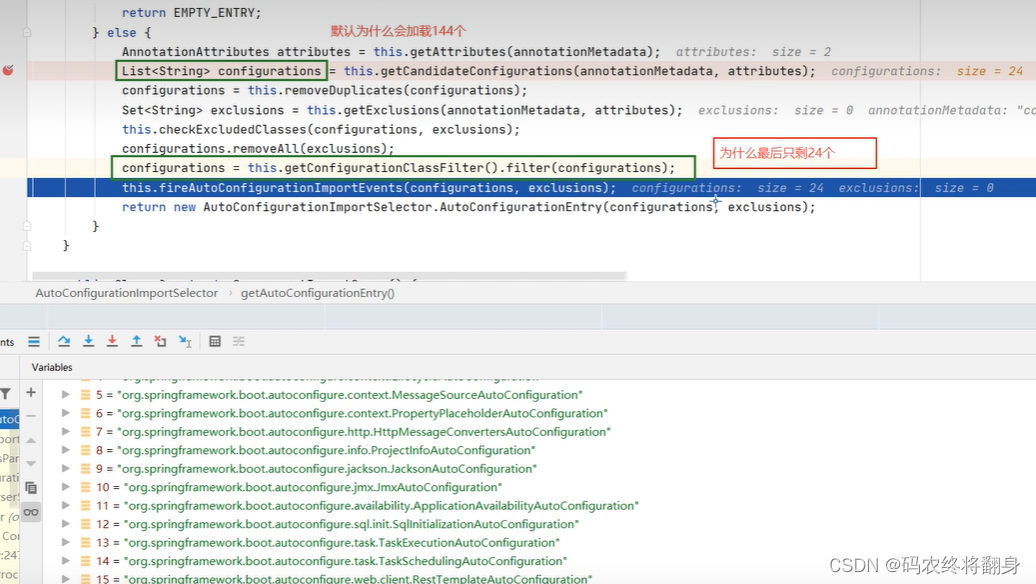
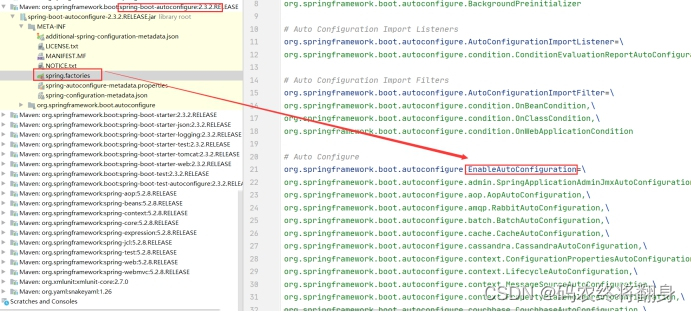
为什么总的自动装配类由144个(之前版本2.2.2是127个),还是上边这个方法。
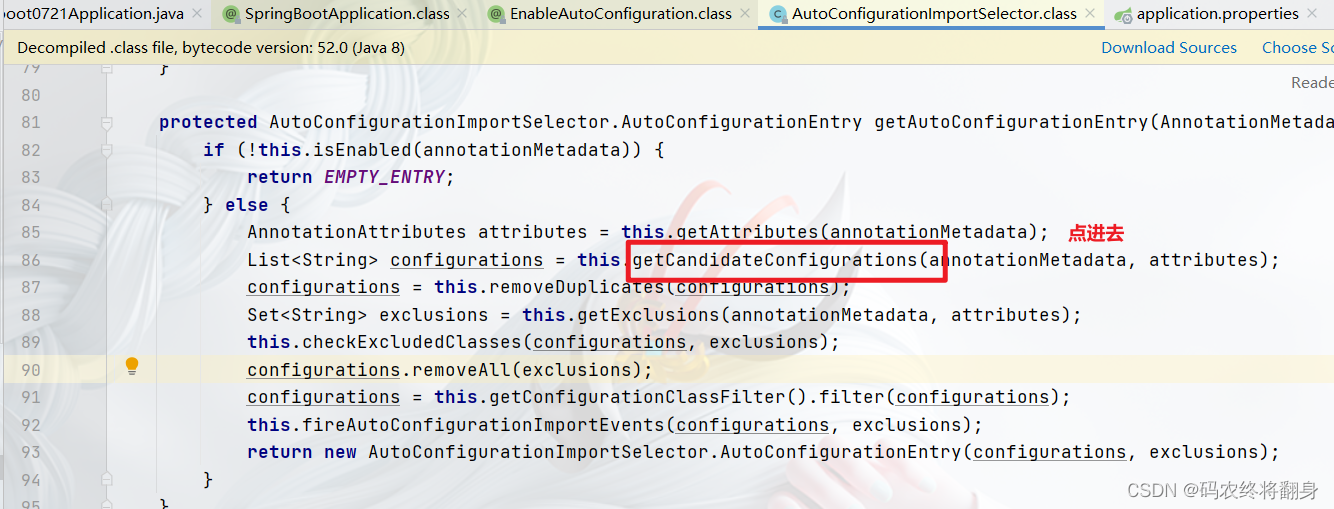

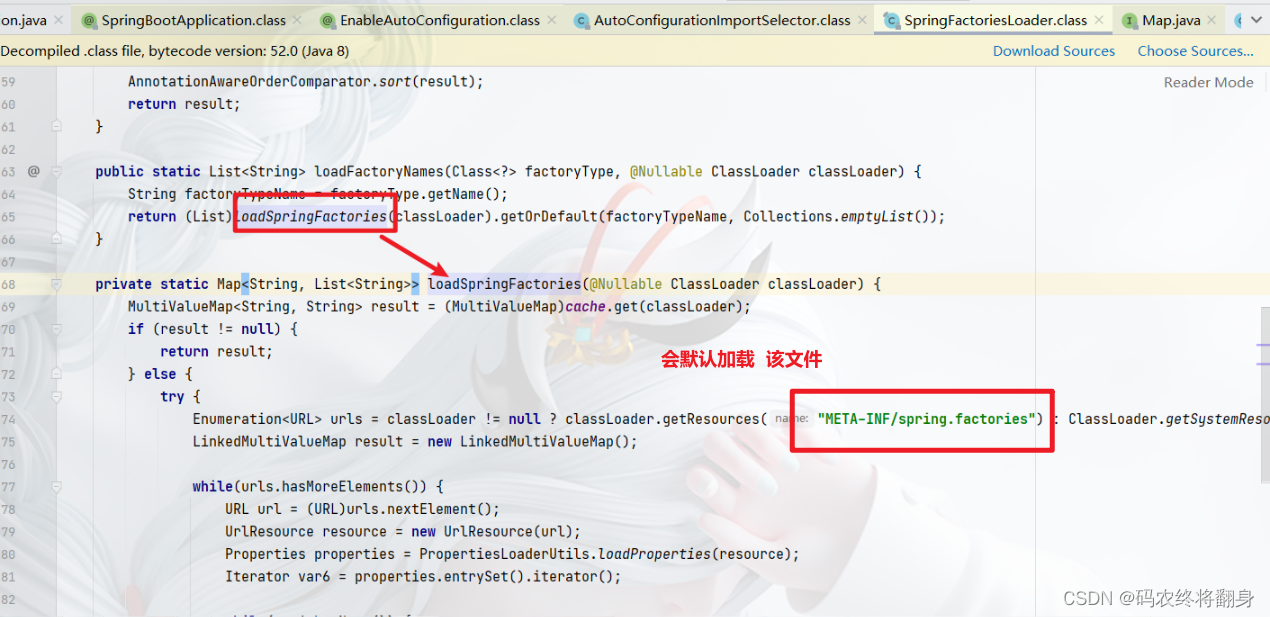
META-INF/spring.factories所在位置: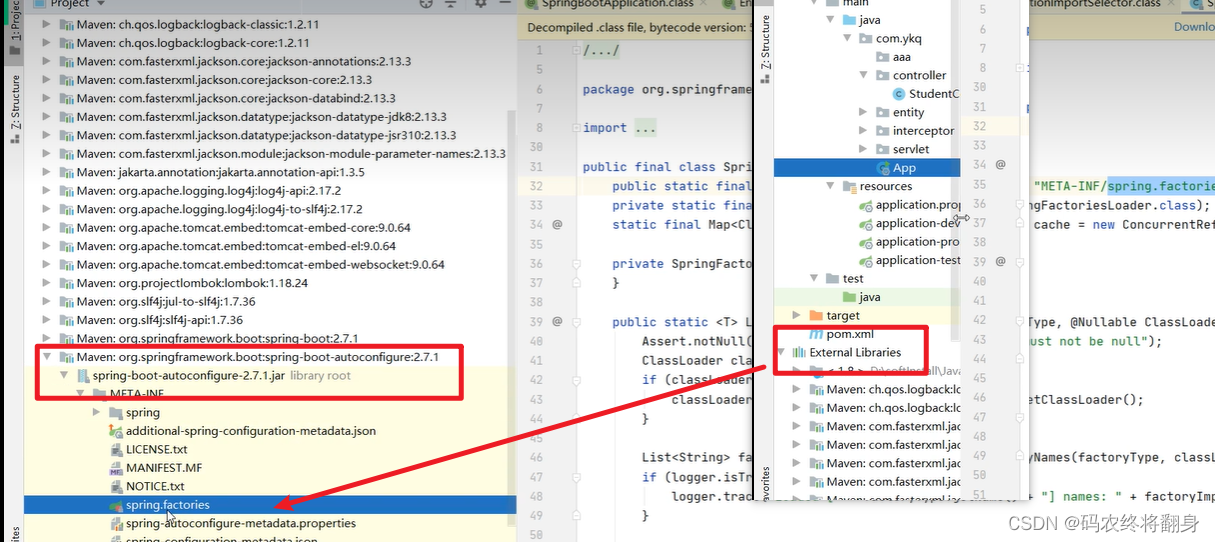
因为这些自动装配类都在这个文件中写死了。
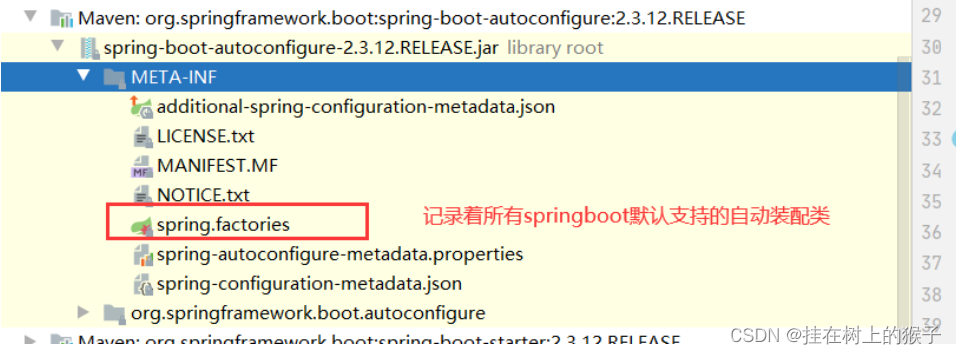
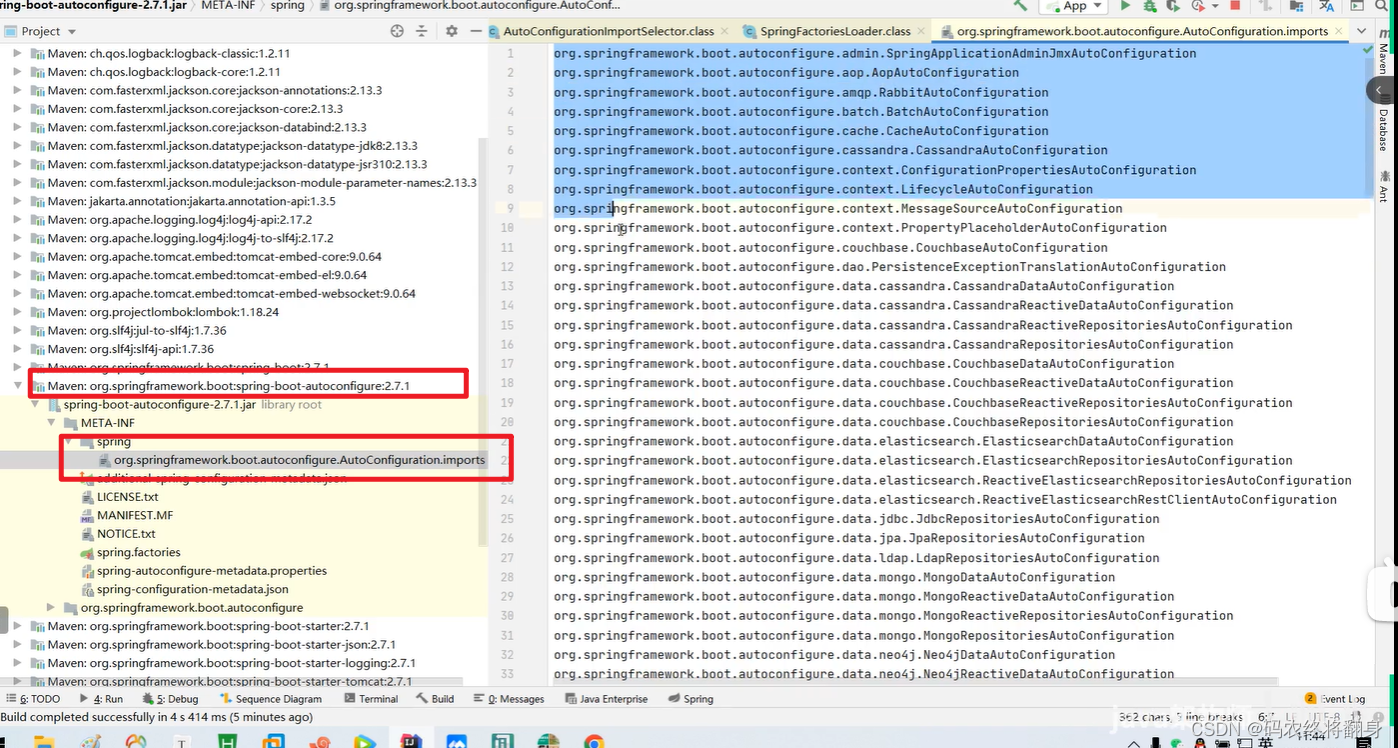
新版本位置:
 为什么最后只加载24个。
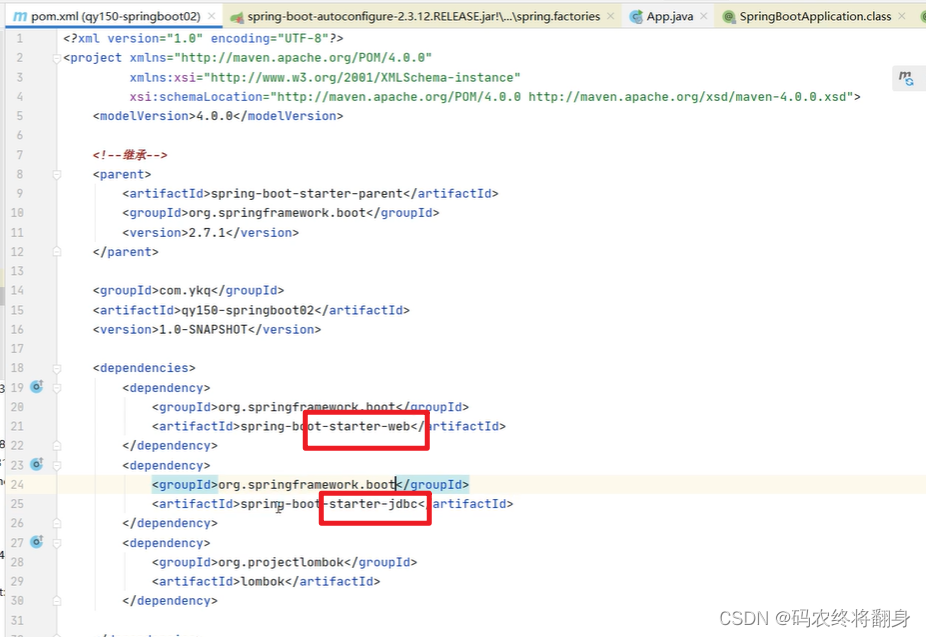
因为在pom.xml文件中只引入了一个start标签依赖。
每当pom.xml文件中多引入一个start标签依赖springboot会多加载n个自动装配类
11.2.Springboot自动装配的原理
文字描述:
主函数启动时会运行一个含@springbootApplication注解的类,--->@springbootApplication中含有@EnableAutoconfiguration开启自动配置的功能--->@Import({AutoConfigurationImportselector.class}))该注解会导入
AutoConfigurationImportselector而这个类会加载一些自动装配类。从而完成了自动装配的功能。

springboot在启动时会自动去加载带有@SpringBootApplication注解的类,该注解是一个复合注解,这个注解中有一个@EnableAutoConfiguration开启自动配置的注解,该注解也是个复合注解,在该注解中有一个@AutoConfigutationPackage自动配置包的注解,在这个注解内部有一个@Import注解,该注解导入了一个名叫Registar的类,该类中有一个名为registerBeanDefinitions的方法,这个方法就是springboot自动配置包扫描的方法,在这个方法内部调用了getPackageNames()的方法,这个方法会获取我们的主启动类所在的包名。最终,springboot就会根据这个方法获取到我们的包名并根据这个包名自动配置包扫描。这就是springboot自动扫描的原理。
如何加载前端控制器
以前的配置
  org*****DispatcherServlet


  1


   /
DispatcherServletAutoConfiguration

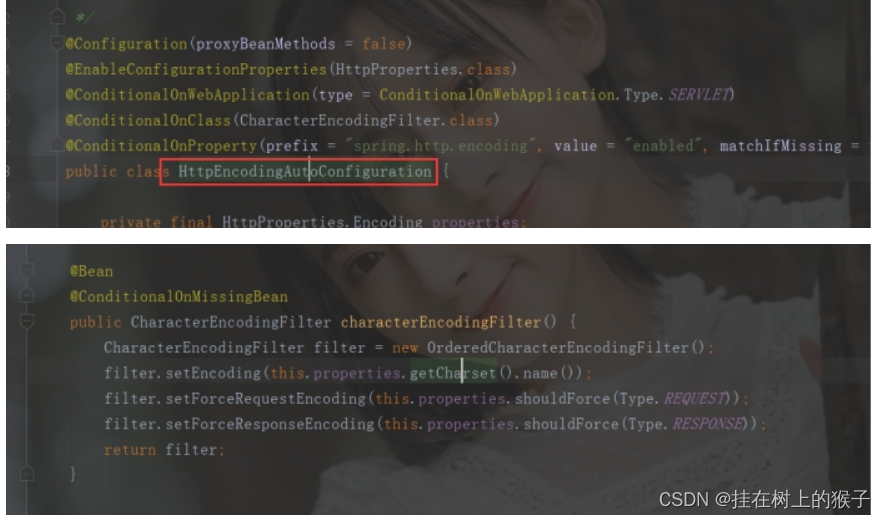
如何加载编码过滤器
12.springboot整合jdbc数据源
数据源: 指的是数据源。即是: springboot框架连接数据库。
(1)引入依赖
org.springframework.boot spring-boot-starter-jdbcmysql mysql-connector-java
(2)配置数据源信息---application.yml
#配置数据源
spring:
  datasource:
    driver-class-name: com.mysql.cj.jdbc.Driver
    url: jdbc:mysql://localhost:3306/myaa?serverTimezone=Asia/Shanghai
    username: root
    password: 123456
    max-active: 10
    min-idle: 5
    max-wait: 5000
    initial-size: 5
或 application.properties
# 配置数据源
spring.datasource.driver-class-name=com.mysql.cj.jdbc.Driver
spring.datasource.url=jdbc:mysql://localhost:3306/mydb?serverTimezone=Asia/Shanghai
spring.datasource.username=root
spring.datasource.password=123456

(3)测试
@SpringBootTest(classes = {Springboot0722Application.class})
class Springboot0722ApplicationTests {
    @Autowired
    private DataSource dataSource;
    @Test
    void contextLoads() throws SQLException {
        //验证了springboot可以帮你完成数据源的自动装配功能
        System.out.println(dataSource);
        System.out.println(dataSource.getConnection());
    }
}
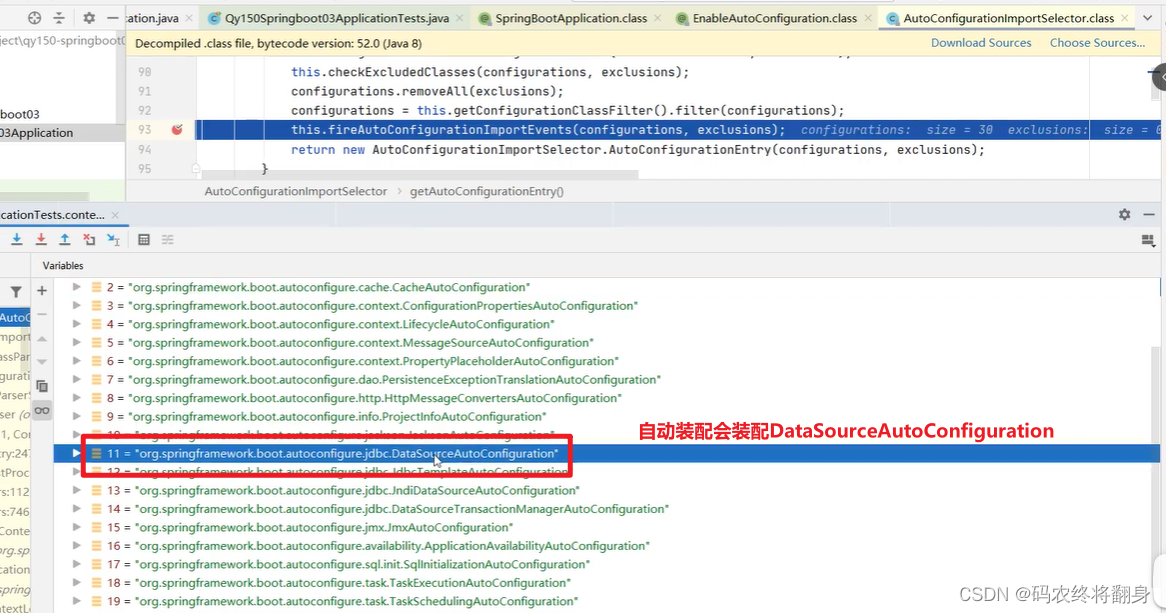
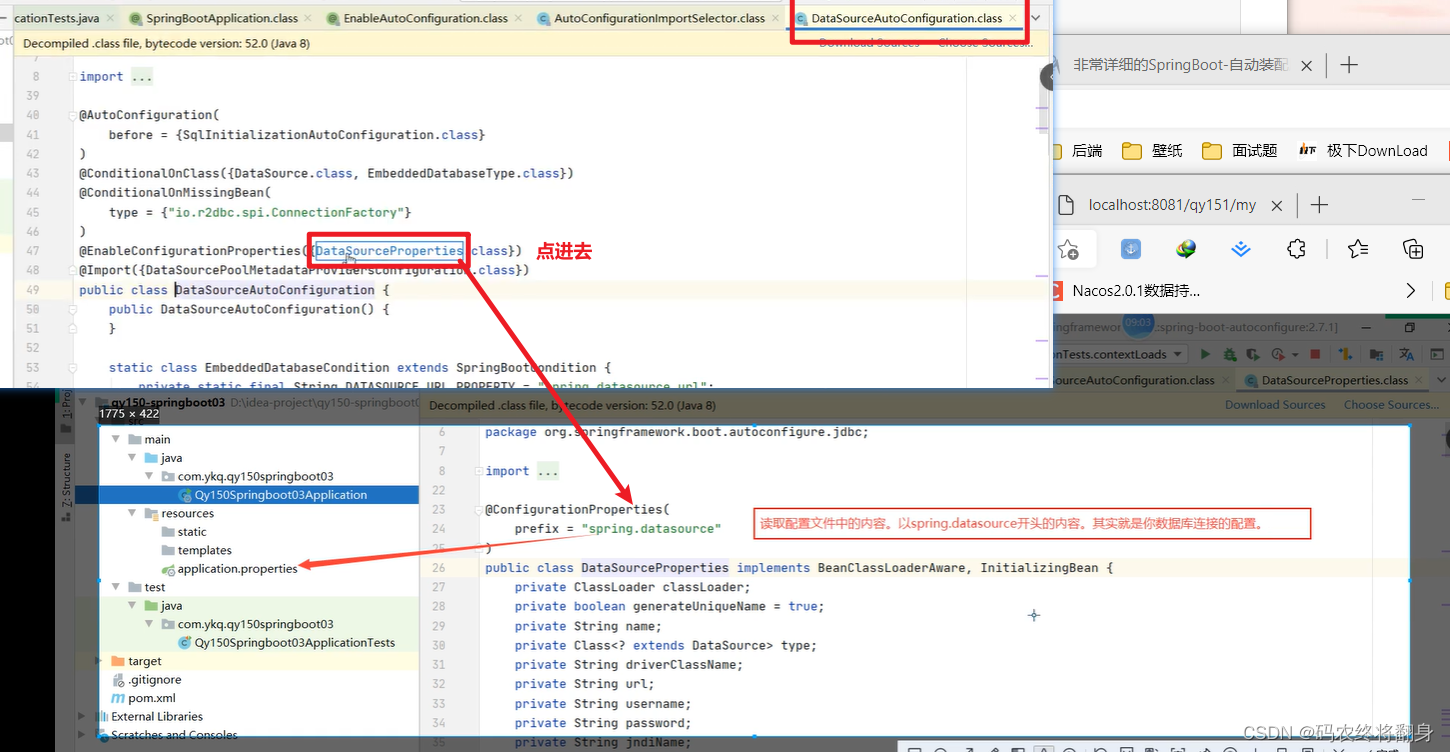
如果引入了jdbc的数据源,没有引入mysql依赖,也没有配置数据库连接信息

原因:
上面默认这个数据源使用的连接池Hikari。如果不想使用默认的连接池,我们可以引入第三方的连接池。
12.1.集成druid数据源
(1)引入依赖
            com.alibaba
            druid-spring-boot-starter
            1.2.8
(2)配置文件application.yml
spring:
  datasource:
    druid:
      driver-class-name: com.mysql.cj.jdbc.Driver
      url: jdbc:mysql://localhost:3306/myaa?serverTimezone=Asia/Shanghai
      username: root
      password: 123456
      #初始化的个数
      initial-size: 5
      #最大活跃数
      max-active: 10
      #最大等待时间
      max-wait: 3000
      #最小的闲置个数
      min-idle: 5
application.properties
spring.datasource.druid.url=jdbc:mysql://localhost:3306/mydb?serverTimezone=Asia/Shanghai
spring.datasource.druid.driver-class-name=com.mysql.cj.jdbc.Driver
spring.datasource.druid.username=root
spring.datasource.druid.password=root
#初始化的个数
spring.datasource.druid.initial-size=5
# 最大活跃数
spring.datasource.druid.max-active=10
# 最大等待时间
spring.datasource.druid.max-wait=3000
# 最小的闲置个数
spring.datasource.druid.min-idle=5
(3)测试
@SpringBootTest(classes = {Springboot0722Application.class})
class Springboot0722ApplicationTests {
    @Autowired
    private DataSource dataSource;
    @Test
    void contextLoads() throws SQLException {
        //验证了springboot可以帮你完成数据源的自动装配功能
        System.out.println(dataSource);
        System.out.println(dataSource.getConnection());
    }
}
13.springboot整合mybatis
(1)引入mybatis启动依赖类
            org.mybatis.spring.boot
            mybatis-spring-boot-starter
            2.2.2
(2) 修改配置文件appilication.yml
#指定映射文件的路径
mybatis:
  mapper-locations: classpath:mapper/*.xml
(3)在主启动类加上注解@MapperScan(basePackages = "com.wzh.mapper")
@SpringBootApplication
@MapperScan(basePackages = "com.wzh.mapper") //为指定的包下的接口生成代理实现类
public class Springboot0722Application {
    public static void main(String[] args) {
        //加载那含有@SpringBootApplication注解的类,它的特殊之处就是该类使用了@SpringBootApplication ,它是一个复合注解。
        //@EnableAutoConfiguration
        SpringApplication.run(Springboot0722Application.class, args);
    }
}
也可以在mapper接口上加注解@Mapper
package com.wzh.mapper;
import com.wzh.entity.User;
import org.apache.ibatis.annotations.Mapper;
import org.springframework.stereotype.Component;
import java.util.List;
/**
 * @ProjectName: springboot0722
 * @Package: com.wzh.mapper
 * @ClassName: UserMapper
 * @Author: 王振华
 * @Description:
 * @Date: 2022/7/22 19:38
 * @Version: 1.0
 */
//@Mapper
public interface UserMapper {
    int insert(User user);
    int delete(Integer id);
    int update(User user);
    User selectById(Integer id);
    /**
    * 方法描述
    * 查询所有
    * @return:
    */
    List selectAll();
}
第一种是 批量 为指定的包下的接口生成代理实现类
第二种需要每个接口都要添加@mapper
(4)测试
@Test
    public void selectById(){
        HelloController helloController = new HelloController();
        CommonResult commonResult = helloController.selectById(1);
        System.out.println(commonResult);
    }
14.springboot整合PageHelper分页插件
(1)引入依赖
            com.github.pagehelper
            pagehelper-spring-boot-starter
            1.4.2
(2)测试:
@Autowired
    private UserMapper userMapper;
    @Test
    public void test01(){
        PageHelper.startPage(1,3);
        List users = userMapper.selectAll();
        PageInfo pageInfo = new PageInfo<>(users);
        System.out.println("当前页码:"+pageInfo.getPageNum());
        System.out.println("当前总页码:"+pageInfo.getPages());
        System.out.println("总条数:"+pageInfo.getTotal());
        System.out.println("当前页码的记录:"+pageInfo.getList());
    }

15.springboot整合swagger2
15.1 什么是swagger
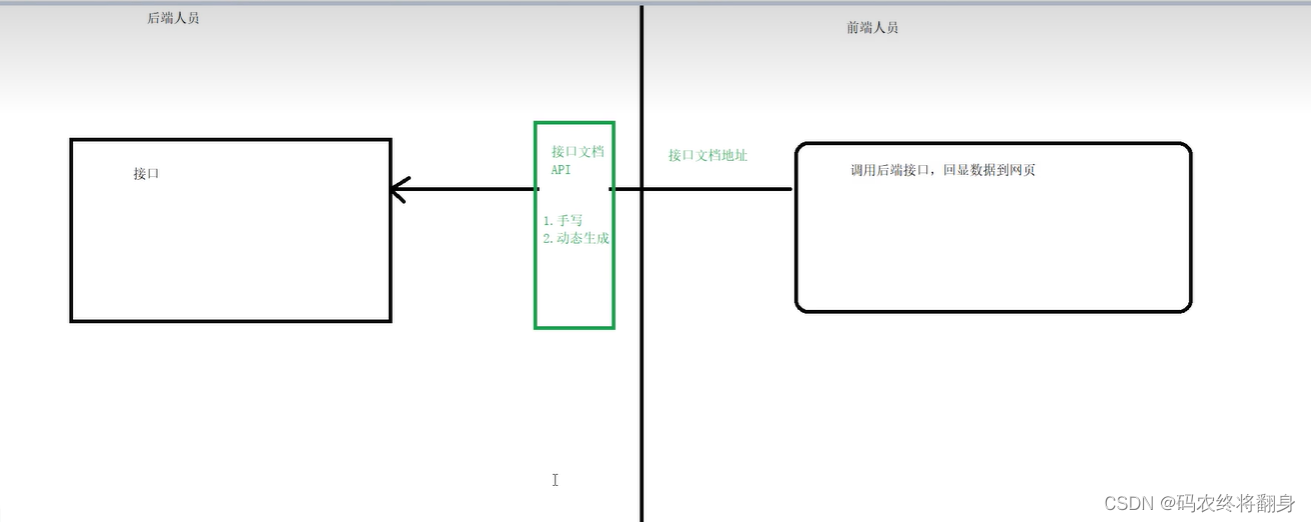
它是一个接口文档----用来前后端分离的一款文档。
编写和维护接口文档是每个程序员的职责,根据Swagger2可以快速帮助我们编写最新的API接口文档,再也不用担心开会前仍忙于整理各种资料了,间接提升了团队开发的沟通效率。

15.2 为什么使用swagger
15.3 整合swagger2
(1)引入swagger依赖
            com.spring4all
            swagger-spring-boot-starter
            1.9.1.RELEASE


            com.github.xiaoymin
            swagger-bootstrap-ui
            1.9.6
(2)创建swagger配置类
package com.wzh.config;
import org.springframework.context.annotation.Bean;
import org.springframework.context.annotation.Configuration;
import springfox.documentation.builders.RequestHandlerSelectors;
import springfox.documentation.service.ApiInfo;
import springfox.documentation.service.Contact;
import springfox.documentation.service.VendorExtension;
import springfox.documentation.spi.DocumentationType;
import springfox.documentation.spring.web.plugins.Docket;
import java.util.ArrayList;
import static springfox.documentation.spi.DocumentationType.SPRING_WEB;
/**
 * @ProjectName: springboot0722
 * @Package: com.wzh.config
 * @ClassName: SwaggerConfig
 * @Author: 王振华
 * @Description:
 * @Date: 2022/7/22 20:17
 * @Version: 1.0
 */
@Configuration  //标记该类为配置类
public class SwaggerConfig {
    @Bean   //swagger中所有的功能都封装在Docket类中。
    public Docket docket(){
        Docket docket = new Docket(DocumentationType.SWAGGER_2)
                .groupName("QY151")
                .apiInfo(getInfo())  //设置api文档信息
                .select()//设置哪些包下的类生产api接口文档
                .apis(RequestHandlerSelectors.basePackage("com.wzh.controller")) //指定为哪些包下的类生成接口文档
                .paths(PathSelectors.any())
                .build();
        return docket;
    }
    //定义自己接口文档信息
    private ApiInfo getInfo(){
        Contact DEFAULT_CONTACT = new Contact("王振华", "http://www/baidu.com", "13234@qq.com");
        ApiInfo apiInfo = new ApiInfo("员工管理系统API接口文档", "世界上最牛的一个文档", "V1.0", "http://www/jd.com",
                DEFAULT_CONTACT, "xx科技有限公司", "http://www.apache.org/licenses/LICENSE-2.0", new ArrayList());
        return apiInfo;
    }
}
(3)开启swagger注解

(4)使用swagger注解
swagger通过注解表明该接口会生成文档,包括接口名、请求方法、参数、返回信息的等等。
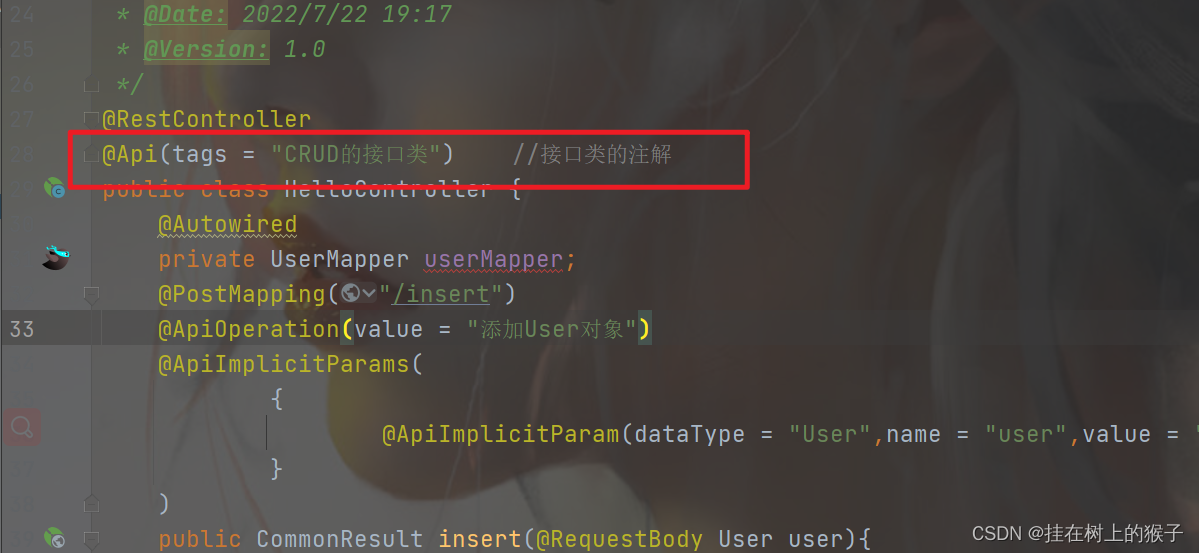
@Api:修饰整个类,描述Controller的作用 接口类的注解---接口类上 tag属性
@ApiOperation:描述一个类的一个方法,或者说一个接口 接口方法的注解---接口方法上 value:
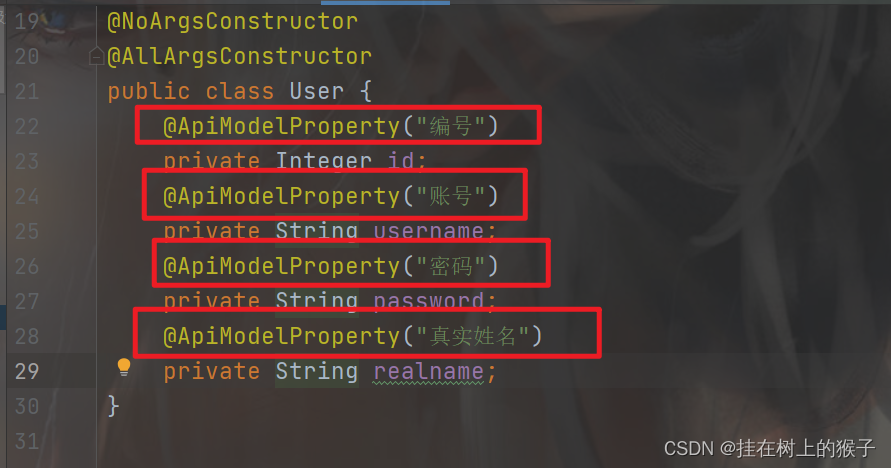
@ApiParam:单个参数描述
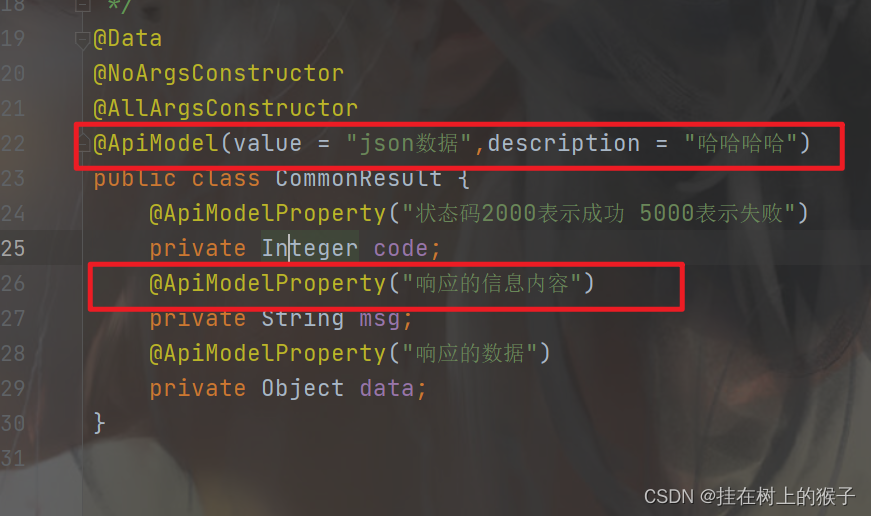
@ApiModel:用对象来接收参数---- 实体类接口注解
@ApiModelProperty:用对象接收参数时,描述对象的一个字段---->实体类属性的说明
@ApiImplicitParam:一个请求参数
@ApiImplicitParams:多个请求参数
@ApiImplicitParams( 接口参数的说明
{
ApiImplicitParam() //单个参数的说明
}
)
@Api的使用
@ApiOperation的使用

@ApiImplicitParams @ApiImplicitParam的使用

@ApiModel @ApiModelProperty的使用
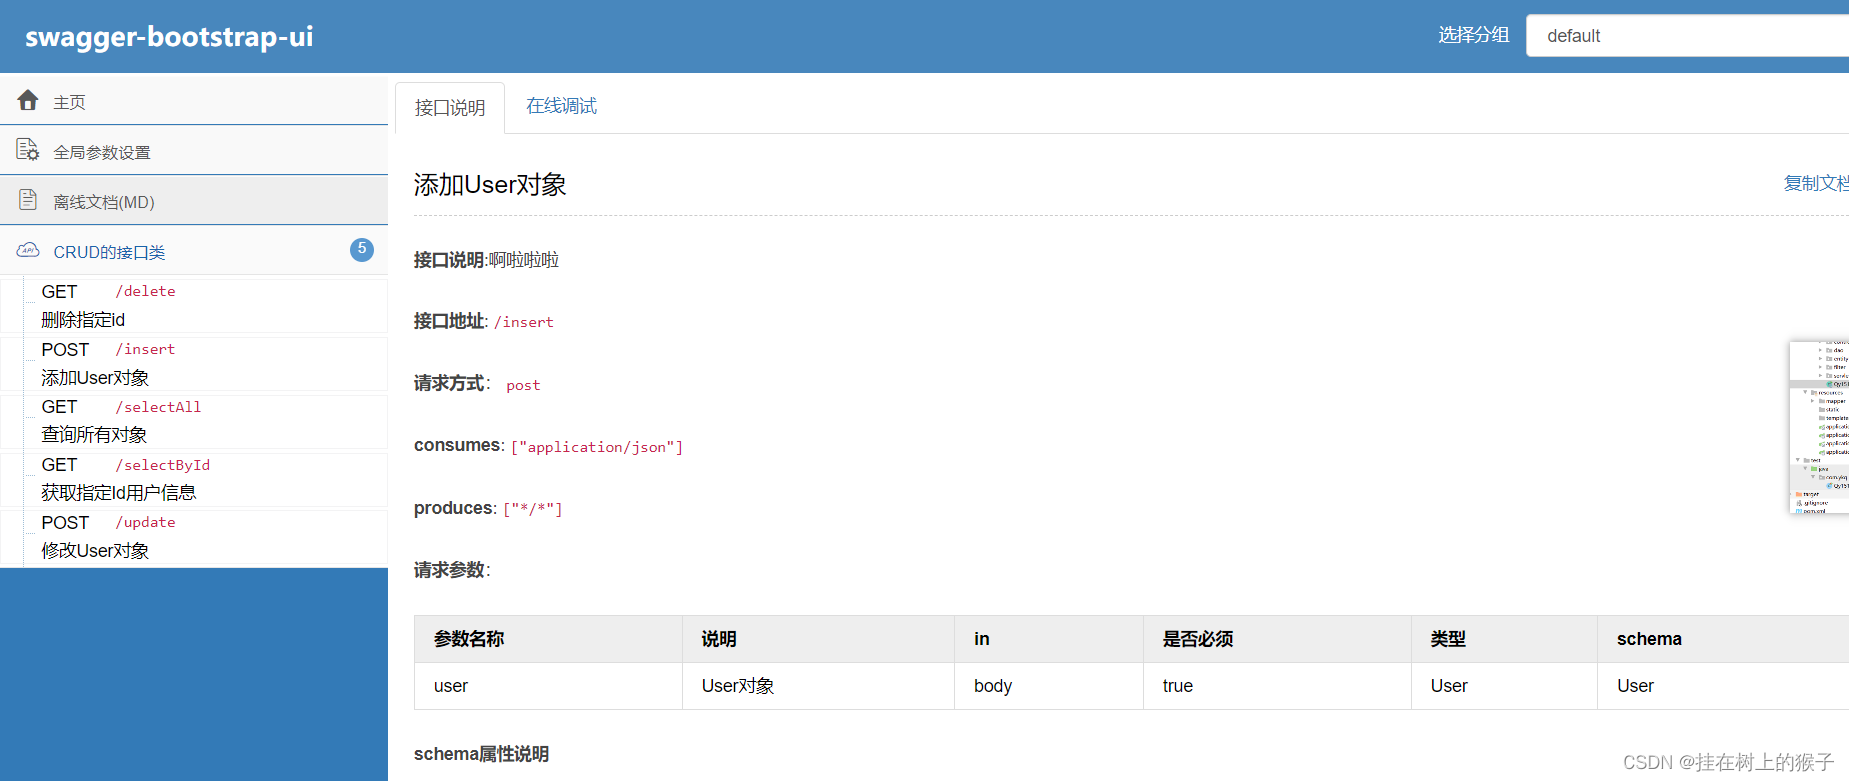
(5)访问
第一种: http://localhost:8080/swagger-ui.html
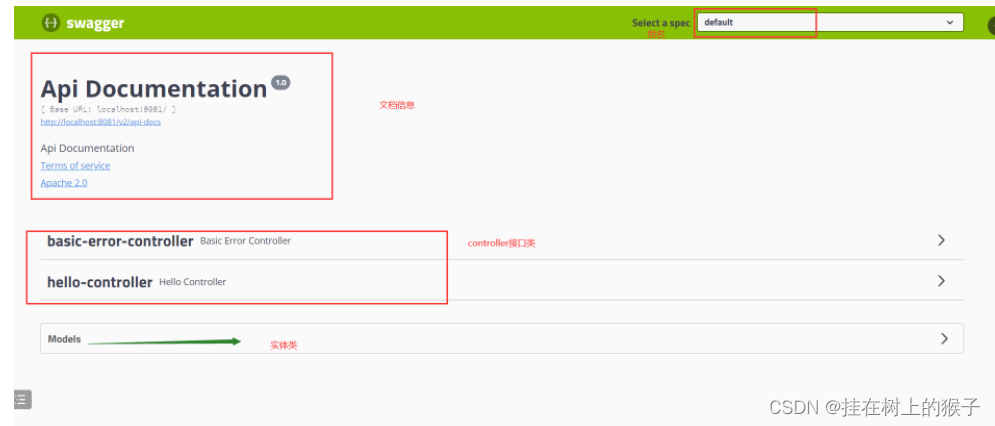
第二种: http://localhost:8080/doc.html
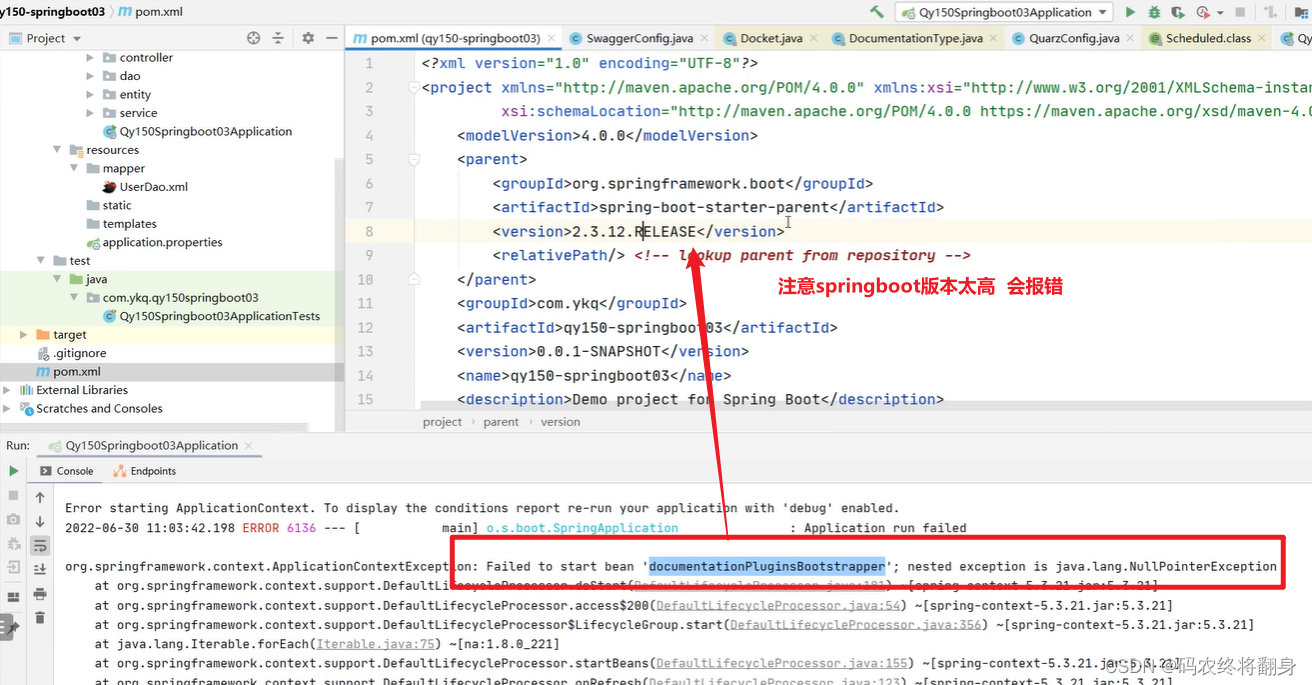
注意:改一下springboot的版本号
16.springboot整合定时器
什么是定时器?
在指定的时间,执行相应的业务代码。
为什么使用定时器?
比如: OSS文件系统服务器,会产生大量冗余文件。定时删除冗余文件【凌晨2~3点】。
比如: 下单后半个未支付--取消订单。
比如:新用户注册后,七天发送问候短信。
如何来使用定时器。
(1)引入定时器依赖。
            org.springframework.boot
            spring-boot-starter-quartz
(2)编写定义任务代码。
在线Cron表达式生成器 (pppet.net) https://www.pppet.net/
package com.wzh.config;
import org.springframework.scheduling.annotation.Scheduled;
import org.springframework.stereotype.Component;
/**
 * @ProjectName: springboot-mp
 * @Package: com.wzh.config
 * @ClassName: QuartzTask
 * @Author: 王振华
 * @Description:
 * @Date: 2022/7/25 19:09
 * @Version: 1.0
 */
@Component  //该类交于spring容器来管理
public class QuartzTask {
    //任务代码cron:定于定时任务的规则
    // 0/2 * * * * ?   表示每2秒 执行任务
    @Scheduled(cron = "0/2 * * * * ?")
    public void task01(){
        System.out.println("业务代码");
    }
}
(3) 开启定时任务的注解

上一篇:SpringBoot 启动流程


