- QT学习之路——Qt QMySQL driver not loaded
- eNSP防火墙配置实验(trust、DMZ、untrust)
- 网络爬虫之爬虫原理
- springboot 如何编写增删改查后端接口,小白极速入门,附完整代
- 14.网络爬虫—数据提取2-正则表达式规则详讲
- 【面试高高手】—— SpringCloud(共22题)
- 什么是网络爬虫?认识网络爬虫
- Prometheus实战篇:Prometheus监控nginx
- Resolved [org.springframework.http.
- Mysql中 order by 多个字段排序
- SQL Server数据库以及Management Studio详细安
- MySQL中如何将字符串替换
- 【LeetCode力扣】287.寻找重复数(中等)
- 【Docker系列】容器访问宿主机的Mysql
- 【排序】排序这样写才对Ⅰ --插入排序与选择排序
- 华为ensp中链路聚合两种(lacp-static)模式配置方法
- linux:nginx报错,提示host not found in u
- 牛客周赛 Round 39(A,B,C,D,E,F,G)
- Kafka 架构深入探索
- Mac清理软件cleanmymac x4.14.4破解版,2024年有
- Idea搭建springboot基本框架
- MySQL中的SET数据类型详解
- 2024年第十七届 认证杯 网络挑战赛 (D题)| AI图片判断 |
- mysql workbench使用教程
- 一篇讲明白 Hadoop 生态的三大部件
- 【解读Kubernetes架构】全面指南,带你掌握Kubernetes
- GOPROXY 代理设置
- 云计算时代的运维: 职业发展方向与岗位选择
- MySQL-视图:视图概述、创建、查看、更新、修改、删除
- MongoDB【四】查询与聚合框架
一. 安装Java开发工具包(JDK):
访问Java Software | OracleOracle官方网站,下载适合你操作系统的最新版本的JDK。安装JDK并设置好JAVA_HOME环境变量。
二. 安装集成开发环境(IDE):
推荐使用IntelliJ IDEA作为IDE。你可以从官方网站(IntelliJ IDEA – the Leading Java and Kotlin IDE)下载适合你操作系统的版本,并根据安装向导进行安装。最新2023.2版本需要注册登录后才允许试用30天,可以自行寻找破解办法
三. 创建一个Spring Boot项目:
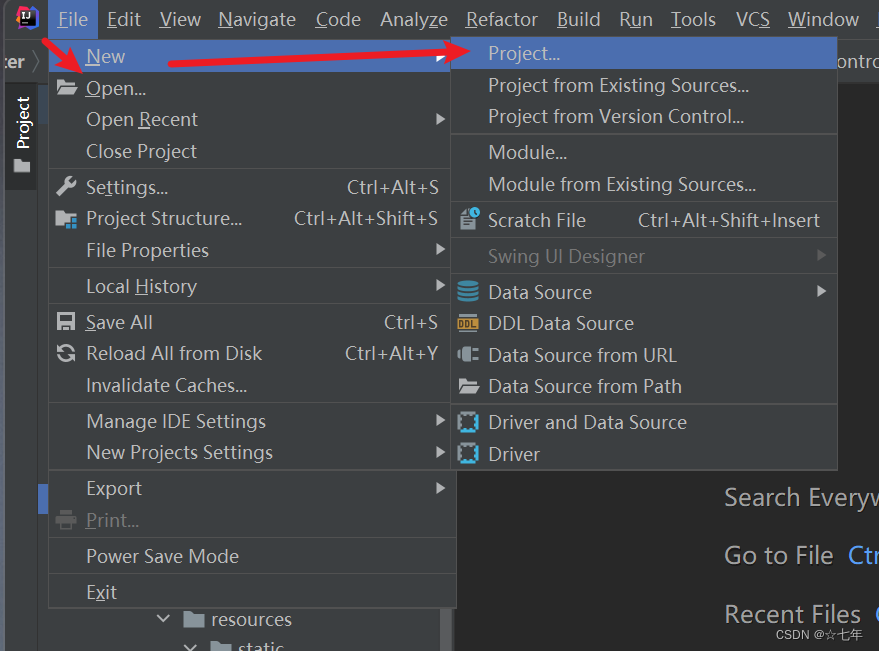
1.打开IDE,选择创建新的项目。
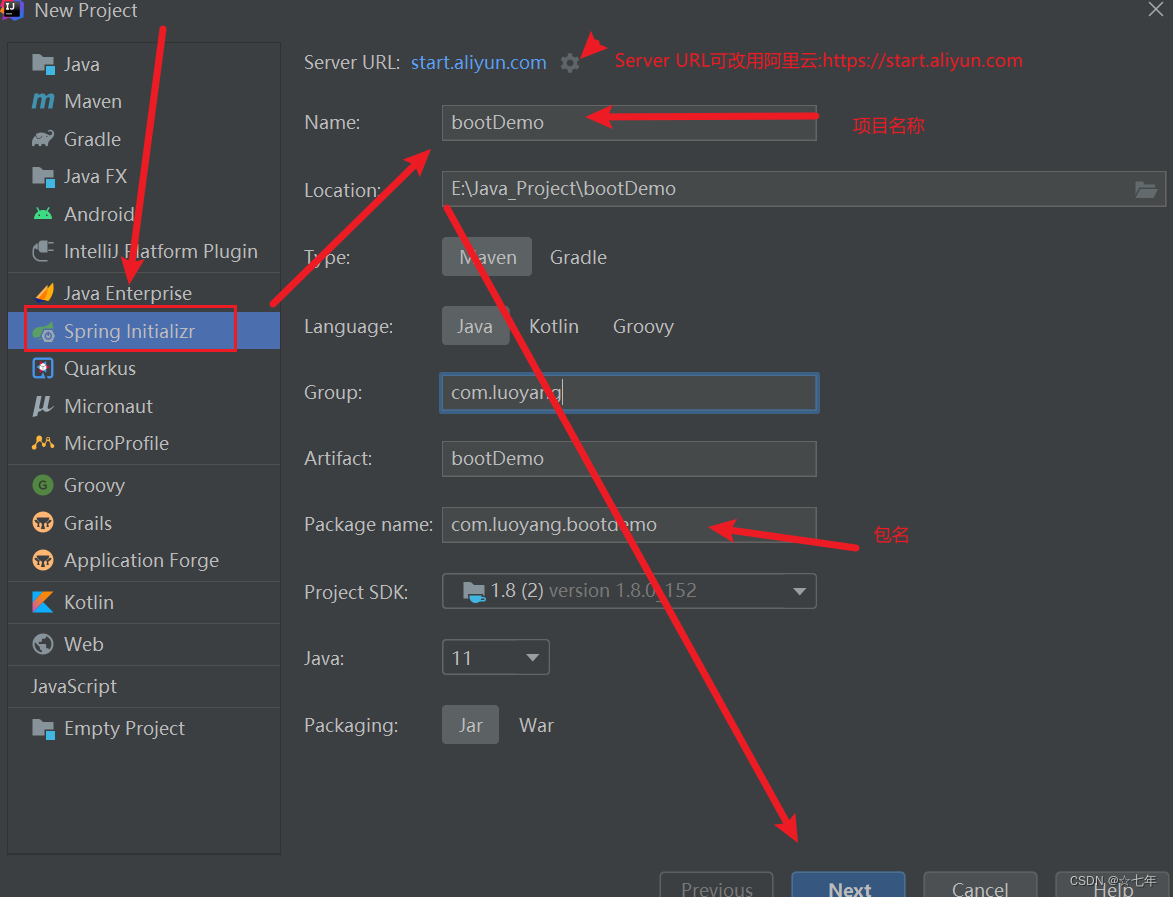
2.在创建项目的向导中选择Spring Initializr,填写项目的基本信息。
比如项目名称和所需的依赖。之后点击next进行下一步。
注:Server URL可改用阿里云:https://start.aliyun.com
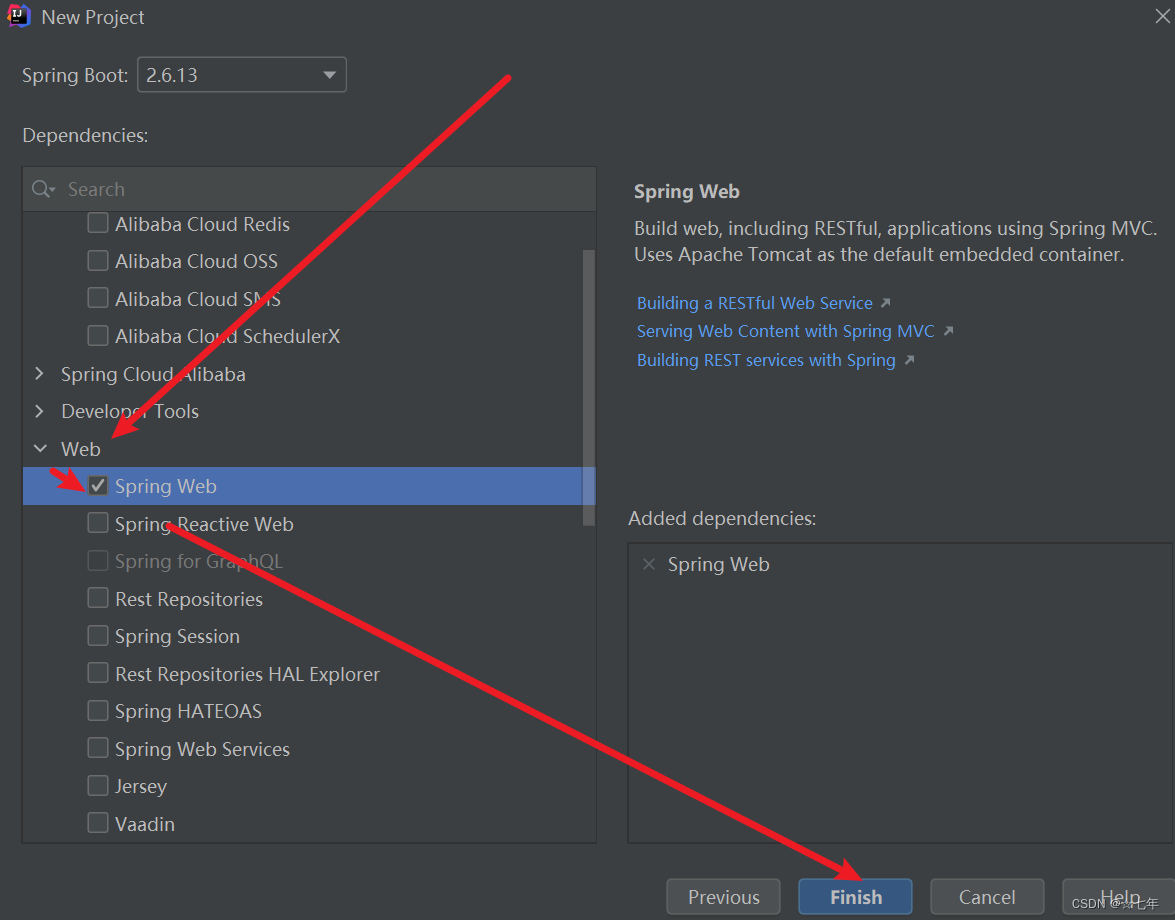
3.勾选Spring Web,并点击finish完成项目的创建
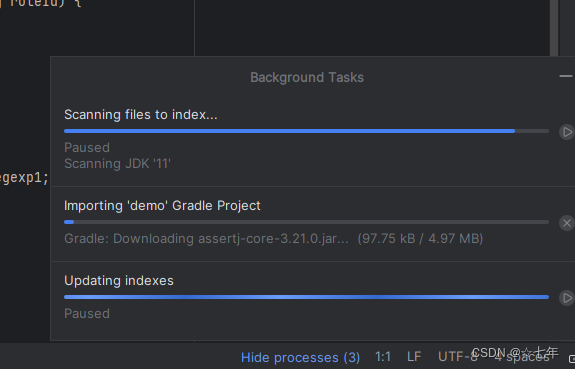
4.第一次使用intellij idea,会自动下载加载资源。
四. 目录结构、配置项目依赖。
## SpringBoot项目结构 如下:
src/main/java/com项目根包:SpringBoot项目要求我们将来定义的类和包必须放在这个包下
BootDemoApplications是项目启动类:SpringBoot项目自动生成,里面包含main方法,直接启动后端
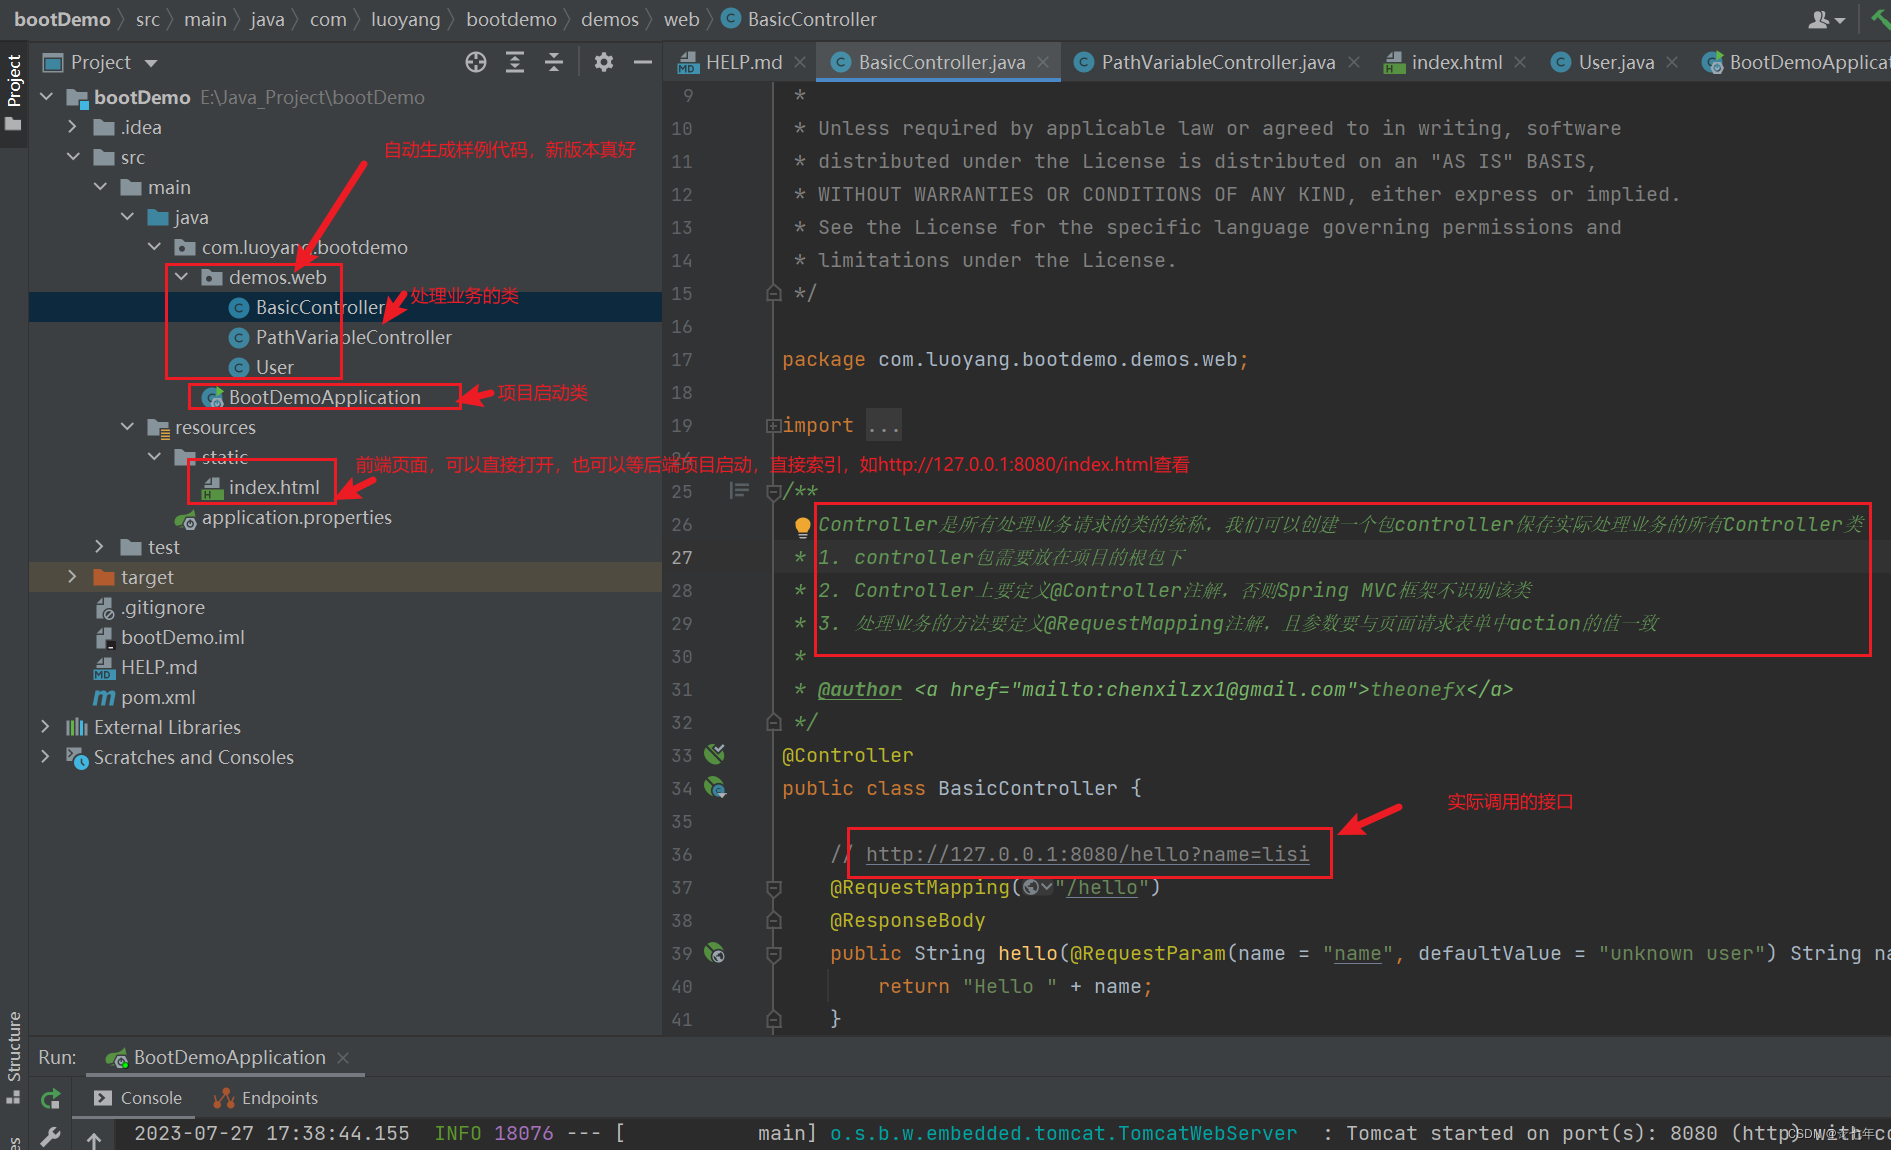
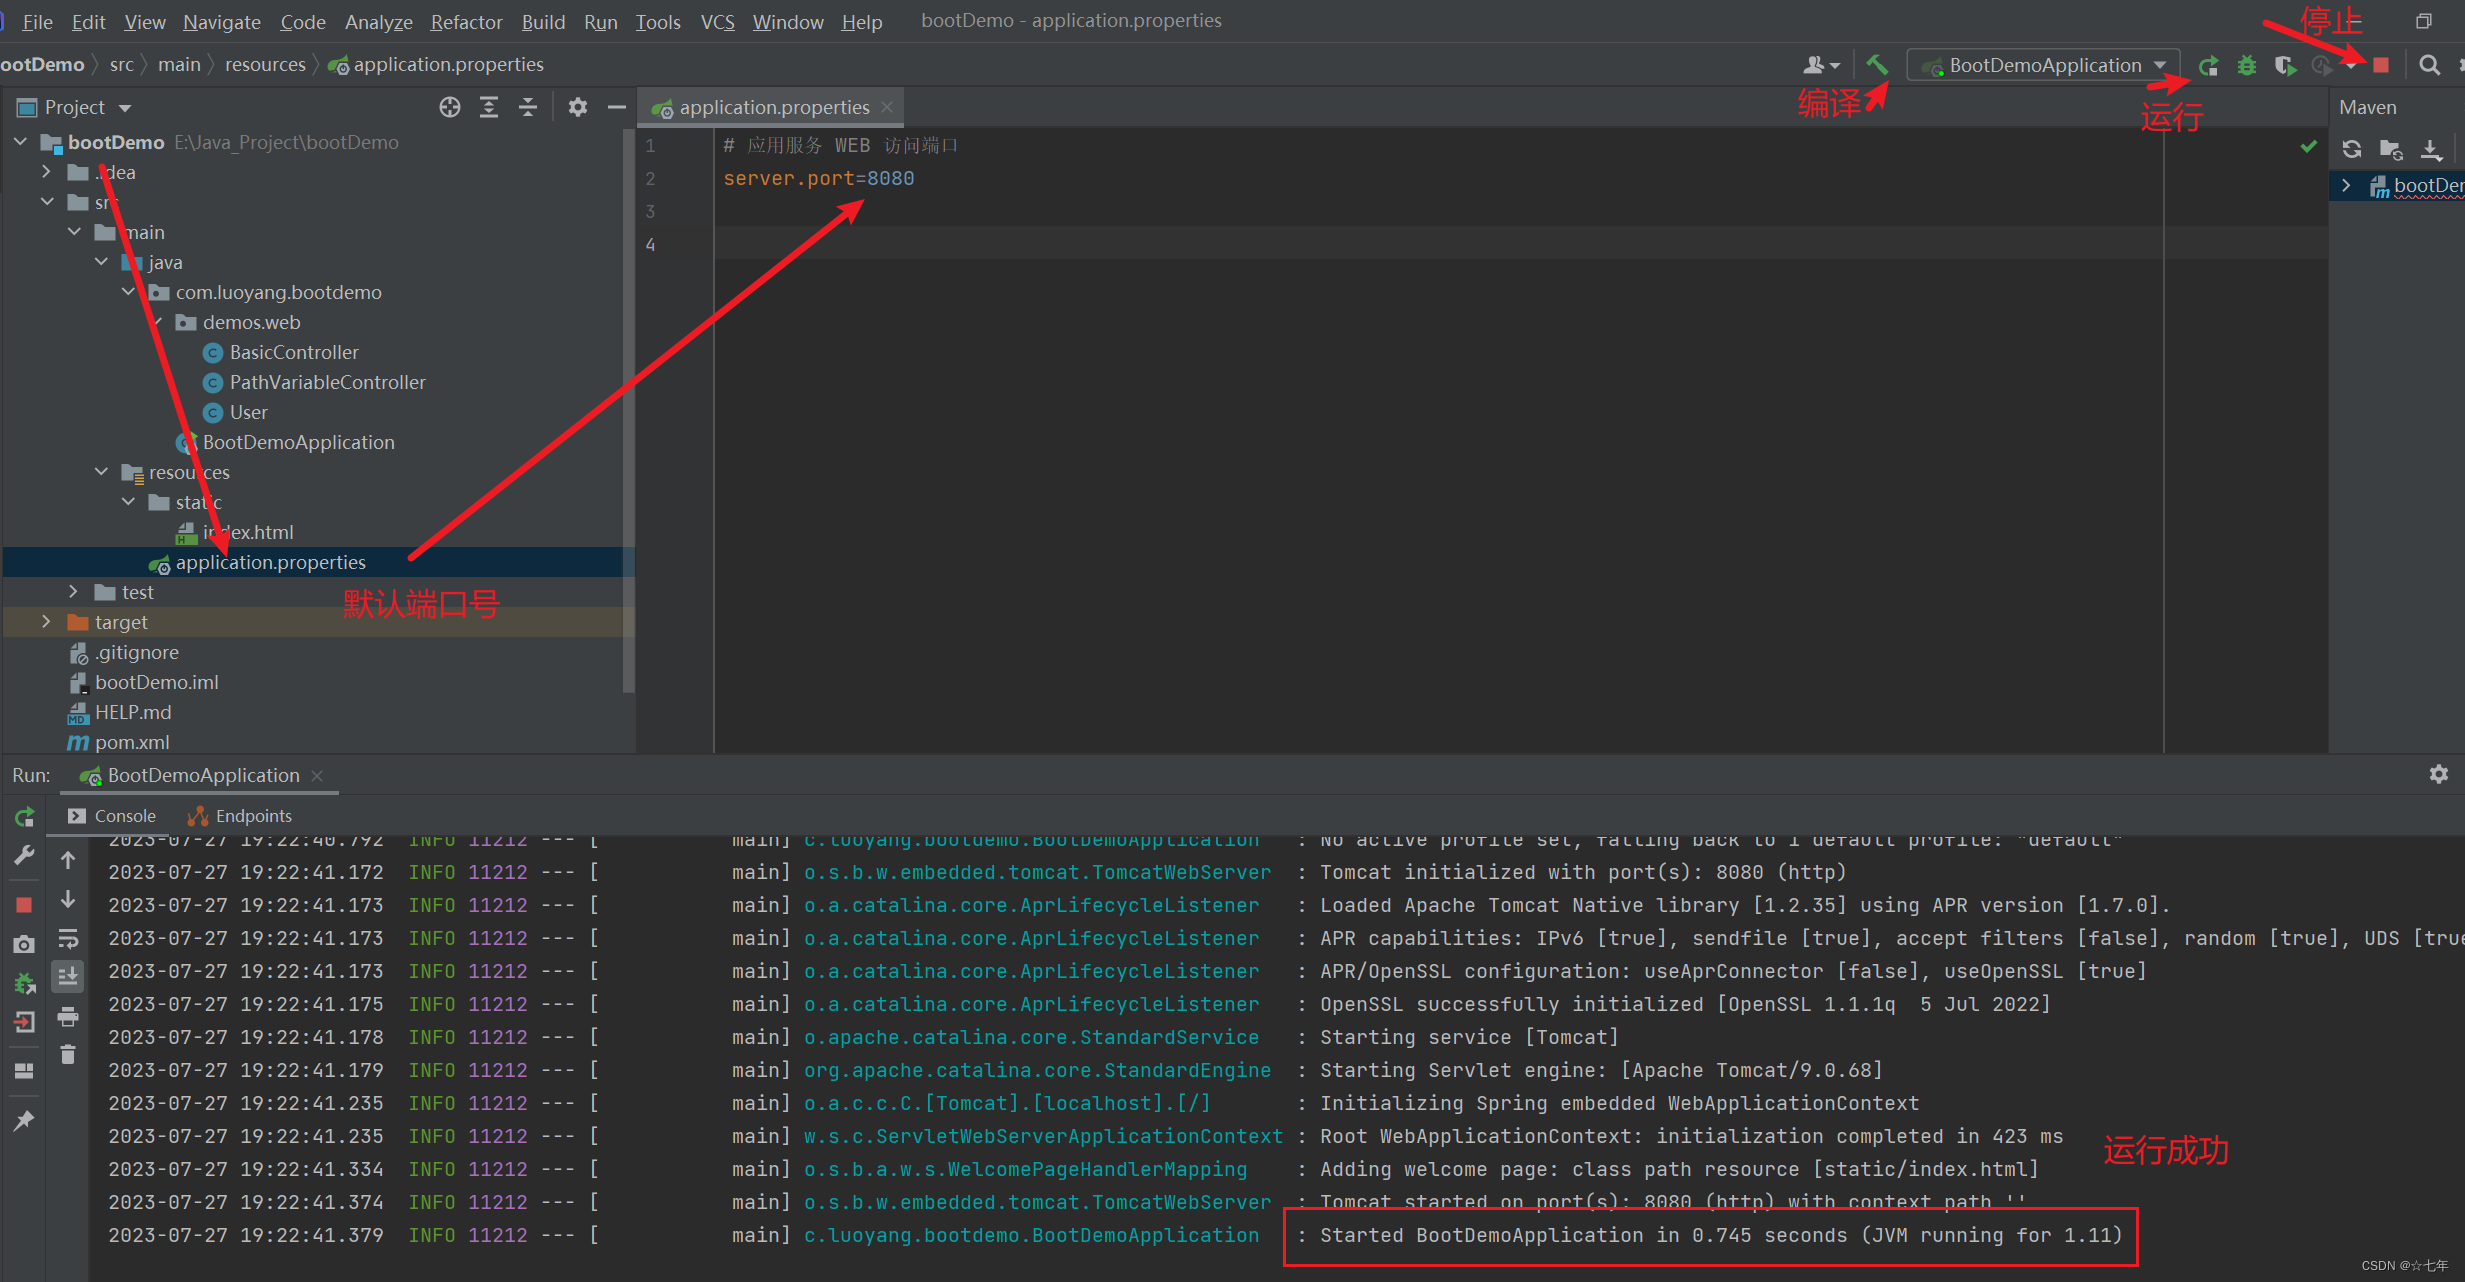
src/main/resoures/application.properties中定义端口号,如 server.port=8080
在项目创建过程中,选择添加Spring Boot的相关依赖。这些依赖将提供基本的Spring Boot功能和特性。可以在项目的构建文件(如pom.xml或build.gradle)中手动添加所需的依赖。
五. 编写代码
自动这里生成了样例代码
1.在项目结构中找到主启动类
(通常是一个名为Application的类),这是项目的入口,点击main即可运行。
你可以在这个类中添加启动Spring Boot应用的代码。
package com.luoyang.bootdemo;
import org.springframework.boot.SpringApplication;
import org.springframework.boot.autoconfigure.SpringBootApplication;
@SpringBootApplication
public class BootDemoApplication {
    public static void main(String[] args) {
        SpringApplication.run(BootDemoApplication.class, args);
    }
}
创建控制器(Controller)类来处理请求,创建数据访问对象(DAO)类来访问数据库,创建服务(Service)类来处理业务逻辑等。
2.控制器(Controller)样例代码
这里IDE自动生成了样例代码,给前端和移动端访问,提供了一些简单的Controller接口;
在demos.web目录下生成了Controller类,如下:
BasicController.java -Controller简单实现类
package com.luoyang.bootdemo.demos.web;
import org.springframework.stereotype.Controller;
import org.springframework.web.bind.annotation.ModelAttribute;
import org.springframework.web.bind.annotation.RequestMapping;
import org.springframework.web.bind.annotation.RequestParam;
import org.springframework.web.bind.annotation.ResponseBody;
/**
 * Controller是所有处理业务请求的类的统称,我们可以创建一个包controller保存实际处理业务的所有Controller类
 * 1. controller包需要放在项目的根包下
 * 2. Controller上要定义@Controller注解,否则Spring MVC框架不识别该类
 * 3. 处理业务的方法要定义@RequestMapping注解,且参数要与页面请求表单中action的值一致
 *
 * @author theonefx
 */
@Controller
public class BasicController {
    // http://127.0.0.1:8080/hello?name=lisi
    @RequestMapping("/hello")
    @ResponseBody
    public String hello(@RequestParam(name = "name", defaultValue = "unknown user") String name) {
        return "我是后端,请求返回值是 " + name;
    }
    // http://127.0.0.1:8080/user
    @RequestMapping("/user")
    @ResponseBody
    public User user() {
        User user = new User();
        user.setName("theonefx");
        user.setAge(666);
        return user;
    }
    // http://127.0.0.1:8080/save_user?name=newName&age=11
    @RequestMapping("/save_user")
    @ResponseBody
    public String saveUser(User u) {
        return "user will save: name=" + u.getName() + ", age=" + u.getAge();
    }
    // http://127.0.0.1:8080/html
    @RequestMapping("/html")
    public String html() {
        return "index.html";
    }
    @ModelAttribute
    public void parseUser(@RequestParam(name = "name", defaultValue = "unknown user") String name
            , @RequestParam(name = "age", defaultValue = "12") Integer age, User user) {
        user.setName("zhangsan");
        user.setAge(18);
    }
}
PathVariableController.java Controller具体实现类简单示例
package com.luoyang.bootdemo.demos.web;
import org.springframework.stereotype.Controller;
import org.springframework.web.bind.annotation.PathVariable;
import org.springframework.web.bind.annotation.RequestMapping;
import org.springframework.web.bind.annotation.RequestMethod;
import org.springframework.web.bind.annotation.ResponseBody;
/**
 * 子类-具体实现类
 *
 * @author theonefx
 */
@Controller
public class PathVariableController {
    // http://127.0.0.1:8080/user/123/roles/222
    @RequestMapping(value = "/user/{userId}/roles/{roleId}", method = RequestMethod.GET)
    @ResponseBody
    public String getLogin(@PathVariable("userId") String userId, @PathVariable("roleId") String roleId) {
        return "User Id : " + userId + " Role Id : " + roleId;
    }
    // http://127.0.0.1:8080/javabeat/somewords
    @RequestMapping(value = "/javabeat/{regexp1:[a-z-]+}", method = RequestMethod.GET)
    @ResponseBody
    public String getRegExp(@PathVariable("regexp1") String regexp1) {
        return "URI Part : " + regexp1;
    }
}
User.java 实体类
package com.luoyang.bootdemo.demos.web;
/**
 * 实体类
 *
 * @author theonefx
 */
public class User {
    private String name;
    private Integer age;
    public String getName() {
        return name;
    }
    public void setName(String name) {
        this.name = name;
    }
    public Integer getAge() {
        return age;
    }
    public void setAge(Integer age) {
        this.age = age;
    }
}
静态资源目录src/main/resoures/static :用来保存当前web应用(我们的网站)中所有的静态资源(页面,图片和其他素材)
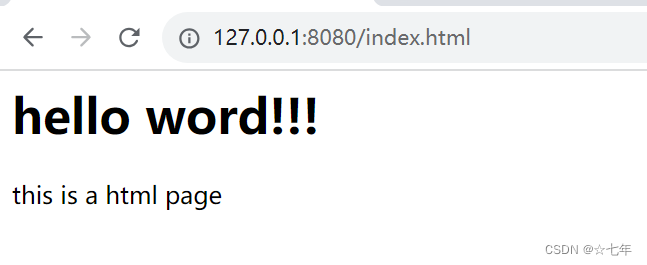
index.html
hello word!!!
this is a html page
六. 配置数据库:
根据项目需求,选择适合的数据库(如MySQL、PostgreSQL、MongoDB等),安装并配置数据库连接信息。可以使用Spring Boot的配置文件(application.properties或application.yml)来设置数据库连接参数。
这里简单样例,直接把数据写死了
七. 运行项目:
在IDE中运行Spring Boot项目,IDE会自动启动内嵌的Web服务器。
1.在编辑器上点击编译项目,开启项目点击运行,如下图
如果使用Maven或Gradle构建项目,则可以使用命令行运行mvn spring-boot:run或gradle bootRun。
可能遇到的问题
1.启动不了,端口被占用
查看8080端口会不会被占用_☆七年的博客-CSDN博客
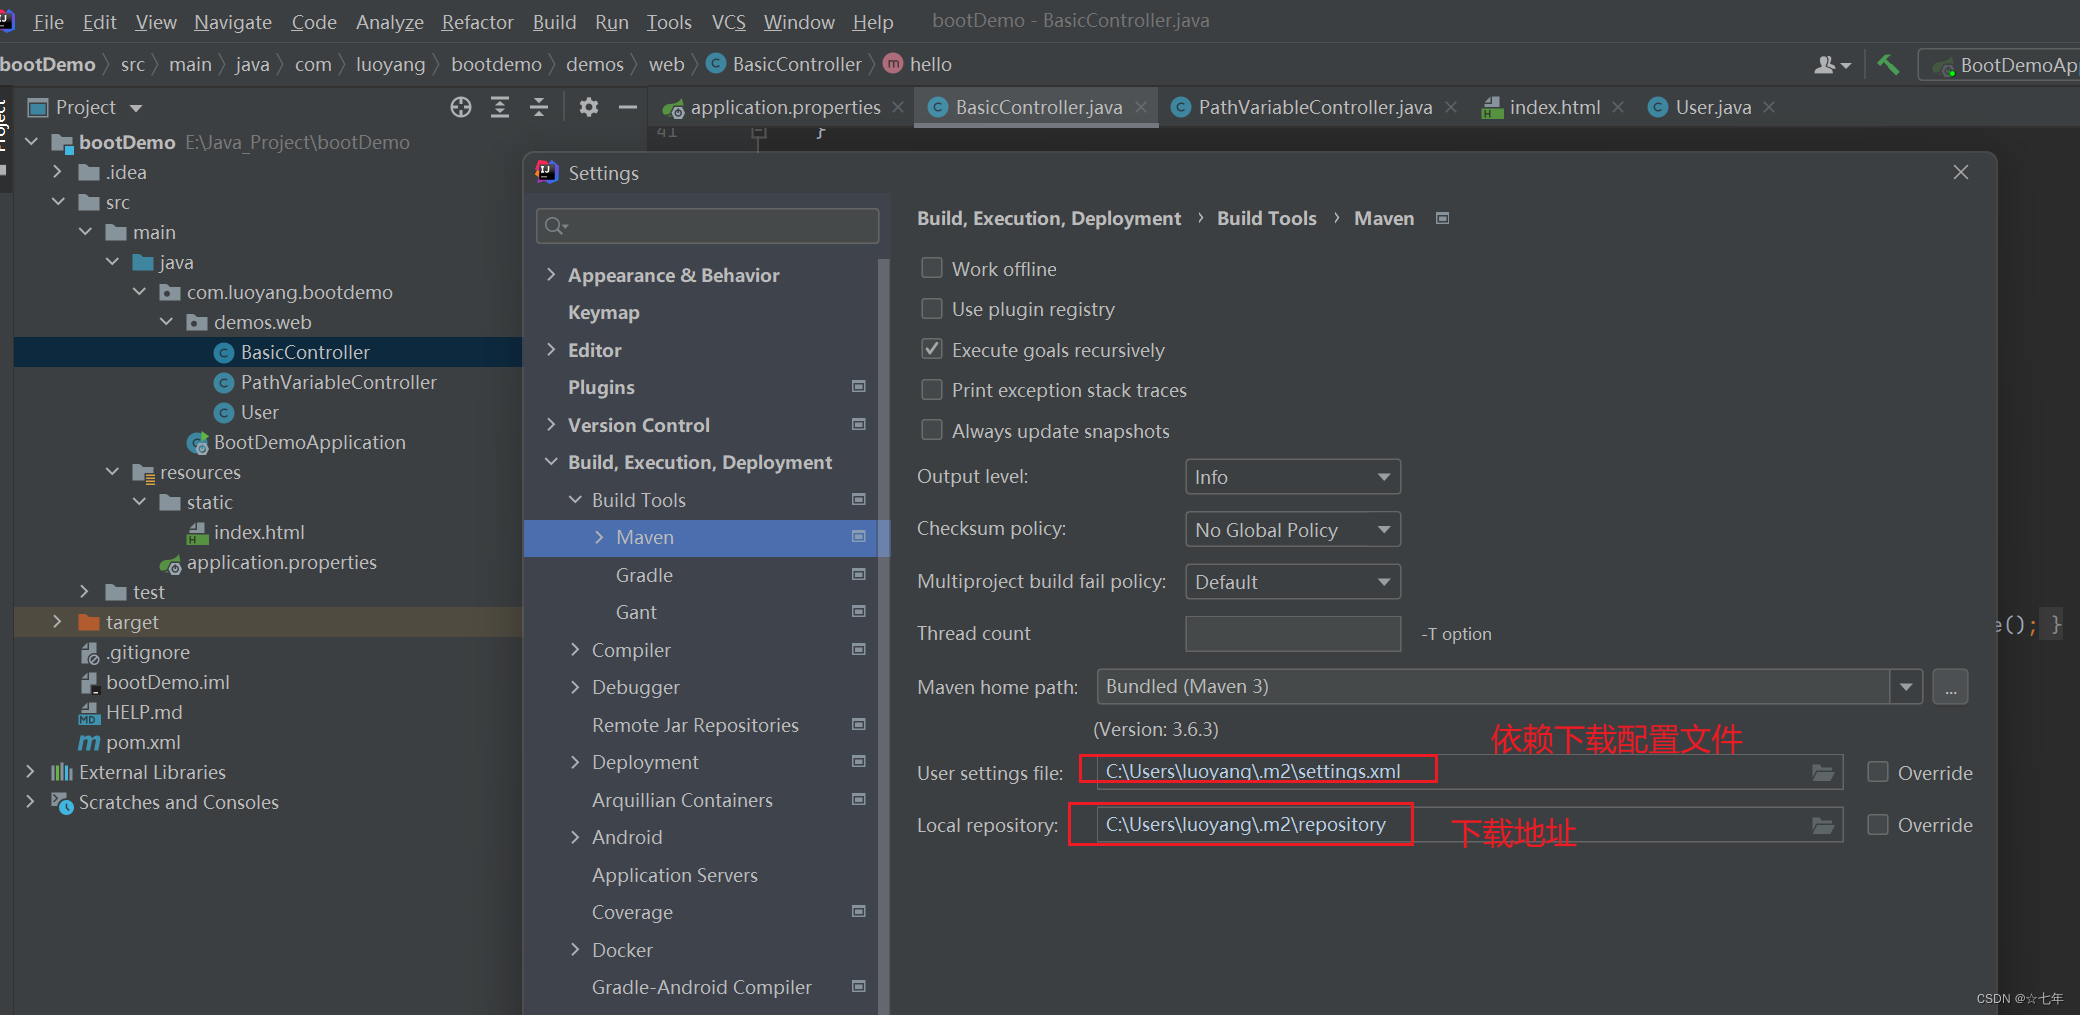
2.配置下载依赖仓库
File>Setting>Build、Execution、deployment>Build Tools>Maven,设置你自己的setting.xml,配置依赖下载地址,以及存储repository本地仓库
八. 验证项目
1.项目启动后,可以通过浏览器或API测试工具(如Postman)。
访问http://localhost:8080/或者指定的端口号,确保你能够看到Spring Boot欢迎页面。
这表示你的项目已经成功启动并运行。
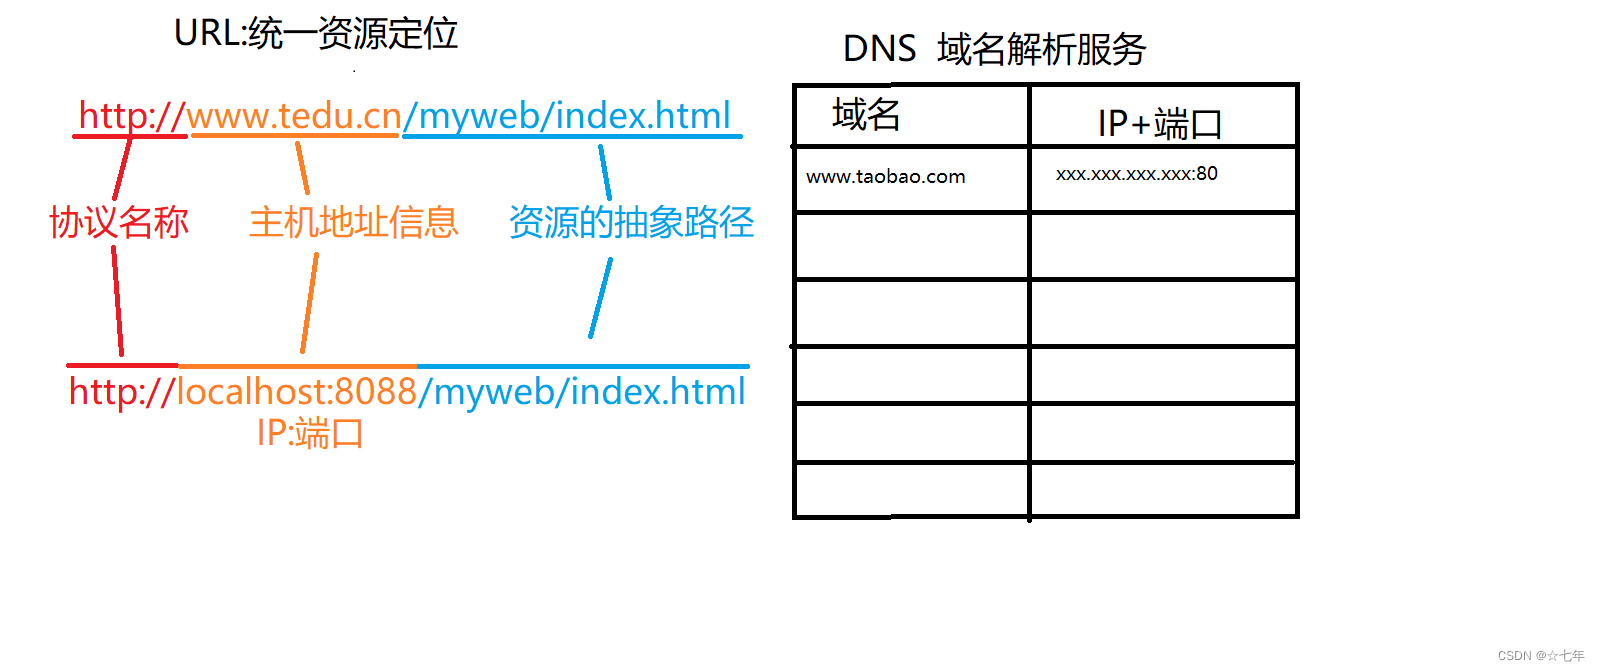
其中使用了URL-统一资源定位
2.访问后端静态web页面
在浏览器中,根据URL的主机地址信息,可以找到服务器(Tomcat),抽象路径部分最开始的"/",则是让服务器去项目的static目录下找对应的资源文件
3.请求后端接口
以下是简单的示例接口,Get请求类型
http://127.0.0.1:8080/hello?name=lisi

九. 开发和测试
根据项目需求,继续开发和测试功能模块,编写业务逻辑和处理请求的代码。
十. 保存代码和版本控制
定期保存代码,使用版本控制工具(如Git)对代码进行管理,并提交代码到代码仓库。
以上是搭建一个Spring Boot项目及基本开发环境的步骤。你可以根据项目需求,进一步配置和扩展项目,例如添加安全认证、集成第三方服务等。记得在开发过程中关注错误日志和进行单元测试,以确保代码的质量和稳定性。
创造价值,乐哉分享!
一起入门后端 204146007


