- MVC 三层架构案例详细讲解
- MySQL题库(1)
- springboot项目中如何查看springBoot版本和Sprin
- SpringBoot整合SpringSecurity详细教程(实战开发
- 基于python+django+爬虫豆瓣电影数据可视化分析系统的设计与
- Spring Boot中内置Tomcat最大连接数、线程数与等待数 实
- nginx: [emerg] “location“ directive
- 【SAP ABAP】SAP Webservice & REST
- Spring Cloud Alibaba全家桶——微服务链路追踪Sky
- 【Python数据分析案例】——中国高票房电影分析(爬虫获取数据及分析
- Spring Boot项目使用Maven打包并带上依赖
- python3一篇学会人脸识别(详细教学篇(附源码))
- MySQL(七):一文带你学透 mysql运算符 (超详解)
- 基于Python的爬虫系统设计与实现(Django框架) 研究背景与意
- Spring Boot 中批量执行 SQL 脚本的实践
- C++ Qt开发:QSqlDatabase数据库组件
- 【MySQL新手到通关】第五章 多表查询
- springboot自帶线程池ThreadPoolTaskExecut
- 前端uniapp+后端springboot 详细教程《实现微信小程序授
- Ubuntu20种安装MySQL8(超全教程)
- CentOS用nginx搭建文件下载服务器
- Golang每日一练(leetDay0052) 寻找旋转排序数组中的最
- Springboot 返回文件给前端
- Java从ftp服务器上传与下载文件
- saga模式、Seata saga模式详解
- SpringBoot集成 ElasticSearch
- PostgreSQL向量数据插件--pgvector安装(附Postg
- 【Spring Security】分布式鉴权的使用
- 【Azure】微软 Azure 基础解析(七)Azure 网络服务中的
- Mysql5.7大限将至升级Mysql 8.0过程记录(未完)

🎉🎉欢迎来到我的CSDN主页!🎉🎉
🏅我是Java方文山,一个在CSDN分享笔记的博主。📚📚
🌟推荐给大家我的专栏《Spring Security》。🎯🎯
👉点击这里,就可以查看我的主页啦!👇👇
Java方文山的个人主页
🎁如果感觉还不错的话请给我点赞吧!🎁🎁
💖期待你的加入,一起学习,一起进步!💖💖

前言
我们都知道Spring Security是做认证鉴权的框架,为了一些不必要的麻烦,登录功能都是他们自己做的,那我们就需要将登录的功能交给Spring Security管理,但是他们做的东西肯定也是不满足于我们的需求,所以我们要在根据他们提供的代码上自定义,可以将自定义的用户信息获取逻辑集成到Spring Security中,从而实现基于数据库的用户身份认证。
再上一篇中我是通过实现UserDetailsService接口并重写loadUserByUsername方法完成的,但是后面我想了想不应该把代码放在UserServiceImpl层,所以我们需要创建一个类来继承UserServiceImpl将自定义用户身份认证的代码写入。
MyUserDetailsService
package com.csdn.security.config;
import com.baomidou.mybatisplus.core.conditions.query.QueryWrapper;
import com.csdn.security.pojo.User;
import com.csdn.security.service.impl.UserServiceImpl;
import org.springframework.beans.factory.annotation.Autowired;
import org.springframework.security.core.userdetails.UserDetails;
import org.springframework.security.core.userdetails.UserDetailsService;
import org.springframework.security.core.userdetails.UsernameNotFoundException;
import org.springframework.stereotype.Component;
import java.util.Objects;
/**
 * @author Java方文山
 * @compay csdn_Java方文山
 * @create 2023-12-22-12:10
 */
@Component
public class MyUserDetailsService implements UserDetailsService {

    @Autowired
    private UserServiceImpl userService;
    /**
     * 实现Spring Security内置的UserDetailService接口,重写loadUserByUsername方法实现数据库的身份校验
     * @param username
     * @return
     * @throws UsernameNotFoundException
     */
    @Override
    public UserDetails loadUserByUsername(String username) throws UsernameNotFoundException {
        //根据用户名查询数据库中用户信息
        User user = userService.getOne(new QueryWrapper().eq("username", username));
        //判断用户是否存在
        if(Objects.isNull(user))
            throw new UsernameNotFoundException("用户不存在");
        //权限校验TODO,后续讲解
        return user;
    }
}
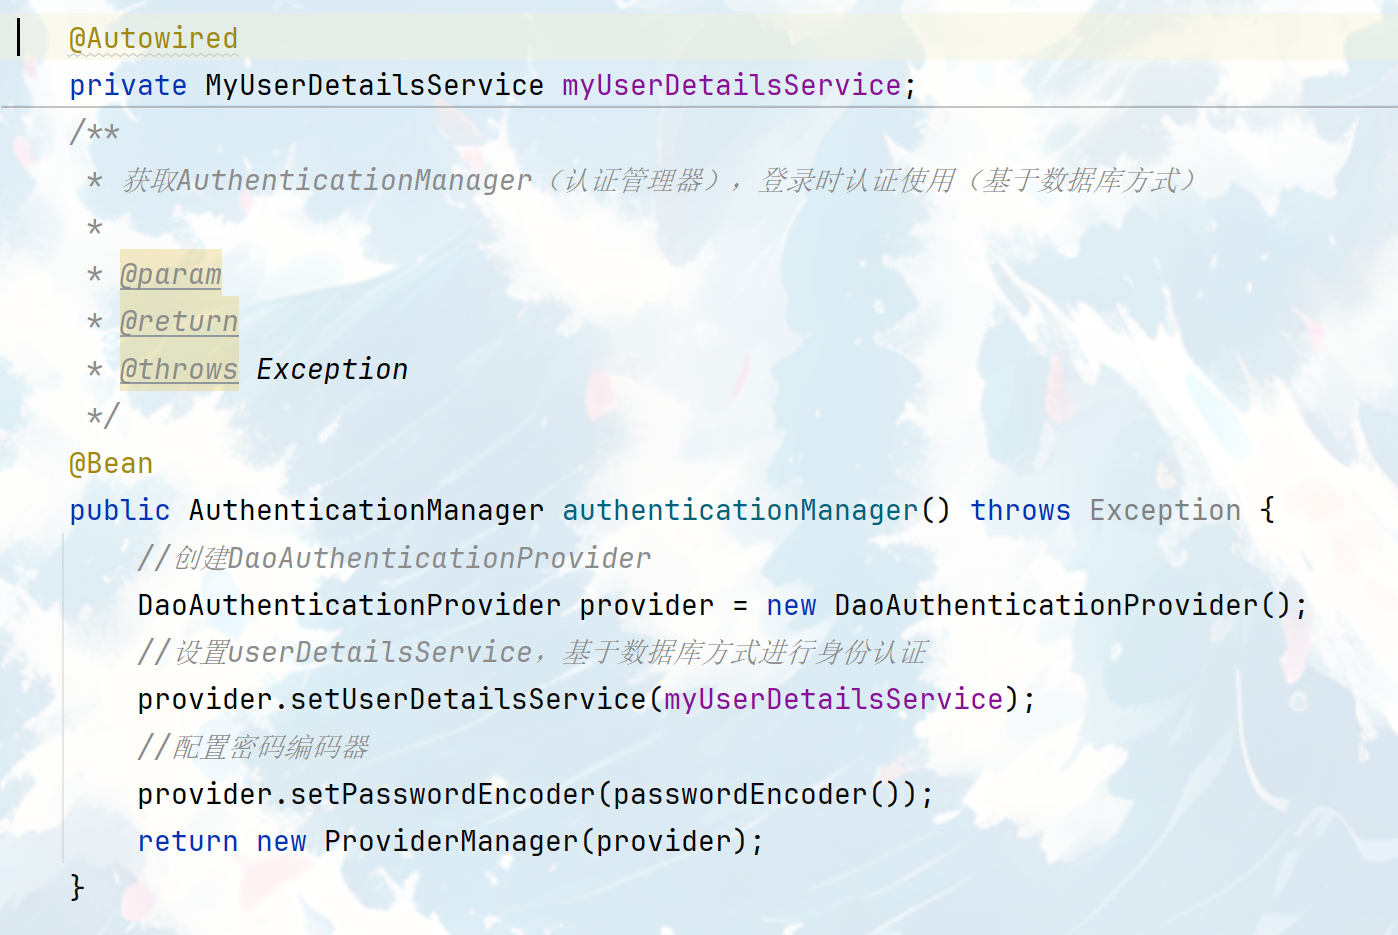
记得我们也要把我们做身份验证这里也改掉,替换成MyUserDetailsService

一、前期准备
我们将数据相应到前端,肯定需要特定的格式,方便我们前端做数据显示,这里会用到两个类
JsonResponseStatus
package com.csdn.security.resp;
import lombok.Getter;
@Getter
public enum JsonResponseStatus {
    OK(200, "OK"),
    UN_KNOWN(500, "未知错误"),
    RESULT_EMPTY(1000, "查询结果为空!"),
    ;
    private final Integer code;
    private final String msg;
    JsonResponseStatus(Integer code, String msg) {
        this.code = code;
        this.msg = msg;
    }
}
这个类是一个枚举类,用于定义接口返回的 JSON 响应状态。它包含了一些常见的响应状态,如 OK(200, "OK") 表示请求成功,UN_KNOWN(500, "未知错误") 表示未知错误,RESULT_EMPTY(1000, "查询结果为空!") 表示查询结果为空。每个响应状态都有一个对应的状态码和消息。在接口的返回值中,可以使用这个枚举类来表示具体的响应状态。
JsonResponseBody
package com.csdn.security.resp; import lombok.Data; @Data public class JsonResponseBody{ private Integer code; private String msg; private T data; private Long total; private JsonResponseBody(JsonResponseStatus jsonResponseStatus, T data) { this.code = jsonResponseStatus.getCode(); this.msg = jsonResponseStatus.getMsg(); this.data = data; } private JsonResponseBody(JsonResponseStatus jsonResponseStatus, T data, Long total) { this.code = jsonResponseStatus.getCode(); this.msg = jsonResponseStatus.getMsg(); this.data = data; this.total = total; } public static JsonResponseBody success() { return new JsonResponseBody (JsonResponseStatus.OK, null); } public static JsonResponseBody success(T data) { return new JsonResponseBody (JsonResponseStatus.OK, data); } public static JsonResponseBody success(T data, Long total) { return new JsonResponseBody (JsonResponseStatus.OK, data, total); } public static JsonResponseBody unknown() { return new JsonResponseBody (JsonResponseStatus.UN_KNOWN, null); } public static JsonResponseBody other(JsonResponseStatus jsonResponseStatus) { return new JsonResponseBody (jsonResponseStatus, null); } }
这个类是一个通用的 JSON 响应体类
- code:表示响应状态码。
- msg:表示响应消息。
- data:表示响应数据的泛型对象。
- total:表示响应数据的总数。
修改我们登陆成功后的操作,加入一个JSON字符串转换类并将获取到的对象输出到前端。
    //JSON格式转换
    @Autowired
    private ObjectMapper objectMapper;
 //设置登录成功后重定向到那个页面
  .successHandler((req, resp, auth) -> {
    objectMapper.writeValue(resp.getOutputStream(),auth.getPrincipal());
 })
重启服务器登录进行测试

可以看到我们的数据都响应到前端了,前端人员就可以拿着数据进行操作了
二、分布式鉴权
1.授权介绍
Spring Security 中的授权分为两种类型:
-
基于角色的授权:以用户所属角色为基础进行授权,如管理员、普通用户等,通过为用户分配角色来控制其对资源的访问权限。
-
基于资源的授权:以资源为基础进行授权,如 URL、方法等,通过定义资源所需的权限,来控制对该资源的访问权限。
Spring Security 提供了多种实现授权的机制,最常用的是使用基于注解的方式,建立起访问资源和权限之间的映射关系。
其中最常用的两个注解是 @Secured 和 @PreAuthorize。@Secured 注解是更早的注解,基于角色的授权比较适用,@PreAuthorize 基于 SpEL 表达式的方式,可灵活定义所需的权限,通常用于基于资源的授权。
2.表设计
我们会用到以下五张表sys_user、sys_user_role、sys_role、sys_role_module、sys_module
sys_user(用户表)

sys_user_role(用户角色表)

sys_role(角色表)
 sys_role_module(角色权限表)
sys_module(模块表)

3.获取用户权限
我们在数据表都在一个服务器的情况下,可以直接进行联表查询
select * from sys_user a,
              sys_user_role b,
              sys_role_module c,
              sys_module d
where a.id=b.user_id and
      b.role_id=c.role_id and
      c.module_id=d.id
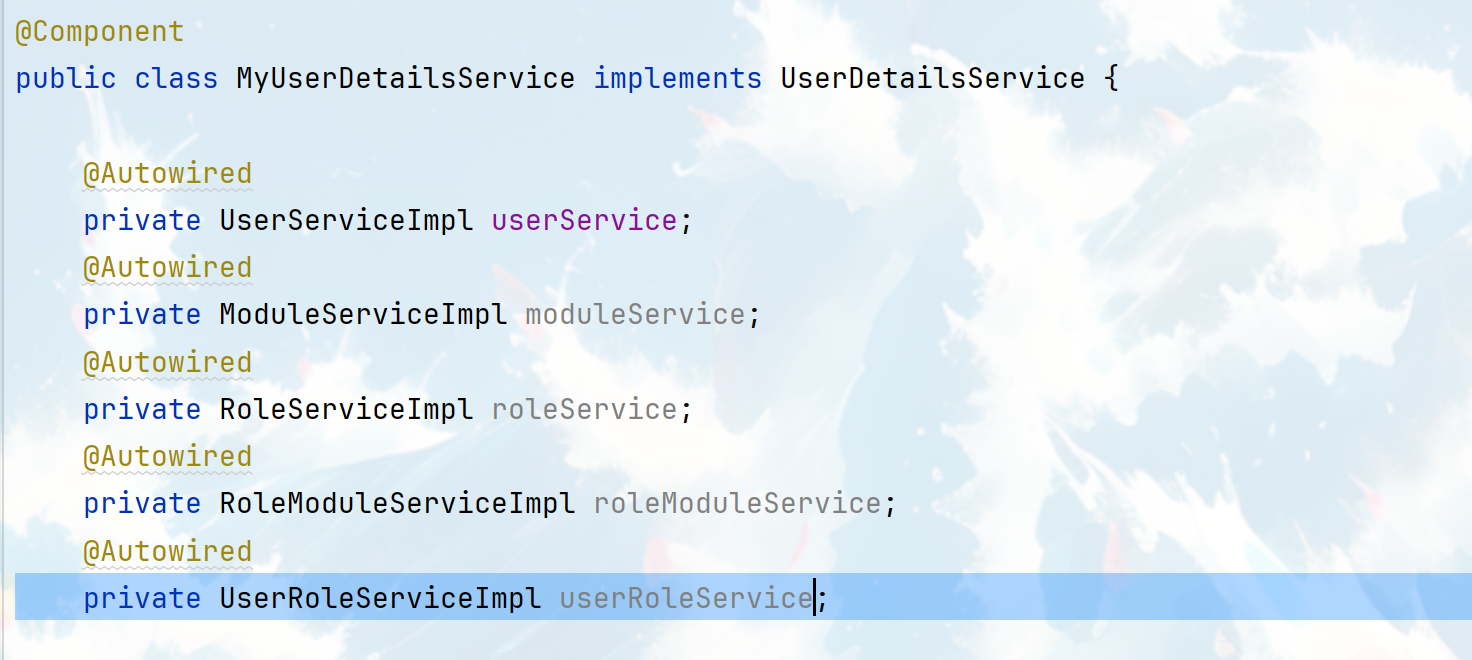
如果我们不是源于一个数据库或者一个服务器,那么就要将数据在后端做处理,先在我们自定义身份验证类也就是MyUserDetailsService类,随后将五个表的service实现类引入

认证身份的同时把权限查询出来。
@Override public UserDetails loadUserByUsername(String username) throws UsernameNotFoundException { //根据用户名查询数据库中用户信息 User user = userService.getOne(new QueryWrapper().eq("username", username)); //判断用户是否存在 if(Objects.isNull(user)) throw new UsernameNotFoundException("用户不存在"); //权限校验TODO //.stream().map()遍历所有对象将新的数据放入流中 // .collect将流中的数据变成一个集合 //1.先查询出用户拥有的角色 List userId = userRoleService. list(new QueryWrapper () .eq("user_id", user.getId())) .stream().map(UserRole::getRoleId) .collect(Collectors.toList()); //2.根据角色查询角色名称 List roleId = roleService .list(new QueryWrapper ().in("role_id", userId)) .stream().map(Role::getRoleName) .collect(Collectors.toList()); //3.根据角色查询角色所拥有模块ID List ModuleId = roleModuleService .list(new QueryWrapper ().in("role_id", userId)) .stream().map(RoleModule::getModuleId) .collect(Collectors.toList()); //4.根据模块ID查询模块URL List urls = moduleService .list(new QueryWrapper ().in("id", ModuleId)) .stream().map(Module::getUrl) .collect(Collectors.toList()); //将用户角色名称与模块url放入一个集合 roleId.addAll(urls); //认证集合对象 List collect = roleId.stream().map(e -> { return new SimpleGrantedAuthority(e); }).collect(Collectors.toList()); //将认证集合对象赋值给用户实体 user.setAuthorities(collect); return user; } 这里还有一个问题需要我们解决,我们写完以上代码进行测试后发现有错误

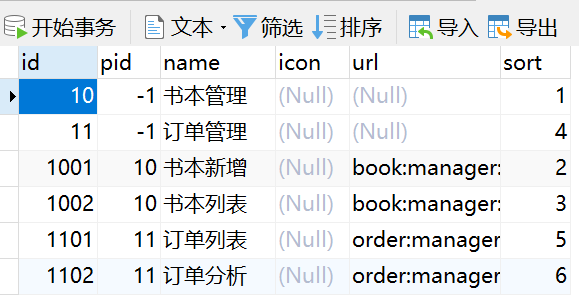
该错误很简单出现在对模块URL遍历这里,因为我们的数据库表中有两个值是空的

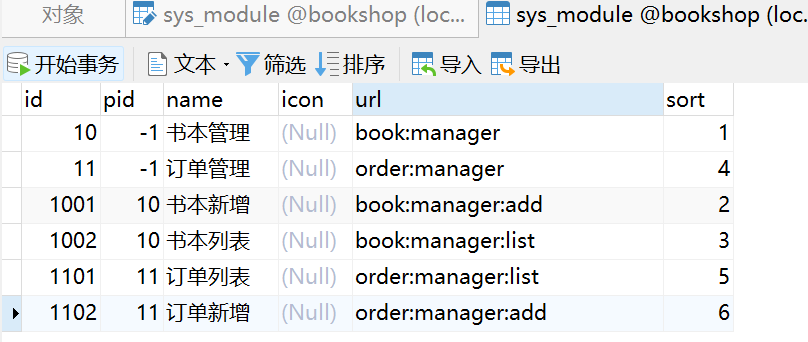
第一个方法是加上url的值

第二个方法就是过滤

4.修改SpringSecurity配置类
当我们想要开启spring方法级安全时,只需要在任何 @Configuration实例上使用@EnableGlobalMethodSecurity 注解就能达到此目的。同时这个注解为我们提供了prePostEnabled 、securedEnabled 和 jsr250Enabled 三种不同的机制来实现同一种功能。
修改WebSecurityConfig配置类,开启基于方法的安全认证机制,也就是说在web层的controller启用注解机制的安全确认。
@Configuration
@EnableWebSecurity
@EnableGlobalMethodSecurity(prePostEnabled = true)
public class WebSecurityConfig {
    ...
}
@EnableGlobalMethodSecurity是Spring Security提供的一个注解,用于启用方法级别的安全性。它可以在任何@Configuration类上使用,以启用Spring Security的方法级别的安全性功能。它接受一个或多个参数,用于指定要使用的安全注解类型和其他选项。以下是一些常用的参数:
-
prePostEnabled:如果设置为true,则启用@PreAuthorize和@PostAuthorize注解。默认值为false。
-
securedEnabled:如果设置为true,则启用@Secured注解。默认值为false。
-
jsr250Enabled:如果设置为true,则启用@RolesAllowed注解。默认值为false。
-
proxyTargetClass:如果设置为true,则使用CGLIB代理而不是标准的JDK动态代理。默认值为false。
使用@EnableGlobalMethodSecurity注解后,可以在应用程序中使用Spring Security提供的各种注解来保护方法,例如@Secured、@PreAuthorize、@PostAuthorize和@RolesAllowed。这些注解允许您在方法级别上定义安全规则,以控制哪些用户可以访问哪些方法。
注解介绍:
注解 说明 @PreAuthorize 用于在方法执行之前对访问进行权限验证 @PostAuthorize 用于在方法执行之后对返回结果进行权限验证 @Secured 用于在方法执行之前对访问进行权限验证 @RolesAllowed 是Java标准的注解之一,用于在方法执行之前对访问进行权限验证 5.控制Controller层接口权限
    @PreAuthorize("hasAuthority('order:manager:list')")
    @RequestMapping("/queryRoles")
    public String  queryRoles(){
        return "管理员权限";
    }
    @PreAuthorize("hasAnyAuthority('book:manager:list','order:manager:list')")
    @RequestMapping("/queryModules")
    public String queryModules(){
        return "管理员权限/用户权限";
    }
至此我们的鉴权就全部完成了

到这里我的分享就结束了,欢迎到评论区探讨交流!!
💖如果觉得有用的话还请点个赞吧 💖

-
上一篇:设置MySQL允许外部访问


