- Spring Boot集成knife4j
- 深度解析预训练权重的本质和作用:你真的了解它们吗?
- 【MySQL】使用C语言连接数据
- Mysql中 order by 多个字段排序
- 数据库的基本知识(mysql)
- Spring 家族之 @JsonFormat 与 @DateTimeF
- Loading class `com.mysql.jdbc.Drive
- 2024年(第十届)全国大学生统计建模大赛选题参考(一)
- golang工程——opentelemetry简介、架构、概念、追踪原
- 【Linux系列】Linux判断架构信息
- Go语言面试宝典:50道必会题目与精解
- Python进阶(一)(MySQL,Navicat16免费安装)
- 2024最新!一文看懂Spring Batch批处理(大白话版,干货满
- 基于SpringBoot+vue的高校学生成绩管理系统
- 【机器人小车】自己动手用ESP32手搓一个智能机器人:ESP32-CA
- Hive:开窗函数
- PostgreSQL的date
- 【MyBatis Plus】初识 MyBatis Plus,在 Spr
- MySQL中的sql优化
- 【Jenkins PipeLine】Jenkins PipeLine
- 深入了解 Spring boot的事务管理机制:掌握 Spring 事
- MySQL中的TRUNCATE TABLE命令
- Spring Boot中的RESTful API:@GetMappin
- 【解读Kubernetes架构】全面指南,带你掌握Kubernetes
- 【python】flask各种版本的项目,终端命令运行方式的实现
- 【已解决】.nginx: error while loading sh
- Modbus报文详解
- Mac清理软件cleanmymac x4.14.4破解版,2024年有
- Springboot项目从Nacos读取MySQL数据库配置错误:Pu
- 【vue加载16秒优化到2秒】Vue3加载慢的性能优化,打包后页面静态
目录
- App生命周期
- 应用状态
- 未运行——Not running
- 未激活——Inactive
- 激活——Active
- 后台——Backgroud
- 挂起——Suspended
- 关系图
- 生命周期方法
- 相关方法
- 注意
- 在其他地方监听
- ViewController生命周期
- UIView生命周期
App生命周期
应用状态
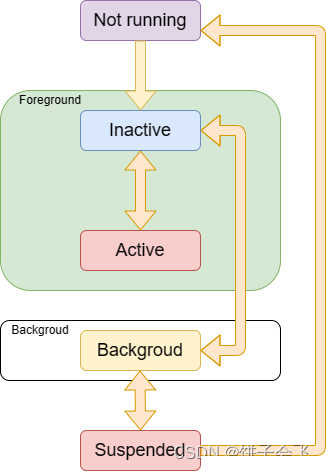
App主要有五种状态,分别是:
未运行——Not running
应用程序没启动
未激活——Inactive
程序在前台运行,不过没有接收到事件。
一般每当应用要从一个状态切换到另一个不同的状态时,中途过渡会短暂停留在此状态。唯一在此状态停留时间比较长的情况是:当用户锁屏时,或者系统提示用户去响应某些(诸如电话来电、有未读短信等)事件的时候。
激活——Active
程序在前台运行而且接收到了事件,这也是前台的一个正常的模式。
后台——Backgroud
程序在后台而且能执行代码,大多数程序进入这个状态后会在在这个状态上停留一会,时间到之后会进入挂起状态(Suspended),有的程序经过特殊的请求后可以长期处于Backgroud状态。
挂起——Suspended
程序在后台不能执行代码。系统会自动把程序变成这个状态而且不会发出通知。当挂起时,程序还是停留在内存中的,当系统内存低时,系统就把挂起的程序清除掉,为前台程序提供更多的内存。
关系图
生命周期方法
APP的生命周期就是UIApplicationDelegate中的回调方法,这些方法是根据状态变化进行响应的地方,其中最常用的就是以下7个方法:
application:willFinishLaunchingWithOptions:
在App启动时调用表示应用加载进程已经开始,常用来处理应用状态的存储和恢复
application:didFinishLaunchingWithOptions:
表示App将从未运行状态进入运行状态,用于对App的初始化操作
applicationDidBecomeActive:
当应用即将进入前台运行时调用
applicationWillResignActive:
当应用即将进从前台退出时调用
applicationDidEnterBackground:
当应用开始在后台运行的时候调用
applicationWillEnterForeground:
当程序从后台将要重新回到前台(但是还没变成Active状态)时候调用
applicationWillTerminate:
当前应用即将被终止,在终止前调用的函数。通常是用来保存数据和一些退出前的清理工作。如果应用当前处在suspended,此方法不会被调用。 该方法最长运行时限为5秒,过期应用即被kill掉并且移除内存。
相关方法
AppDelegate实现了UIApplicationDelegate,有以下方法可供测试:
	//在App启动时调用表示应用加载进程已经开始,常用来处理应用状态的存储和恢复
    func application(_ application: UIApplication, willFinishLaunchingWithOptions launchOptions: [UIApplication.LaunchOptionsKey : Any]? = nil) -> Bool {
        print("willFinishLaunchingWithOptions")
        print("——应用开始加载——")
        return true
    }
    //表示App将从未运行状态进入运行状态,用于对App的初始化操作
    func application(_ application: UIApplication, didFinishLaunchingWithOptions launchOptions: [UIApplication.LaunchOptionsKey: Any]?) -> Bool {
        // Override point for customization after application launch.
        print("调用:didFinishLaunchingWithOptions")
        print("——应用开始运行——")
        return true
    }
    //当应用即将进入前台运行时调用
    func applicationDidBecomeActive(_ application: UIApplication) {
        print("调用:applicationDidBecomeActive")
        print("——应用即将进入前台——")
    }
    //当应用即将进从前台退出时调用
    func applicationWillResignActive(_ application: UIApplication) {
        print("调用:applicationWillResignActive")
        print("——应用即将从前台退出——")
    }
    //当程序从后台将要重新回到前台(但是还没变成Active状态)时候调用
    func applicationWillEnterForeground(_ application: UIApplication) {
        print("调用:applicationWillEnterForeground")
        print("——应用即将从后台进入前台——")
    }
    //当应用开始在后台运行的时候调用
    func applicationDidEnterBackground(_ application: UIApplication) {
        print("调用:applicationDidEnterBackground")
        print("——应用开始在后台运行——")
    }
    //当前应用即将被终止,在终止前调用的函数。通常是用来保存数据和一些退出前的清理工作。如果应用当前处在suspended,此方法不会被调用。 该方法最长运行时限为5秒,过期应用即被kill掉并且移除内存
    func applicationWillTerminate(_ application: UIApplication) {
        print("调用:applicationWillTerminate")
        print("——应用即将终止——")
    }
注意
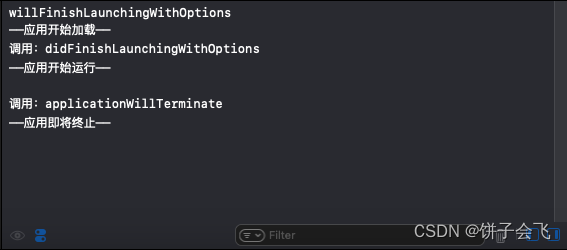
虽然都有这些方法,但是我实测下来,在AppDelegate种有的方法并没有打印信息,也就说明没有被调用。
applicationDidBecomeActive
applicationWillResignActive
applicationWillEnterForeground
applicationDidEnterBackground
这几个方法并没有打印信息,不管我如何在前台或者后台。因此,我又在SceneDelegate中找到了对应的方法:
func sceneDidBecomeActive(_ scene: UIScene) {
        // Called when the scene has moved from an inactive state to an active state.
        // Use this method to restart any tasks that were paused (or not yet started) when the scene was inactive.
        print("调用:applicationDidBecomeActive")
        print("——应用即将进入前台——")
    }
    func sceneWillResignActive(_ scene: UIScene) {
        // Called when the scene will move from an active state to an inactive state.
        // This may occur due to temporary interruptions (ex. an incoming phone call).
        print("调用:applicationWillResignActive")
        print("——应用即将从前台退出——")
    }
    func sceneWillEnterForeground(_ scene: UIScene) {
        // Called as the scene transitions from the background to the foreground.
        // Use this method to undo the changes made on entering the background.
        print("调用:applicationWillEnterForeground")
        print("——应用即将从后台进入前台——")
    }
    func sceneDidEnterBackground(_ scene: UIScene) {
        // Called as the scene transitions from the foreground to the background.
        // Use this method to save data, release shared resources, and store enough scene-specific state information
        // to restore the scene back to its current state.
        print("调用:applicationDidEnterBackground")
        print("——应用开始在后台运行——")
    }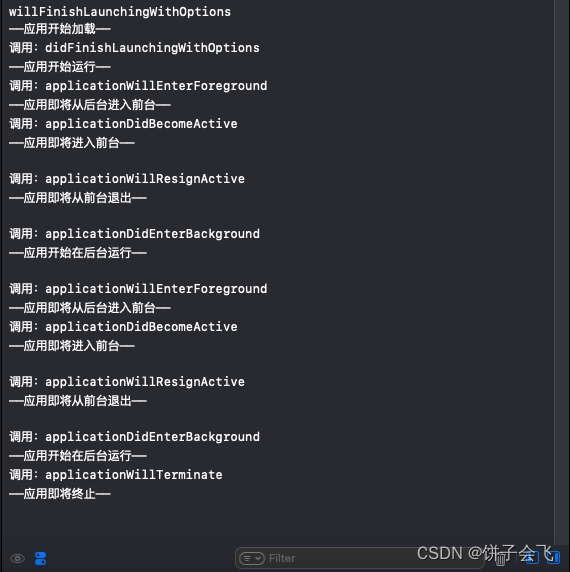
这次就完整的打印了生命周期方法,操作依次是:运行、按一次Home键返回桌面、重新进入App、双击Home键然后Kill掉应用。
在其他地方监听
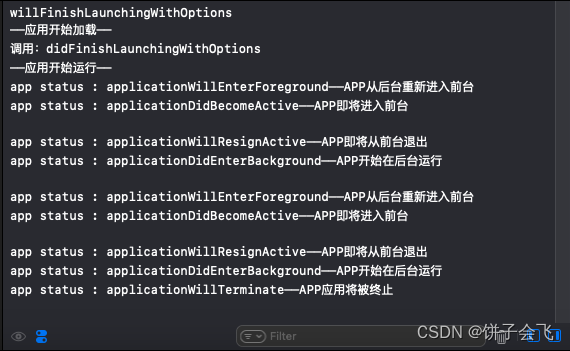
除了在AppDelegate和SceneDelegate中可以监听生命周期之外,还可以在ViewController等地方监听,代码如下:
	func applicationNotification() {
        //应用开始在后台运行的时候通知
        NotificationCenter.default.addObserver(self, selector: #selector(applicationDidEnterBackground), name: UIApplication.didEnterBackgroundNotification, object: nil)
        //当程序从后台将要重新回到前台(但是还没变成Active状态)时候通知
        NotificationCenter.default.addObserver(self, selector: #selector(applicationWillEnterForeground), name: UIApplication.willEnterForegroundNotification, object: nil)
        //应用进入运行状态通知
        NotificationCenter.default.addObserver(self, selector: #selector(applicationDidFinishLaunching), name: UIApplication.didFinishLaunchingNotification, object: nil)
        //应用即将进入前台运行时通知
        NotificationCenter.default.addObserver(self, selector: #selector(applicationDidBecomeActive), name: UIApplication.didBecomeActiveNotification, object: nil)
        //应用即将进从前台退出时通知
        NotificationCenter.default.addObserver(self, selector: #selector(applicationWillResignActive), name: UIApplication.willResignActiveNotification, object: nil)
        //应用因内存警告退出通知
        NotificationCenter.default.addObserver(self, selector: #selector(applicationDidReceiveMemoryWarning), name: UIApplication.didReceiveMemoryWarningNotification, object: nil)
        //双击Home键杀掉应用通知
        NotificationCenter.default.addObserver(self, selector: #selector(applicationWillTerminate), name: UIApplication.willTerminateNotification, object: nil)
    }
    @objc func applicationDidEnterBackground() {
        print("app status : applicationDidEnterBackground——APP开始在后台运行")
    }
    @objc func applicationWillEnterForeground() {
        print("app status : applicationWillEnterForeground——APP从后台重新进入前台")
    }
    @objc func applicationDidFinishLaunching() {
        print("app status : applicationDidFinishLaunching——APP进入运行状态")
    }
    @objc func applicationDidBecomeActive() {
        print("app status : applicationDidBecomeActive——APP即将进入前台")
    }
    @objc func applicationWillResignActive() {
        print("app status : applicationWillResignActive——APP即将从前台退出")
    }
    @objc func applicationDidReceiveMemoryWarning() {
        print("app status : applicationDidReceiveMemoryWarning——APP因内存警告退出")
    }
    @objc func applicationWillTerminate() {
        print("app status : applicationWillTerminate——APP应用将被终止")
    }
结果如图:
ViewController生命周期
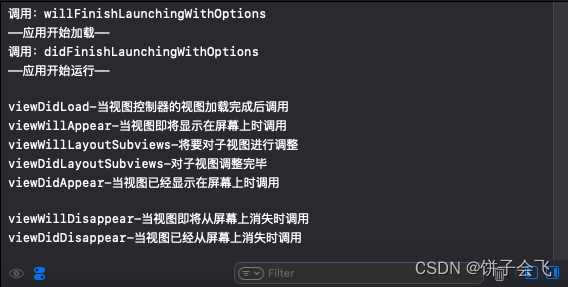
常用的控制器生命周期方法如下:
	override func viewDidLoad() {
        super.viewDidLoad()
        print("viewDidLoad-当视图控制器的视图加载完成后调用")
    }
    override func viewWillAppear(_ animated: Bool) {
        print("viewWillAppear-当视图即将显示在屏幕上时调用")
    }
    override func viewWillLayoutSubviews() {
        print("viewWillLayoutSubviews-将要对子视图进行调整")
    }
    override func viewDidLayoutSubviews() {
        print("viewDidLayoutSubviews-对子视图调整完毕")
    }
    override func viewDidAppear(_ animated: Bool) {
        print("viewDidAppear-当视图已经显示在屏幕上时调用")
    }
    override func viewWillDisappear(_ animated: Bool) {
        print("viewWillDisappear-当视图即将从屏幕上消失时调用")
    }
    override func viewDidDisappear(_ animated: Bool) {
        print("viewDidDisappear-当视图已经从屏幕上消失时调用")
    }
    override func didReceiveMemoryWarning() {
        print("didReceiveMemoryWarning-当系统内存不足时调用")
    }
结果如图:
UIView生命周期
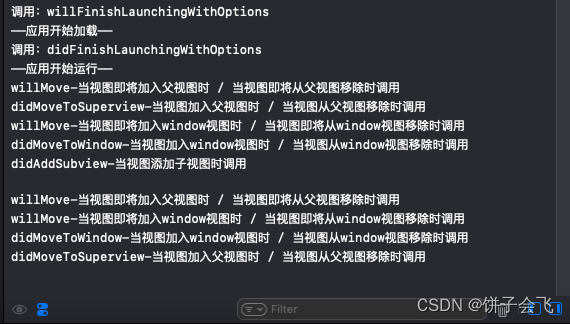
UIView常用的生命周期方法如下:
import Foundation
import UIKit
class Button:UIButton{
    override func willRemoveSubview(_ subview: UIView) {
        super.willRemoveSubview(subview)
        print("willRemoveSubview-当子视图从本视图移除时调用")
    }
    override func willMove(toSuperview newSuperview: UIView?) {
        super.willMove(toSuperview: newSuperview)
        print("willMove-当视图即将加入父视图时 / 当视图即将从父视图移除时调用")
    }
    override func didMoveToSuperview() {
        super.didMoveToSuperview()
        print("didMoveToSuperview-当视图加入父视图时 / 当视图从父视图移除时调用")
    }
    override func willMove(toWindow newWindow: UIWindow?) {
        super.willMove(toWindow: newWindow)
        print("willMove-当视图即将加入window视图时 / 当视图即将从window视图移除时调用")
    }
    override func didMoveToWindow() {
        super.didMoveToWindow()
        print("didMoveToWindow-当视图加入window视图时 / 当视图从window视图移除时调用")
    }
    override func didAddSubview(_ subview: UIView) {
        super.didAddSubview(subview)
        print("didAddSubview-当视图添加子视图时调用")
    }
}
这里是通过创建一个自定义的按钮监听,然后使用:
    var button:Button!
    override func viewDidLoad() {
        super.viewDidLoad()

        button=Button(frame: CGRect(x: 100, y: 100, width: 100, height: 80))
        button.backgroundColor=UIColor.orange
        button.setTitle("按钮", for: .normal)
        self.view.addSubview(button)
        button.addTarget(self, action: #selector(click), for: UIControl.Event.touchUpInside)
    }
    @objc func click(){
        button.removeFromSuperview()
    }
点击按钮然后将其从父布局中移除,结果如下:
参考链接:iOS 生命周期 (最新最完整)
上一篇:[go] 策略模式


